

In this article we’ll look at using WebGL to display a Quad, a rectangle, that fills the window. If you want to code-along then check out the CodePen-start link. Here is the final version.
/1
It’s a very simple shader just using uv to blend the colours. This article isn’t about the shader, it’s about getting the results of the shader on screen. You’ll learn about attributes, buffers, elements and programs. Let’s get started.
Before we can use WebGL in a browser we need a canvas and a context. To create this we’ll use a new function, setupWebGL. We create a canvas element and append it to the body. Then we get the webgl context. This could return null in which case we throw an error. These days most browsers on most devices do support webgl.
function setupWebGl() {
   canvas = document.createElement("canvas");
   document.body.appendChild(canvas);
   const gl = canvas.getContext("webgl");
   if (gl == null) throw "WebGl not Supported";
   return gl;
}
Back in the init method we call the function.
gl = setupWebGl();By default a canvas is sized at 300 x 150. We want it to fill the screen to do that we’ll need a resize method. If a canvas has been created then set its width to window.innerWidth and its height to window.innerHeight.
function onWindowResize() {
   if (canvas){
      canvas.width = window.innerWidth;
      canvas.height = window.innerHeight;
   }
}
In the init method add an event listener and also directly call this function.
window.addEventListener( 'resize', onWindowResize );
onWindowResize();
Now we need to define a quad that will fill the canvas area. For that we need some vertices. The minimum we need to define a quad is the position of 4 vertices. But in our shader we’re also going to use a uv value.
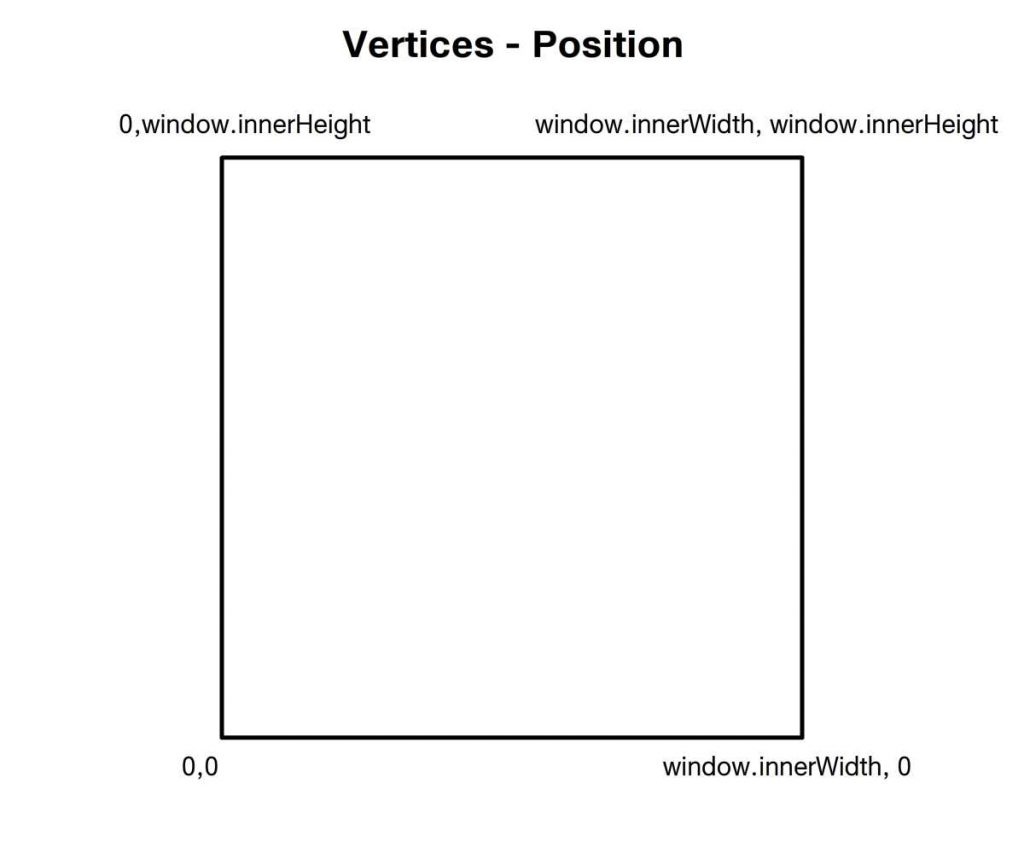

We’re going to define an array of objects with position and uv properties. Each of these properties will be a simple array. Picturing a Quad, see images above. We start with the vertex at the bottom left corner giving this the position 0, 0 and the same values for uv. Then we move to the top left, this has position value 0 for x and window inner height for y. The uv for this vertex is 0, 1. The next vertex is top right, with position values of the window width and height and uv 1, 1. And finally the bottom right with position values of window width, 0 and uv of 1, 0.
const vertices = [
   { position: [0, 0], uv: [0, 0] },
   { position: [0, window.innerHeight], uv: [0, 1] },
   { position: [window.innerWidth, window.innerHeight], uv: [1, 1] },
   { position: [window.innerWidth, 0], uv: [1, 0] }
];
WebGL can draw points, lines and triangles. To render our quad we need to define two triangles by defining the indices of the vertices. When we do this we’re creating what WebGL describes as an Element. Let’s do that using another function, createQuadElement. First we define the indices.
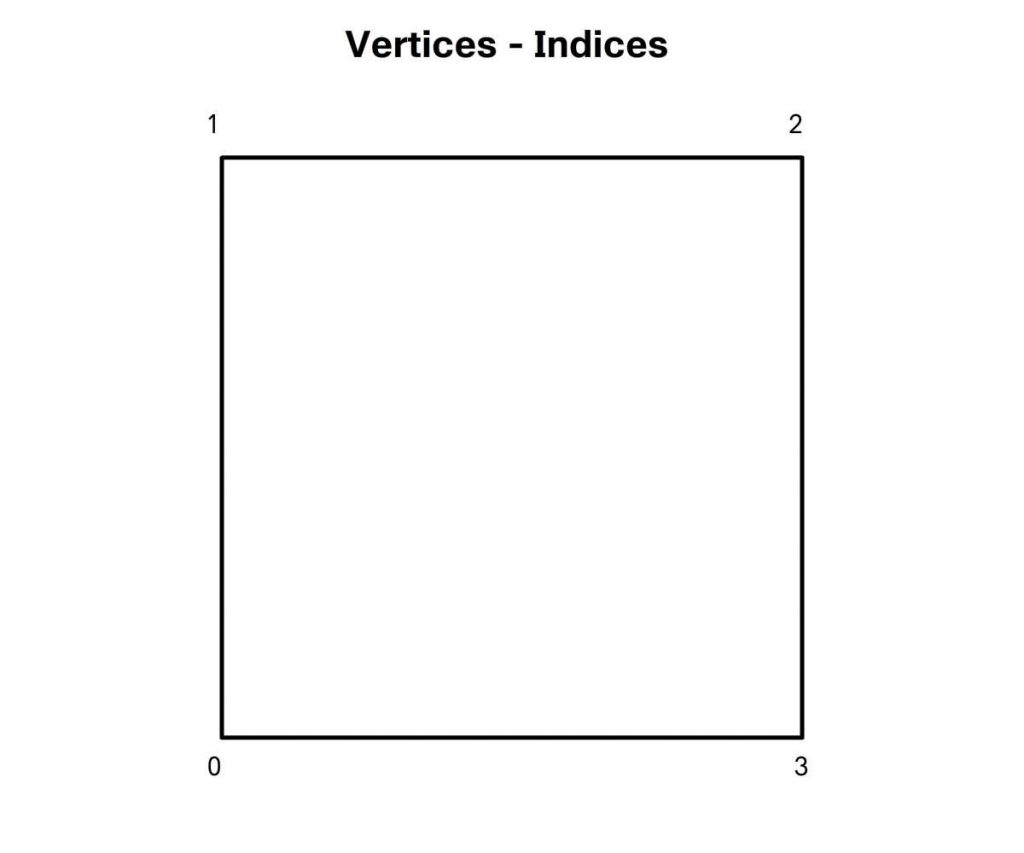

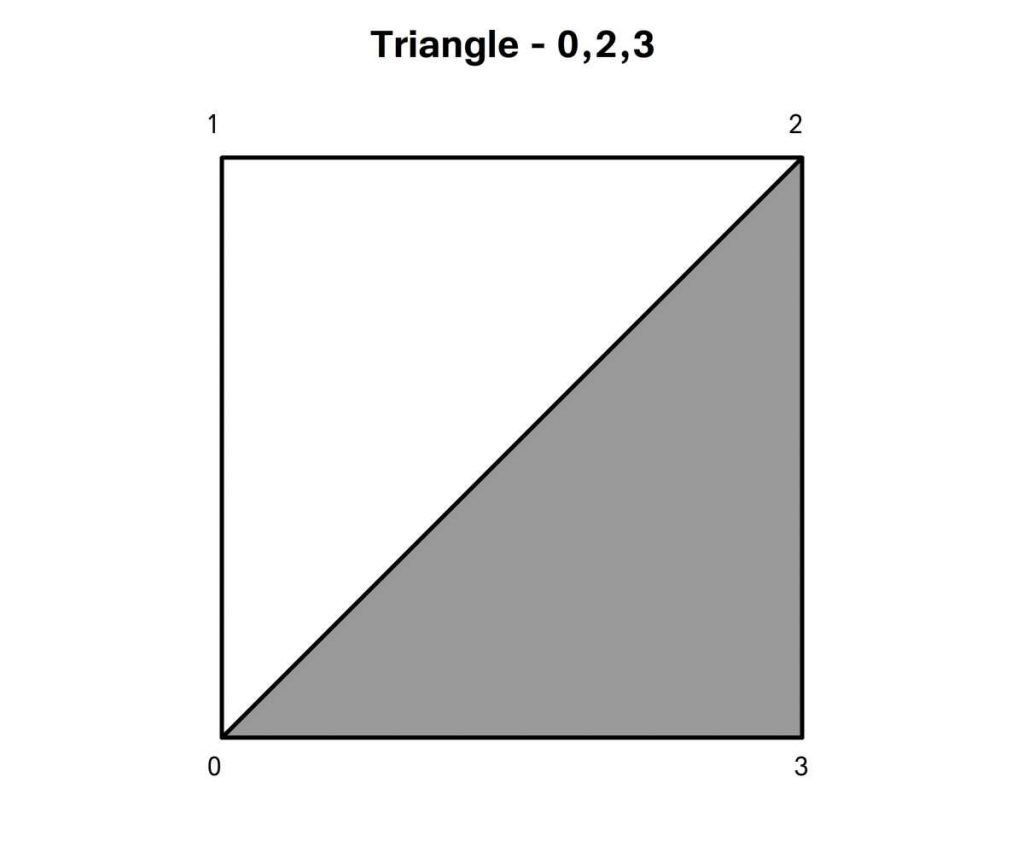
Bottom-left, top-left, top-right for triangle one and bottom-left, top-right, bottom-right for triangle two.
WebGL is all about buffers. This is how we pass data from the CPU to the GPU. Before we can pass any data we need to inform WebGL which buffer we’re passing the data to. We do this using bindBuffer. When we do this we need to inform WebGL what type of data we’re passing so it knows where to store it. For indices we use ELEMENT_ARRAY_BUFFER. And the second parameter is the CPU based buffer. Now WebGL is ready to receive data. This uses the WebGL bufferData method. Again we specify the target type, then the data, here we convert the JS array to an unsigned 16-bit integer array, this is the format that WebGL expects to store indices. The last parameter is the usage value. STATIC_DRAW means the data is going to be defined once and then used multiple times. You use DYNAMIC_DRAW when the data is likely to be updated regularly. This helps the GPU when allocating memory.We return an object with length and indexBuffer properties.
function createQuadElement() {
   const indices = [0, 1, 2, 0, 2, 3];

   //Create indices buffer
   const indexBuffer = gl.createBuffer();

   gl.bindBuffer(gl.ELEMENT_ARRAY_BUFFER, indexBuffer);
   gl.bufferData(
      gl.ELEMENT_ARRAY_BUFFER,
      new Uint16Array(indices),
      gl.STATIC_DRAW
   );

   return {
      length: indices.length,
      indexBuffer
   };
}
Back to the init method. Add a call to this method after defining the vertices.
glRect = createQuadElement();OK, so now gl is a webgl context for a canvas and glRect is a WebGL element defining two triangles by indices. But at this stage WebGL doesn’t have any data about the triangles other than indices. It will need to know the vertex positions and for the shader we’re going to create it will need to know about the uv values. This involves a two stage process. First we define how we transform the vertex position values to canvas space in the vertex shader and what colour to use for each pixel in the fragment shader. For this we need a new function, setupProgram. A program in WebGL is a combination of a compiled vertex shader and fragment shader. After creating a program you can add attributes to the program. For our vertex shader we will have a vec2 uniform that will contain the screen width and height. An attribute defining the vertex position and another the uv. We need to pass an interpolated version of the uv to the fragment shader so we add a varying. The main function passes the uv value. Then we create a coord value.
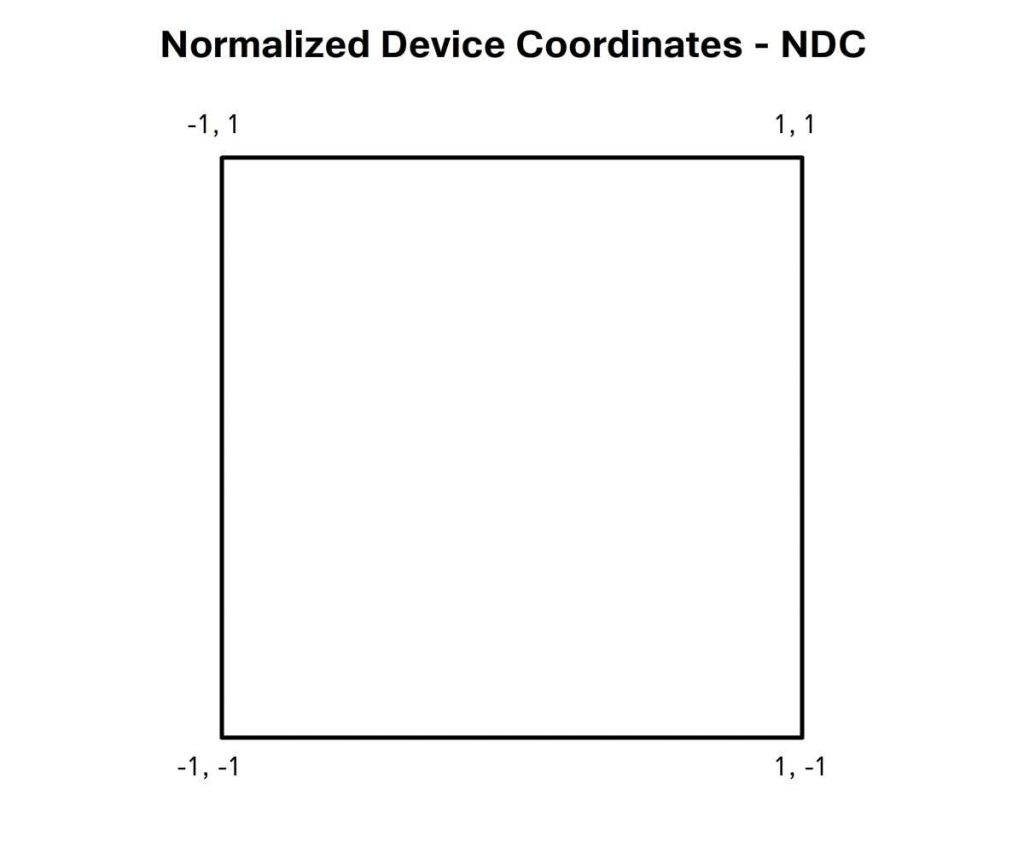
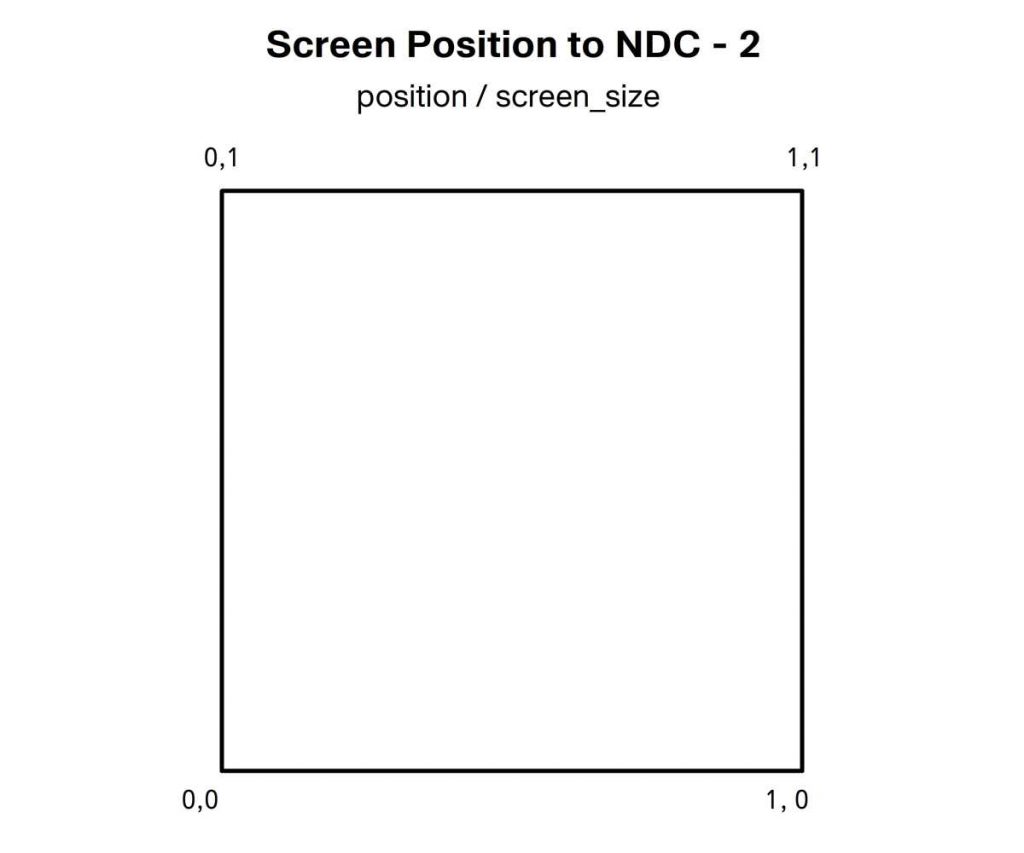
Remember normalized device coordinates? To be on screen the x, y and z values must all be in the range -1 to 1. Position is a window coordinate.

At 0, 0 we want to convert this to -1, -1 and at window top right this should be 1, 1. If we divide position by screen_size then all positions on screen are in the range 0 to 1.
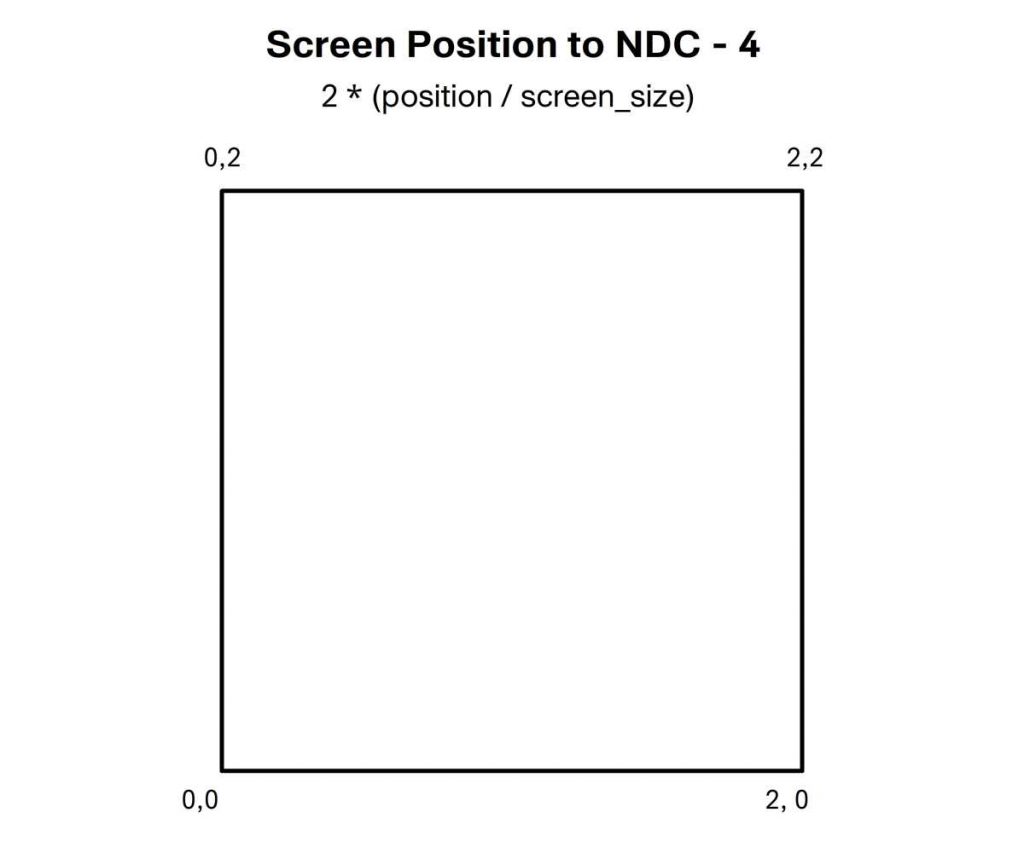
Multiply this by 2 and now we have a range of 0 to 2.
Subtract one and we’re in the range -1 to 1.
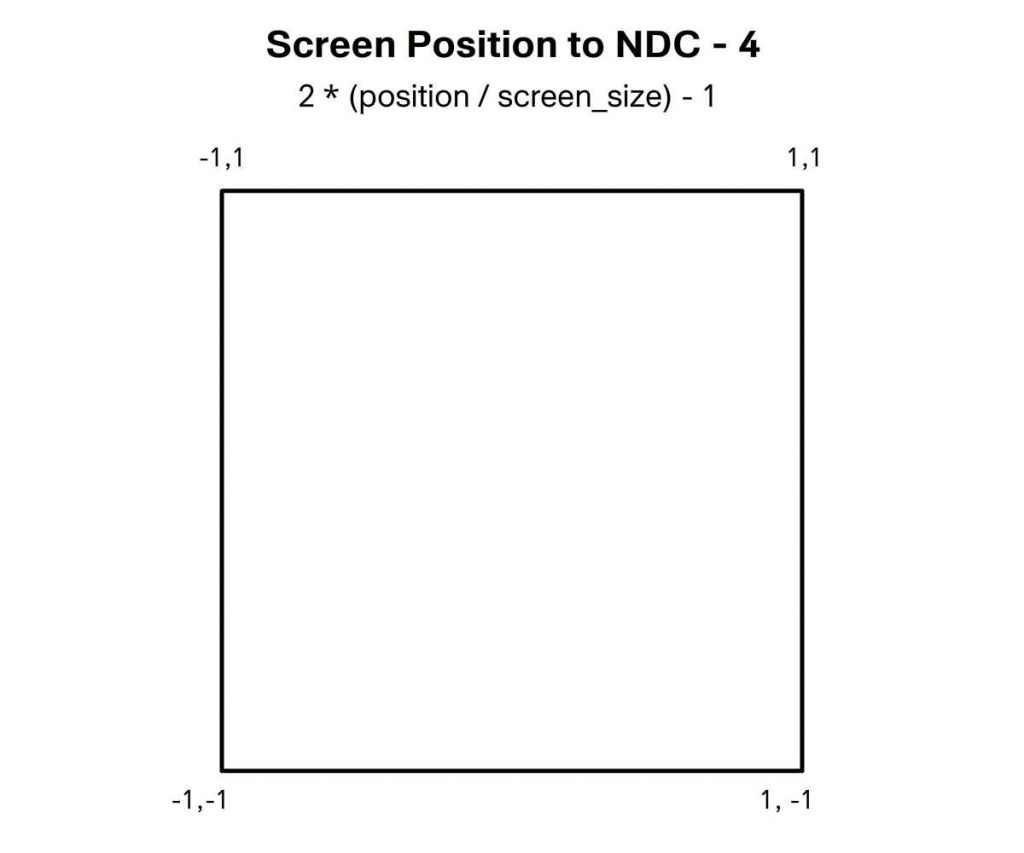
We set the z and w values to 1. Z could be -1 or 0. But if it is less than -1 or greater than 1 it would be clipped and you’d get a blank canvas.
function setupProgram() {
const vertexSource = `
   uniform vec2 screen_size;
   attribute vec2 position;
   attribute vec2 uv;

   varying vec2 vUv;

   void main () {
      vUv = uv;
      vec2 coord = 2.0 * (position / screen_size) - 1.0;
      gl_Position = vec4(coord.xy, 1, 1);
   }
`;
The fragment shader is super simple. We define a precision. Define the varying uv. And in the main function use vUv for the red and green channels. Remember in the fragment shader the value of vUv will be an interpolated value of all the vertices in the triangle based on the fragments location in the triangle. Blue is set to 0 and alpha to 1. Then we call compileShaders to create the program. All would be well if compileShaders existed, time to create this function.
const fragmentSource = `
   precision mediump float;

   varying vec2 vUv;

   void main () {
      gl_FragColor = vec4(vUv, 0, 1);
   }
`;

   return compileShaders(vertexSource, fragmentSource);
}
Let’s keep things simple. Let’s split the task into making two shaders and then making a program from the compiled shaders. The makeShader function we’re going to write needs two parameters. The first will be the shader type and the second the text source. Our makeProgram function will take the compiled shaders and return a program. Because in this example there is only one program we’ll add use program to tell WebGL to make the newly created program the active one.
function compileShaders(vertexSource, fragmentSource) {
   const vertexShader = makeShader(gl.VERTEX_SHADER, vertexSource);
   const fragmentShader = makeShader(gl.FRAGMENT_SHADER, fragmentSource);
   const program = makeProgram(vertexShader, fragmentShader);
   gl.useProgram(program);
   return program;
}
OK. So now we need makeShader and makeProgram. Let’s start with makeShader. Remember this takes two parameters; the type, vertex or fragment and the source. We use the WebGL method createShader passing the type. Then we pass the source. Now we compile the shader. Better check all went well. The WebGL method getShaderParameter returns true if compilation was successful when used with the query flag compile status. If this is false then we tidy up by deleting the shader. Showing a console warn and throwing an error. If all went well then we return the shader.
function makeShader(type, source) {
   const shader = gl.createShader(type);
   gl.shaderSource(shader, source);
   gl.compileShader(shader);
   if (!gl.getShaderParameter(shader, gl.COMPILE_STATUS)) {
      gl.deleteShader(shader);
      console.warn(source);
      throw "Shader is Invalid";
   }
   return shader;
}
Now we have the shaders time to create the WebGL program. The makeProgram function takes the compiled shaders as parameters. We first create a new program using the gl method createProgram. Then we attach the two shaders one at a time using the attachShader method of the WebGL context. To complete the process of creating a program we also need to use the WebGL method linkProgram that finalizes the creation of the data on the GPU. Like creating a shader we should check all went well. We do this using getProgramParameter passing the program and the constant LINK_STATUS. If this returns false then we get the problem using getProgramInfoLog and pass this to console warn. And throw an error.
function makeProgram(vertexShader, fragmentShader) {
   const program = gl.createProgram();
   gl.attachShader(program, vertexShader);
   gl.attachShader(program, fragmentShader);
   gl.linkProgram(program);
   if (!gl.getProgramParameter(program, gl.LINK_STATUS)) {
      console.warn(gl.getProgramInfoLog(program));
      throw "Unable to link Program";
   }
   return program;
}
Back in the init method we can add
program = setupProgram();We getting close. But currently the program uses a uniform and two attributes. Currently we haven’t passed this data to the program. To pass the uniform we’ll use another function set2fUniform with three parameters; the program, a uniform name and the values to pass. The 2f refers to two floats or a vec2. We need a pointer to the memory location of this uniform. We get this using getUniformLocation. Since initially the uniform does not exist this method both returns an existing uniform and creates a new one. Then to populate a vec2 we use the WebGL method uniform2f, passing the location and 2 float values. We could use values[0] comma values[1]. But the rest parameter symbol three dots converts the values array into just that syntax.
function set2fUniform(program, uniformName, values) {
   const uniformLocation = gl.getUniformLocation(program, uniformName);
   gl.uniform2f(uniformLocation, ...values);
}
Now we can define the screen size parameter, back in the init method add
set2fUniform(program, "screen_size", [window.innerWidth, window.innerHeight]);It just remains to set the vertex attributes position and uv for the program. For this we’ll use another function, createAttribute. We’ll use three parameters; program, the attribute name and the vertices array. First we extract an array that only consists of the named property using the JavaScript Array method map. This iterates through the array and returns the value that matches vertex name. We need the size of a single item in this new array. Then we create a new buffer. We get the location of the attribute on the GPU using the WebGL method getAttribLocation. Just like uniforms this has a dual purpose it can return the position of an existing attribute or create a new one. Now we prepare the location by calling enableVertexAttribArray. We bind the buffer, using the constant type ARRAY_BUFFER. The next WebGL call is to vertexAttribPointer. This describes to the GPU how to use the currently bound buffer. It takes the location, the size of each item in the array, the type of data, whether to normalize the data to a range based on the type. Since this does not apply to floats we set it to false. Parameter five is the stride, you can put gaps between each element, for this example the data is tightly packed so stride is 0. And the last parameter is an offset value to the first item, again this is 0 for our purposes.
function createAttribute(program, name, vertices) {

   const values = vertices.map(vertex => vertex[name]);
   const size = values[0].length;

   const buffer = gl.createBuffer();
   const attributeLocation = gl.getAttribLocation(program, name);

   gl.enableVertexAttribArray(attributeLocation);
   gl.bindBuffer(gl.ARRAY_BUFFER, buffer);
   gl.vertexAttribPointer(
      attributeLocation,
      size, // Size
      gl.FLOAT, // Type
      false, // Normalize
      0, // Stride
      0 // Offset
   );
...
Now we create a helper attribute. This is so we can update the position attribute at run time if the window changes size. It has the values array, the buffer and a refresh method as properties. The refresh method binds the buffer, then passes data using the bufferData method of the WebGL context. For this we need to convert the values into a typed array, each element in the array must be a single float not an array. JavaScript has a useful method flat which converts an array of arrays into a simple array. Now we have this helper we can call the refresh method to actually pass the CPU data to the GPU.
...
   const attribute = {
      values,
      buffer,
      refresh() {
         gl.bindBuffer(gl.ARRAY_BUFFER, buffer);
         gl.bufferData(gl.ARRAY_BUFFER, new Float32Array(values.flat()), gl.STATIC_DRAW);
      }
   };

   attribute.refresh();

   return attribute;
}
Back to the init method add
position = createAttribute(program, "position", vertices);
const uv = createAttribute(program, "uv", vertices);
To create the attributes.
We just need one more function. This time to draw the glRect element. Or any other element that is made up of triangles. We simply call the WebGL method drawElements. For this example the type is TRIANGLES. We pass the length property of the element, remember that’s the number of indices. The index type and the buffer.
function drawElement(element) {
   gl.drawElements(
      gl.TRIANGLES,
      element.length,
      gl.UNSIGNED_SHORT,
      element.indexBuffer
   );
}
In the resize method. Add
if (glRect) drawElement(glRect);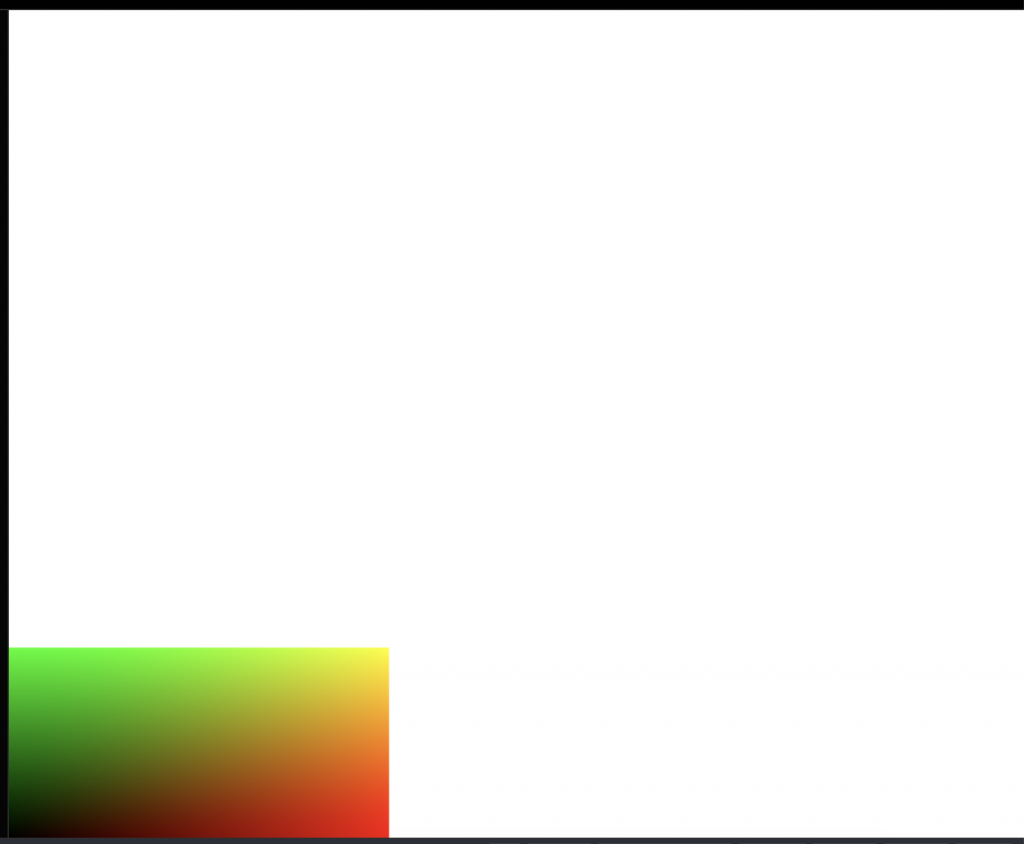
The shader is just in the bottom left. By default the gl viewport will be 300 x 150, the canvas size at the time the context was created. In the resize method add
if (gl){
   gl.viewport(0, 0, window.innerWidth, window.innerHeight);
}
Much better, but there’s still a problem. If the window changes size then the uniform screen_size will have the wrong values and the attribute position will also be wrong.
If program exists then call the set2fUniform function passing the program, screen_size and the window size. If position exists then update the values array and call its refresh method.
if (program){
   set2fUniform( program, "screen_size", [window.innerWidth, window.innerHeight]);
}

if (position){
   position.values[0] = [0, 0];
   position.values[1] = [0, window.innerHeight];
   position.values[2] = [window.innerWidth, window.innerHeight];
   position.values[3] = [window.innerWidth, 0];
   position.refresh();
}
Now if the window size changes the data on the GPU is updated. Great work. I hope this short introduction to WebGL helps you on your shading journey.
For more shading advice check out my courses
- This article is based on this from theodo.com ↩︎