Converting older projects to the new Wonderland Engine framework

When the Wonderland editor moved from 0.9.5 to 1.0.0 there was a significant change to the code framework. In this article we’ll look at how you can easily migrate an old project to work in the latest editor. If you plan to code-along then download my Wonderland course resources.

With the switch by default Wonderland now uses npm, NodeJS Package Manager, and esbuild bundler. The WL.registerComponent method no longer exists. For each of your custom components you need to do some editing. If you want to code-along then open the code-along Migrate project. As you can see, Wonderland creates an npm project.

node modules

After running you’ll find a node_modules folder, two new json files; package.json and package-lock.json and index.js. The node_modules folder by default contains the wonderlandengine, glMatrix and howler and a few other modules. Index.js is auto generated by the editor and this file handles registering your components. 

Console errors

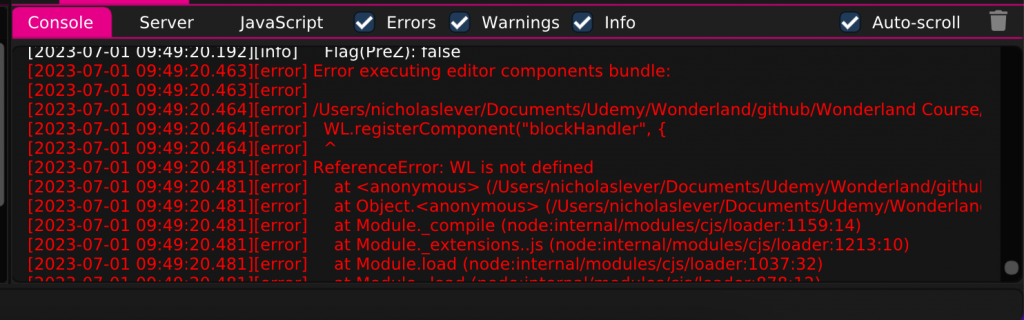
Looking at the project console window we can see there are errors when packaging. WL not defined. Notice it refers to the blockHandler component let’s fix this file.

WL.registerComponent('blockHandler', {
vrCamera: {type: WL.Type.Object, default: null},
speed: {type: WL.Type.Float, default: 5.0 }
}, {

Where we have WL.registerComponent this becomes export class, then the class name, BlockHandler here and then extends Component

export class BlockHandler extends Component {

If you’re familiar with JavaScript classes then you will instantly say, hang on where does Component come from. If so go to the top of the class. We need to add an import. It comes from the wonderlandengine api. From the module we saw in the node_modules folder. 

import {Component} from '@wonderlandengine/api';

Each component needs a TypeName, Wonderland uses the type name in the editor not the class name. 

static TypeName = "blockHandler";

Parameters are defined using a static Properties object. The Wonderland api has a Property class and we use this to specify property types and default values. If we’re using something from the api we need to import it so we add Property as a second import from wonderlandengine/api. 

import {Component, Property} from '@wonderlandengine/api';

We specify vrCamera as a Property.object. This means the editor will include a scene objects dropdown for this component property. Speed is a Property.float, for floats we can pass a default value to the constructor. 

static Properties = {
   vrCamera: Property.object(),
   speed: Property.float( 5.0 )
}

 Now we are dealing with classes we need to remove ‘: function’.

init() {

And we remove all the commas linking the functions in what was previously an object. 

This component uses the glMatrix library and now we are using the new framework we need to add each class we use from the library as an import. For this component we need vec3 and quat. They come from gl-matrix which you can find in the node_modules folder.

import { vec3, quat } from "gl-matrix";

The easiest way to remove glMatrix. Is to use find and replace all. 

this.rotation = quat.create();
quat.fromEuler(this.rotation, 1, 1, 0);

This component also uses HowlerAudioSource. When using this we need to add it as an import.

import {HowlerAudioSource} from '@wonderlandengine/components';

This is a Wonderland component. Because it is not directly attached to a scene object. We need to make sure the component is registered. Any dynamically created component needs to do this. We add a static onRegister method, this method will receive the engine, which was previously the WL global, as a parameter. We use the registerComponent method of the engine and pass the class name. Without this linking would fail and you would get an error in the browser.

static onRegister(engine){
   engine.registerComponent( HowlerAudioSource );
}

We add the HowlerAudioSource in the start method. What was previously a string now takes the class name. 

this.sfxSwish = this.object.addComponent(HowlerAudioAource, {src: 'sfx/swish.mp3', spatial: false});

At this point the project should package correctly. But you will then notice that Wonderland has added several useful warnings about legacy methods. You’ll see several methods have a line through them and if you hover over them a panel will appear explaining what method you should switch to. Position, for example, no longer uses Translation, now it is Position instead.

this.vrCamera.getPositionWorld( this.tmpVec1 );

Instead of translate you choose between translateLocal and translateWorld.

this.object.translateWorld( this.tmpVec );

And getForward is now getForwardWorld.

this.vrCamera.getForwardWorld( this.tmpVec1 );

Some other changes you’ll come across. 

WL.onXRSessionStart is now an instance of the Emitter class. We replace WL with this.engine. Engine is always available to a class that extends Component. And replace push with add.  

this.engine.onXRSessionStart.add(this.setupVREvents.bind(this));

And finally getters and setters have been replaced.

  • this.object.translationLocal use this.object.getPositionLocal(out) and this.object.setPositionLocal(v)
  • this.object.translationWorld use this.object.getPositionWorldl(out) and this.object.setPositionWorld(v)
  • this.object.rotationLocal use this.object.getRotationLocal(out) and this.object.setRotationLocal(q)
  • this.object.rotationWorld use this.object.getRotationWorld(out) and this.object.setRotationWorld(q)
  • this.object.scalingLocal use this.object.getScalingLocal(out) and this.object.setScalingLocal(v)
  • this.object.scalingWorld use this.object.getScalingWorld(out) and this.object.setScalingWorld(v)
  • this.object.transformLocal use this.object.getTransformLocal(out) and this.object.setTransformLocal(q2)
  • this.object.transformWorld  use this.object.getTransformWorld(out) and this.object.setTransformWorld(q2)

Follow the steps in this article and you’ll soon have your projects running smoothly using the latest Wonderland editor.
You’ll find more information in the ‘Migrate Your JavaScript to 1.0.0’ article.

Unity URP Course FREE for 4 days

The Complete Guide to Unity’s Universal Render Pipeline (URP). Is FREE for the next 4 days.

https://www.udemy.com/course/unity-urp/?couponCode=JUNE23_FREE

If you use Unity then you really should get up to speed with this pipeline which will replace the Built-in Render Pipeline. This course by the author of Unity’s e-book will show you how.

Grab it here https://www.udemy.com/course/unity-urp/?couponCode=JUNE23_FREE

Pre-summer SALE!


The days are long, but that doesn’t mean you should neglect your studies. To encourage you I’m having a pre-summer SALE. Grab yourself a bargain and kick back and learn a new skill!!

The Complete Guide to Unity’s Universal Render PipelineWith URP to become Unity’s default pipeline learn how to use it in this course by the author of Unity’s URP e-books
https://www.udemy.com/course/unity-urp/?couponCode=SUMMERSALE23

Create WebXR, VR and AR app, using the Wonderland EngineWonderland is a high performance engine for WebXR apps. The editor makes creating VR experiences super-easy. In this course I show you how.
https://www.udemy.com/course/webxr-wle/?couponCode=SUMMERSALE23

Model viewer: Web 3D made easyModel-viewer is a web component created by Google. It makes displaying user interact-able 3D models on a web page a walk in the park. In this course I show you how.
https://www.udemy.com/course/model-viewer/?couponCode=SUMMERSALE23

The Beginners Guide to 3D Web Game Development with ThreeJSLearn to write JavaScript code while having fun making 3D web games using the most popular Open Source WebGL library ThreeJS
https://www.udemy.com/course/beginners-3d-web-game-development-with-threejs/?couponCode=SUMMERSALE23

Learn to write Unity Compute ShadersLearn to harness the power of the GPU for processing intensive jobs.
https://www.udemy.com/course/compute-shaders/?couponCode=SUMMERSALE23

Learn to Create WebXR, VR and AR, experiences with ThreeJSLearn how to create VR and AR experiences that work directly from the browser, using the latest API from Google and Amazon and our favourite Open Source WebGL library, ThreeJS
https://www.udemy.com/course/learn-webxr/?couponCode=SUMMERSALE23

Learn Unity Shaders from ScratchLearn the black-art of Unity shaders in this comprehensive course on HLSL. Shaders for both the Built-in Render Pipeline and URP are included.
https://www.udemy.com/course/learn-unity-shaders-from-scratch/?couponCode=SUMMERSALE23

Learn GLSL Shaders from ScratchLearn how to harness the power of the GPU in your web pages by learning to code GLSL shaders.
https://www.udemy.com/course/learn-glsl-shaders-from-scratch/?couponCode=SUMMERSALE23

Create a 3D Multi-Player Game using ThreeJS and SocketIOLearn how to use nodeJS, socketIO and ThreeJS to create a 3d multi-player game
https://www.udemy.com/course/create-a-3d-multi-player-game-using-threejs-and-socketio/?couponCode=SUMMERSALE23

Create HTML5 Games using Adobe AnimateAdobe Animate used to be Flash. Learn how you can use your Flash skills to create HTML5 games that use no plugins.
https://www.udemy.com/course/create-html5-games-using-adobe-animate/?couponCode=SUMMERSALE23

Create a 3D Car Racing Game with ThreeJS and CannonJS
Learn to combine the physics engine CannonJS and ThreeJS to create a fun car racing game
https://www.udemy.com/course/create-a-3d-car-racing-game-with-threejs-and-cannonjs/?couponCode=SUMMERSALE23

Create a 3D RPG Game with ThreeJSLearn how to harness the ThreeJS library to create a 3D RPG game
https://www.udemy.com/course/create-a-3d-rpg-game-with-threejs/?couponCode=SUMMERSALE23

HTML5 Game Development: Beginner to ProLearn how to create 2D games that work in the browser. From card games to puzzle games to action games.
https://www.udemy.com/course/html5-game-development-beginner-to-pro/?couponCode=SUMMERSALE23

JavaScript in 12 Easy LessonsNew to JavaScript or coding then this FREE course is for you
https://www.udemy.com/course/javascript-in-12-easy-lessons/?referralCode=086EC53154E29AD37EA1

The ThreeJS PrimerNew to ThreeJS then this FREE course is for you
https://www.udemy.com/course/the-threejs-primer/?referralCode=ABB270C1AE32EF9E7174

Adding Variants to a GLB model and displaying them using ThreeJS

(This article is taken from my Udemy course ‘The ThreeJS Cookbook’ coming Summer 2023. Get the course assets from GitHub. I recommend using VSCode and the Live Server extension when working along with the recipe )

If you’re creating a ThreeJS app for a store. You may be selling an item that comes in a variety of finishes. The GLB format has an extension that allows you to embed multiple materials for an object, then with code you can allow the user to switch materials to view the item with different finishes.

Before we get into coding this recipe take a look at complete > Materials > variants.html . Using the dropdown selector you can view the chair in one of four different finishes. The code reads the options directly from the model file. You can use the same technique in your own GUI.

Before we look at the code let’s look at how we create a glb file that includes material variants. We’re going to use Blender, I’m using Blender 3.5 but anything from version 3.3 will be fine. You can download Blender for free at blender.org. Blender is a complex application but there are loads of tutorials available both free and paid.

In this recipe I assume you have some knowledge of Blender and I focus exclusively on variants. To keep things simple we’ll just create materials that change the colour of the default cube. 

First open Blender and choose the General new project. You’ll get a 2m grey cube centre screen. Right-click on the light and camera and choose Delete. Lights and cameras will be added using code when we create the ThreeJS app to display our model.

Using the buttons at the top right set the display to Material Preview mode.

Select Edit > Preferences…. Select Add-ons and type ‘gltf’ in the Search field. Make sure that for the Import-Export: glTF 2.0 format add-on that the Material Variants checkbox is checked. You can close the preferences panel now.

Select the Cube. Select the Materials tool, the chequered sphere. Click the white on black Material word and rename it Grey. 

Expand the Sidebar and select glTF Variants. In the new panel press the Add Material Variant button.

Rename the variant Grey.

In the materials panel slide down to find glTF Material Variants. Press the Add a new Variant Slot button.

The new variant should take the name you’ve renamed Grey.

Click the + button to add a new material. Rename it red and set the Base Color. 

Now select Grey and press the – button. You can now use the glTF Variants Sidebar tool to add a new variant. Rename it Red and then use the Material glTF Material Variants panel to Add a new Variant Slot.

Repeat from adding a new material for each variant. 

To test whether the variants are working, use the glTF Variants Sidebar panel. Select the variant you’re interested in and press the Display Variant button. You should see the cube change to your chosen material. Now choose File > Export > glTF 2.0 (.glb/.gltf), select a file location and name.

Time to focus on code. The assets include the chair we’ve seen that includes variants with different textures and roughness. We’ll use that in the coding. But feel free to use your model if you prefer.

Before we start coding take a look at a glTF formatted file assets > variant-cube.gltf. This is the text formatted version. Usually you save a file in binary format, a glB file. But it is easy to read a glTF file in any text editor. First notice the extensions object, and see this includes KHR_materials_variants. This object contains a variants array. Each entry in the array is an object with a single property, name. 

{
   "asset":{
      "generator":"Khronos glTF Blender I/O v3.5.30",
      "version":"2.0"
   },
   "extensionsUsed":[
      "KHR_materials_variants"
   ],
   "extensionsRequired":[
      "KHR_materials_variants"
   ],
   "extensions":{
      "KHR_materials_variants":{
         "variants":[
            {
               "name":"Red"
            },
            {
               "name":"Yellow"
            },
            {
               "name":"Default"
            }
         ]
      }
   },

The glTF structure includes, a scene and scenes array. Scene is simply and index into the scenes array. A scene includes a nodes array, which in this case has a single index. 

   "scene":0,
   "scenes":[
      {
         "name":"Scene",
         "nodes":[
            0
         ]
      }
   ],

The nodes array includes a series of objects. Here we have a properties mesh, an index into the meshes array and a name.

   "nodes":[
      {
         "mesh":0,
         "name":"Cube"
      }
   ],

Now the meat of our variants data. The materials array includes a series of objects. Here simply setting the pbrMetallicRoughness.baseColorFactor, metallicFactor and roughness

   "materials":[
      {
         "doubleSided":true,
         "name":"Red",
         "pbrMetallicRoughness":{
            "baseColorFactor":[
               0.8000000715255737,
               0.011036576703190804,
               0.00618034927174449,
               1
            ],
            "metallicFactor":0,
            "roughnessFactor":0.5
         }
      },
      {
         "doubleSided":true,
         "name":"Yellow",
         "pbrMetallicRoughness":{
            "baseColorFactor":[
               0.8000000715255737,
               0.6312862634658813,
               0,
               1
            ],
            "metallicFactor":0,
            "roughnessFactor":0.5
         }
      },
      {
         "doubleSided":true,
         "name":"Material",
         "pbrMetallicRoughness":{
            "baseColorFactor":[
               0.800000011920929,
               0.800000011920929,
               0.800000011920929,
               1
            ],
            "metallicFactor":0,
            "roughnessFactor":0.5
         }
      }
   ],

The meshes array contains each mesh in every scene. But in this simple example there is only the single Cube. Notice that the Cube has an extensions object, which contains a KHR_materials_variants object. This in turn contains a mappings array. Each entry in the mappings array contains a material index and a variants array containing a single index in this instance. 

   "meshes":[
      {
         "name":"Cube",
         "primitives":[
            {
               "attributes":{
                  "POSITION":0,
                  "TEXCOORD_0":1,
                  "NORMAL":2
               },
               "extensions":{
                  "KHR_materials_variants":{
                     "mappings":[
                        {
                           "material":0,
                           "variants":[
                              0
                           ]
                        },
                        {
                           "material":1,
                           "variants":[
                              1
                           ]
                        },
                        {
                           "material":2,
                           "variants":[
                              2
                           ]
                        }
                     ]
                  }
               },
               "indices":3,
               "material":2
            }
         ]
      }
   ],

The code we need to generate should read root level extensions object, look for KHR_materials_variants and read the names of the variants. Using this to populate a GUI. Then we need a function that given a variant name, finds the index of this variant. Then iterates over each mesh in the scene, checks if the mesh has a KHR_materials_variants extension. If it has then it checks the mappings object to see if its variants array includes the variant index found for the name given. If it does then we get the material using the index and apply it to the mesh. If that sounds complex it might be clearer once we’ve added the code. 

We’ll source the variant names from the root level extension first. First we create a new GUI using the lil-gui library. Then we grab a reference to the gltf.parser object. More about that later. After parsing, extensions are stored in the userData object for each Object3D instance in the hierarchy. We check if gltfExtensions is a gltf.userData property. If it is we attempt to assign the extension KHR_materials_variants. At this stage variantsExtension is either null if missing or a reference to the data. 

gui = new GUI();

const parser = gltf.parser;

let variantsExtension;

if ( 'gltfExtensions' in gltf.userData ){
  variantsExtension = gltf.userData.gltfExtensions[ 'KHR_materials_variants' ];
}

If variantsExtension is not null then we use the JavaScript array method map to return a new array containing just an array of names. Then we add a select control. The state object is defined at the start of the script with a single property variant.

if (variantsExtension != null){
   const variants = variantsExtension.variants.map( ( variant ) => variant.name );
   const variantsCtrl = gui.add( state, 'variant', variants ).name( 'Variant' );
}

If you try the app now you should get a list of variant names in the GUI. 

Now we need a function to call when a name is selected in the GUI. It needs a reference to the scene, the parser we stored, the variants extension and the variant name. We need to convert the variant name into an index, so we use the findIndex method of a JavaScript array. 

function selectVariant( scene, parser, extension, variantName ) {

   const variantIndex = extension.variants.findIndex( ( v ) => v.name.includes( variantName ) );

Now we can traverse the scene. We do this asynchronously since a scene may contain a lot of Object3D instances and we don’t want to hold up processing. The callback retrieves each object in the gltf scene. We’re only interested in meshes, so we check if the isMesh flag is set. And we need userData to contain a gltfExtensions object. If either of these checks fail we return from the callback for the current object and move on to the next. Then we assign meshVariantDef as the gltfExtensions object KHR_materials_variants. That’s the extension stored in the object definition. The one we saw that includes mappings.

scene.traverse( async ( object ) => {

if ( ! object.isMesh || ! object.userData.gltfExtensions ) return;

const meshVariantDef = object.userData.gltfExtensions[ 'KHR_materials_variants' ];

If meshVariantDef is null then we can also return. Now we store the current material as userData.originalMaterial, assuming this hasn’t already been set.

if ( ! meshVariantDef ) return;

if ( ! object.userData.originalMaterial ) {

   object.userData.originalMaterial = object.material;

}

To find the mapping we’re interested in we use the find method of a JavaScript array, searching through the variants array for one that includes the variantIndex.

const mapping = meshVariantDef.mappings
                .find( ( mapping ) => mapping.variants.includes( variantIndex ) );

If we find a mapping, we use the parser method getDependency, use material as the property and the mapping.material index. This returns the material in the materials array with the given index. The parser object also contains a method, assignFinalMaterial that ensures the material is correctly assigned and compiled. If mapping is not found then we restore the original material from the one we stored in userData. We also call render because this app doesn’t use a render loop. Instead we call render on each change.

if ( mapping ) {

   object.material = await parser.getDependency( 'material', mapping.material );
   parser.assignFinalMaterial( object );

} else {

   object.material = object.userData.originalMaterial;

}

render();

It just remains to update our GUI code to call this function on a change event. 

variantsCtrl.onChange( ( value ) => selectVariant( scene, parser, variantsExtension, value ) );

Now the GUI is populated and on a change event the variant name is passed to the selectVariant method. 

Variants are a great solution for allowing users to view an object using a variety of finishes.

May the 4th Be With You!

May the 4th be with you. Starry sky poster, star force and hand drawn stars. Wars movie slogan banner, futuristic stars glow poster or space star fantasy vector illustration

It’s Star Wars Day. My courses are at Udemy’s Best Price for the next few days. Grab yourself a bargain and May the Fourth be with you!!

Or use the menu to check-out my tutorial links.

The Complete Guide to Unity’s Universal Render Pipeline

With URP to become Unity’s default pipeline with Unity 6. Learn how to use it in this course by the author of Unity’s URP e-books

https://www.udemy.com/course/unity-urp/?couponCode=MAY24_FOURTH

Create WebXR, VR and AR app, using the Wonderland Engine

Wonderland is a high performance engine for WebXR apps. The editor makes creating VR experiences super-easy. In this course I show you how.

https://www.udemy.com/course/webxr-wle/?couponCode=MAY24_FOURTH

Model viewer: Web 3D made easy

Model-viewer is a web component created by Google. It makes displaying user interact-able 3D models on a web page a walk in the park. In this course I show you how.

https://www.udemy.com/course/model-viewer/?couponCode=MAY24_FOURTH

The Beginners Guide to 3D Web Game Development with ThreeJS

Learn to write JavaScript code while having fun making 3D web games using the most popular Open Source WebGL library ThreeJS

https://www.udemy.com/course/beginners-3d-web-game-development-with-threejs/?couponCode=MAY24_FOURTH

Learn to write Unity Compute Shaders

Learn to harness the power of the GPU for processing intensive jobs.

https://www.udemy.com/course/compute-shaders/?couponCode=MAY24_FOURTH

Learn to Create WebXR, VR and AR, experiences with ThreeJS

Learn how to create VR and AR experiences that work directly from the browser, using the latest API from Google and Amazon and our favourite Open Source WebGL library, ThreeJS

https://www.udemy.com/course/learn-webxr/?couponCode=MAY24_FOURTH

Learn Unity Shaders from Scratch

Learn the black-art of Unity shaders in this comprehensive course on HLSL. Shaders for both the Built-in Render Pipeline and URP are included.

https://www.udemy.com/course/learn-unity-shaders-from-scratch/?couponCode=MAY24_FOURTH

Learn GLSL Shaders from Scratch

Learn how to harness the power of the GPU in your web pages by learning to code GLSL shaders.

https://www.udemy.com/course/learn-glsl-shaders-from-scratch/?couponCode=MAY24_FOURTH

Create a 3D Multi-Player Game using ThreeJS and SocketIO

Learn how to use nodeJS, socketIO and ThreeJS to create a 3d multi-player game

https://www.udemy.com/course/create-a-3d-multi-player-game-using-threejs-and-socketio/?couponCode=MAY24_FOURTH

Create HTML5 Games using Adobe Animate

Adobe Animate used to be Flash. Learn how you can use your Flash skills to create HTML5 games that use no plugins.

https://www.udemy.com/course/create-html5-games-using-adobe-animate/?couponCode=MAY24_FOURTH

Create a 3D Car Racing Game with ThreeJS and CannonJS

Learn to combine the physics engine CannonJS and ThreeJS to create a fun car racing game

https://www.udemy.com/course/create-a-3d-car-racing-game-with-threejs-and-cannonjs/?couponCode=MAY24_FOURTH

Create a 3D RPG Game with ThreeJS

Learn how to harness the ThreeJS library to create a 3D RPG game

https://www.udemy.com/course/create-a-3d-rpg-game-with-threejs/?couponCode=MAY24_FOURTH

HTML5 Game Development: Beginner to Pro

Learn how to create 2D games that work in the browser. From card games to puzzle games to action games.

https://www.udemy.com/course/html5-game-development-beginner-to-pro/?couponCode=MAY24_FOURTH

JavaScript in 12 Easy Lessons

New to JavaScript or coding then this FREE course is for you

https://www.udemy.com/course/javascript-in-12-easy-lessons/?referralCode=086EC53154E29AD37EA1

The ThreeJS Primer

New to ThreeJS then this FREE course is for you

https://www.udemy.com/course/the-threejs-primer/?referralCode=ABB270C1AE32EF9E7174

Happy Lunar New Year!

Just an update to my 36,000 students. I’m currently developing a course teaching how to get the best from Unity’s Universal Render Pipeline (URP). It’s based on the e-book I wrote for Unity.

Introduction to the Universal Render Pipeline for Advanced Unity Creators.

The course, aimed more at intermediate level, is going well and should be live in March.

If you plan to do the course then take a look at these two tutorial videos on YouTube as a taster to what to expect.

Converting custom shaders to URP

Make your shaders Scriptable Render Pipeline Batcher compatible. This step by step video tutorial will show you how to convert a custom unlit Built-in shader to the Universal Render Pipeline (URP).

Three ways to use URP Renderer Features

A Renderer Feature is a C# script that can be used at any stage in the Render Pipeline to affect the final render. Renderer Features provide a great way of adding custom rendering effects to your scene, often with no code required, making them artist-friendly.

Nik Lever 22 Jan 2023

Nik Lever’s New Year Sale

Hope you’re all enjoying the holidays. To celebrate the New Year. All my courses are available at the lowest price Udemy will allow this week with the coupon code NEWYEAR23 . Read through to find two FREE courses

Create WebXR, VR and AR app, using the Wonderland Engine

Wonderland is a high performance engine for WebXR apps. The editor makes creating VR experiences super-easy. In this course I show you how.

https://www.udemy.com/course/webxr-wle/?couponCode=NEWYEAR23

Model viewer: Web 3D made easy

Model-viewer is a web component created by Google. It makes displaying user interact-able 3D models on a web page a walk in the park. In this course I show you how.

https://www.udemy.com/course/model-viewer/?couponCode=NEWYEAR23

The Beginners Guide to 3D Web Game Development with ThreeJS

Learn to write JavaScript code while having fun making 3D web games using the most popular Open Source WebGL library ThreeJS

https://www.udemy.com/course/beginners-3d-web-game-development-with-threejs/?couponCode=NEWYEAR23

Learn to write Unity Compute Shaders

Learn to harness the power of the GPU for processing intensive jobs.

https://www.udemy.com/course/compute-shaders/?couponCode=NEWYEAR23

Learn to Create WebXR, VR and AR, experiences with ThreeJS

Learn how to create VR and AR experiences that work directly from the browser, using the latest API from Google and Amazon and our favourite Open Source WebGL library, ThreeJS

https://www.udemy.com/course/learn-webxr/?couponCode=NEWYEAR23

Learn Unity Shaders from Scratch

Learn the black-art of Unity shaders in this comprehensive course on HLSL. Shaders for both the Built-in Render Pipeline and URP are included.

https://www.udemy.com/course/learn-unity-shaders-from-scratch/?couponCode=NEWYEAR23

Learn GLSL Shaders from Scratch

Learn how to harness the power of the GPU in your web pages by learning to code GLSL shaders.

https://www.udemy.com/course/learn-glsl-shaders-from-scratch/?couponCode=NEWYEAR23

Create a 3D Multi-Player Game using ThreeJS and SocketIO

Learn how to use nodeJS, socketIO and ThreeJS to create a 3d multi-player game

https://www.udemy.com/course/create-a-3d-multi-player-game-using-threejs-and-socketio/?couponCode=NEWYEAR23

Create HTML5 Games using Adobe Animate

Adobe Animate used to be Flash. Learn how you can use your Flash skills to create HTML5 games that use no plugins.

https://www.udemy.com/course/create-html5-games-using-adobe-animate/?couponCode=NEWYEAR23

Create a 3D Car Racing Game with ThreeJS and CannonJS

Learn to combine the physics engine CannonJS and ThreeJS to create a fun car racing game

https://www.udemy.com/course/create-a-3d-car-racing-game-with-threejs-and-cannonjs/?couponCode=NEWYEAR23

Create a 3D RPG Game with ThreeJS

Learn how to harness the ThreeJS library to create a 3D RPG game

https://www.udemy.com/course/create-a-3d-rpg-game-with-threejs/?couponCode=NEWYEAR23

HTML5 Game Development: Beginner to Pro

Learn how to create 2D games that work in the browser. From card games to puzzle games to action games.

https://www.udemy.com/course/html5-game-development-beginner-to-pro/?couponCode=NEWYEAR23

JavaScript in 12 Easy Lessons

New to JavaScript or coding then this FREE course is for you

https://www.udemy.com/course/javascript-in-12-easy-lessons/?referralCode=086EC53154E29AD37EA1

The ThreeJS Primer

New to ThreeJS then this FREE course is for you

https://www.udemy.com/course/the-threejs-primer/?referralCode=ABB270C1AE32EF9E7174

My Unity URP e-book is published today!

URP for Advanced Unity Creators

Download this valuable guide to fully leverage the benefits of URP for professional game development. I hope that you find the e-book helpful.

To celebrate the publication of my Unity URP e-book my Udemy Unity courses are available for just $10.99 for the next few days.

Unity Compute Shaders
Learn to Write Unity Compute Shaders

Learn to Write Unity Compute Shaders

Unity Shaders
Learn to Write Unity Shaders from Scratch

Learn to Write Unity Shaders from Scratch

Includes URP shaders and ShaderGraph

Create installable Oculus Quest app using PWAs

I’ve added a new section to my ‘Learn to create WebXR, VR and AR, experiences with Three.JS‘ course. Learn how to make your WebXR website into an installable app, using Progressive Web Apps (PWA) technology. You’ll start with a super simple example. Then learn how to package it using PWABuilder. Then learn how to use Oculus Developer Hub to deploy your app to your headset. Finally you’ll learn to create, package and deploy a WebXR example.

Course is available at the lowest price Udemy will allow until Tuesday 12th June.https://www.udemy.com/course/learn-webxr/?couponCode=OCULUS_PWA