
(This article is taken from my Udemy course ‘The ThreeJS Cookbook’ coming Summer 2023. Get the course assets from GitHub. I recommend using VSCode and the Live Server extension when working along with the recipe )
If you’re creating a ThreeJS app for a store. You may be selling an item that comes in a variety of finishes. The GLB format has an extension that allows you to embed multiple materials for an object, then with code you can allow the user to switch materials to view the item with different finishes.
Before we get into coding this recipe take a look at complete > Materials > variants.html . Using the dropdown selector you can view the chair in one of four different finishes. The code reads the options directly from the model file. You can use the same technique in your own GUI.
Before we look at the code let’s look at how we create a glb file that includes material variants. We’re going to use Blender, I’m using Blender 3.5 but anything from version 3.3 will be fine. You can download Blender for free at blender.org. Blender is a complex application but there are loads of tutorials available both free and paid.
In this recipe I assume you have some knowledge of Blender and I focus exclusively on variants. To keep things simple we’ll just create materials that change the colour of the default cube.
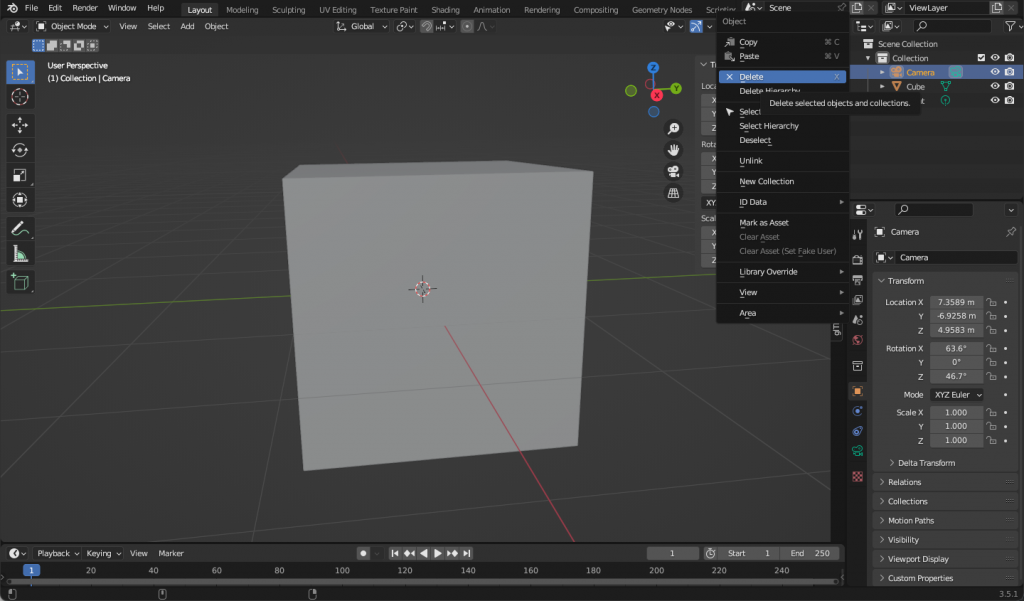
First open Blender and choose the General new project. You’ll get a 2m grey cube centre screen. Right-click on the light and camera and choose Delete. Lights and cameras will be added using code when we create the ThreeJS app to display our model.
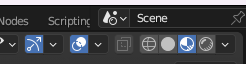
Using the buttons at the top right set the display to Material Preview mode.
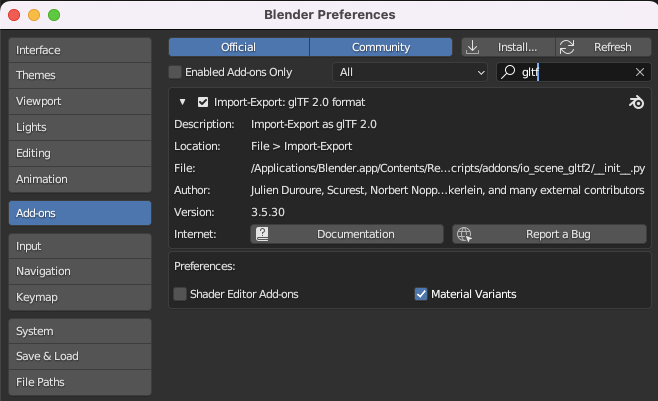
Select Edit > Preferences…. Select Add-ons and type ‘gltf’ in the Search field. Make sure that for the Import-Export: glTF 2.0 format add-on that the Material Variants checkbox is checked. You can close the preferences panel now.
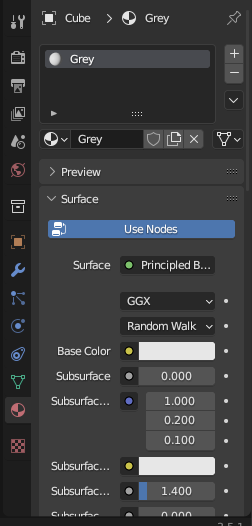
Select the Cube. Select the Materials tool, the chequered sphere. Click the white on black Material word and rename it Grey.
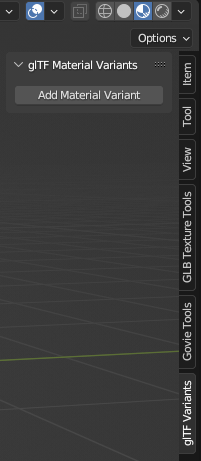
Expand the Sidebar and select glTF Variants. In the new panel press the Add Material Variant button.
Rename the variant Grey.
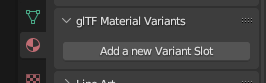
In the materials panel slide down to find glTF Material Variants. Press the Add a new Variant Slot button.

The new variant should take the name you’ve renamed Grey.
Click the + button to add a new material. Rename it red and set the Base Color.
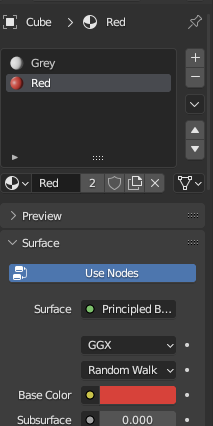
Now select Grey and press the – button. You can now use the glTF Variants Sidebar tool to add a new variant. Rename it Red and then use the Material glTF Material Variants panel to Add a new Variant Slot.
Repeat from adding a new material for each variant.
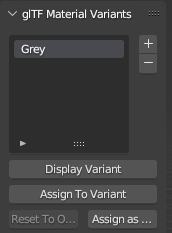
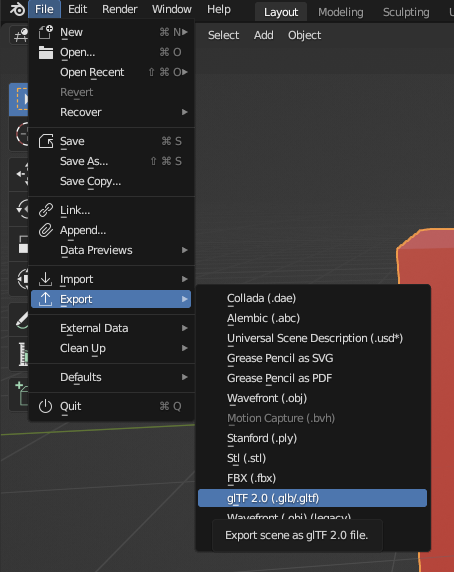
To test whether the variants are working, use the glTF Variants Sidebar panel. Select the variant you’re interested in and press the Display Variant button. You should see the cube change to your chosen material. Now choose File > Export > glTF 2.0 (.glb/.gltf), select a file location and name.
Time to focus on code. The assets include the chair we’ve seen that includes variants with different textures and roughness. We’ll use that in the coding. But feel free to use your model if you prefer.
Before we start coding take a look at a glTF formatted file assets > variant-cube.gltf. This is the text formatted version. Usually you save a file in binary format, a glB file. But it is easy to read a glTF file in any text editor. First notice the extensions object, and see this includes KHR_materials_variants. This object contains a variants array. Each entry in the array is an object with a single property, name.
{
   "asset":{
      "generator":"Khronos glTF Blender I/O v3.5.30",
      "version":"2.0"
   },
   "extensionsUsed":[
      "KHR_materials_variants"
   ],
   "extensionsRequired":[
      "KHR_materials_variants"
   ],
   "extensions":{
      "KHR_materials_variants":{
         "variants":[
            {
               "name":"Red"
            },
            {
               "name":"Yellow"
            },
            {
               "name":"Default"
            }
         ]
      }
   },
The glTF structure includes, a scene and scenes array. Scene is simply and index into the scenes array. A scene includes a nodes array, which in this case has a single index.
   "scene":0,
   "scenes":[
      {
         "name":"Scene",
         "nodes":[
            0
         ]
      }
   ],
The nodes array includes a series of objects. Here we have a properties mesh, an index into the meshes array and a name.
   "nodes":[
      {
         "mesh":0,
         "name":"Cube"
      }
   ],
Now the meat of our variants data. The materials array includes a series of objects. Here simply setting the pbrMetallicRoughness.baseColorFactor, metallicFactor and roughness
   "materials":[
      {
         "doubleSided":true,
         "name":"Red",
         "pbrMetallicRoughness":{
            "baseColorFactor":[
               0.8000000715255737,
               0.011036576703190804,
               0.00618034927174449,
               1
            ],
            "metallicFactor":0,
            "roughnessFactor":0.5
         }
      },
      {
         "doubleSided":true,
         "name":"Yellow",
         "pbrMetallicRoughness":{
            "baseColorFactor":[
               0.8000000715255737,
               0.6312862634658813,
               0,
               1
            ],
            "metallicFactor":0,
            "roughnessFactor":0.5
         }
      },
      {
         "doubleSided":true,
         "name":"Material",
         "pbrMetallicRoughness":{
            "baseColorFactor":[
               0.800000011920929,
               0.800000011920929,
               0.800000011920929,
               1
            ],
            "metallicFactor":0,
            "roughnessFactor":0.5
         }
      }
   ],
The meshes array contains each mesh in every scene. But in this simple example there is only the single Cube. Notice that the Cube has an extensions object, which contains a KHR_materials_variants object. This in turn contains a mappings array. Each entry in the mappings array contains a material index and a variants array containing a single index in this instance.
   "meshes":[
      {
         "name":"Cube",
         "primitives":[
            {
               "attributes":{
                  "POSITION":0,
                  "TEXCOORD_0":1,
                  "NORMAL":2
               },
               "extensions":{
                  "KHR_materials_variants":{
                     "mappings":[
                        {
                           "material":0,
                           "variants":[
                              0
                           ]
                        },
                        {
                           "material":1,
                           "variants":[
                              1
                           ]
                        },
                        {
                           "material":2,
                           "variants":[
                              2
                           ]
                        }
                     ]
                  }
               },
               "indices":3,
               "material":2
            }
         ]
      }
   ],
The code we need to generate should read root level extensions object, look for KHR_materials_variants and read the names of the variants. Using this to populate a GUI. Then we need a function that given a variant name, finds the index of this variant. Then iterates over each mesh in the scene, checks if the mesh has a KHR_materials_variants extension. If it has then it checks the mappings object to see if its variants array includes the variant index found for the name given. If it does then we get the material using the index and apply it to the mesh. If that sounds complex it might be clearer once we’ve added the code.
We’ll source the variant names from the root level extension first. First we create a new GUI using the lil-gui library. Then we grab a reference to the gltf.parser object. More about that later. After parsing, extensions are stored in the userData object for each Object3D instance in the hierarchy. We check if gltfExtensions is a gltf.userData property. If it is we attempt to assign the extension KHR_materials_variants. At this stage variantsExtension is either null if missing or a reference to the data.
gui = new GUI();

const parser = gltf.parser;

let variantsExtension;

if ( 'gltfExtensions' in gltf.userData ){
  variantsExtension = gltf.userData.gltfExtensions[ 'KHR_materials_variants' ];
}
If variantsExtension is not null then we use the JavaScript array method map to return a new array containing just an array of names. Then we add a select control. The state object is defined at the start of the script with a single property variant.
if (variantsExtension != null){
   const variants = variantsExtension.variants.map( ( variant ) => variant.name );
   const variantsCtrl = gui.add( state, 'variant', variants ).name( 'Variant' );
}
If you try the app now you should get a list of variant names in the GUI.
Now we need a function to call when a name is selected in the GUI. It needs a reference to the scene, the parser we stored, the variants extension and the variant name. We need to convert the variant name into an index, so we use the findIndex method of a JavaScript array.
function selectVariant( scene, parser, extension, variantName ) {

   const variantIndex = extension.variants.findIndex( ( v ) => v.name.includes( variantName ) );
Now we can traverse the scene. We do this asynchronously since a scene may contain a lot of Object3D instances and we don’t want to hold up processing. The callback retrieves each object in the gltf scene. We’re only interested in meshes, so we check if the isMesh flag is set. And we need userData to contain a gltfExtensions object. If either of these checks fail we return from the callback for the current object and move on to the next. Then we assign meshVariantDef as the gltfExtensions object KHR_materials_variants. That’s the extension stored in the object definition. The one we saw that includes mappings.
scene.traverse( async ( object ) => {

if ( ! object.isMesh || ! object.userData.gltfExtensions ) return;

const meshVariantDef = object.userData.gltfExtensions[ 'KHR_materials_variants' ];
If meshVariantDef is null then we can also return. Now we store the current material as userData.originalMaterial, assuming this hasn’t already been set.
if ( ! meshVariantDef ) return;

if ( ! object.userData.originalMaterial ) {

   object.userData.originalMaterial = object.material;

}
To find the mapping we’re interested in we use the find method of a JavaScript array, searching through the variants array for one that includes the variantIndex.
const mapping = meshVariantDef.mappings
                .find( ( mapping ) => mapping.variants.includes( variantIndex ) );
If we find a mapping, we use the parser method getDependency, use material as the property and the mapping.material index. This returns the material in the materials array with the given index. The parser object also contains a method, assignFinalMaterial that ensures the material is correctly assigned and compiled. If mapping is not found then we restore the original material from the one we stored in userData. We also call render because this app doesn’t use a render loop. Instead we call render on each change.
if ( mapping ) {

   object.material = await parser.getDependency( 'material', mapping.material );
   parser.assignFinalMaterial( object );

} else {

   object.material = object.userData.originalMaterial;

}

render();
It just remains to update our GUI code to call this function on a change event.
variantsCtrl.onChange( ( value ) => selectVariant( scene, parser, variantsExtension, value ) );Now the GUI is populated and on a change event the variant name is passed to the selectVariant method.
Variants are a great solution for allowing users to view an object using a variety of finishes.