So far as we build towards the flocking example we’ve met attributeArrays, vertex shaders and compute functions. In this lesson we won’t learn any new TSL, but we will consolidate your knowledge and along the way you’ll learn about a simple computational solution to bird behaviour in a flock. Buckle up and let’s get started.
Take a look at the video above. The behaviour looks very complex. But can you see that a bird could only know about the behaviour of a small group of birds nearby and within eyesight. It was first suggested at Siggraph 87 by Craig Reynolds in a ground-breaking paper he presented there. He called members of the flock Boids, a term that has stuck as a common term for an individual member of a computer simulated flock. Boid is short for Bird oid object.
So when computing the solution we scan for the members of the flock that are within a certain user defined radius and in the line of sight. Then use these three simple rules that can be easily computed.
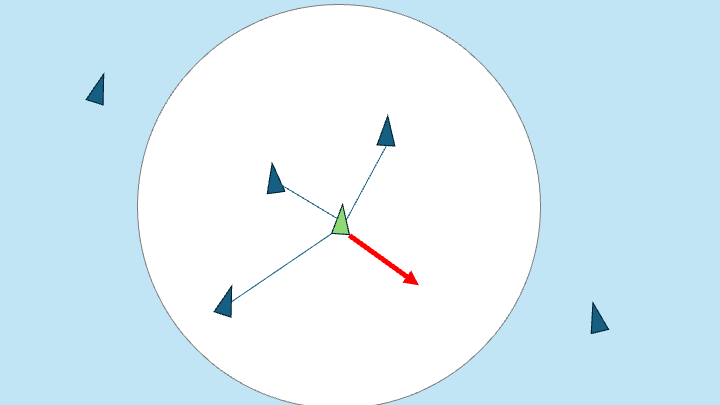
1. Separation: steer to avoid crowding other local Boids.
To achieve this, find the vector that points away from vectors from the current Boid to other local Boids.

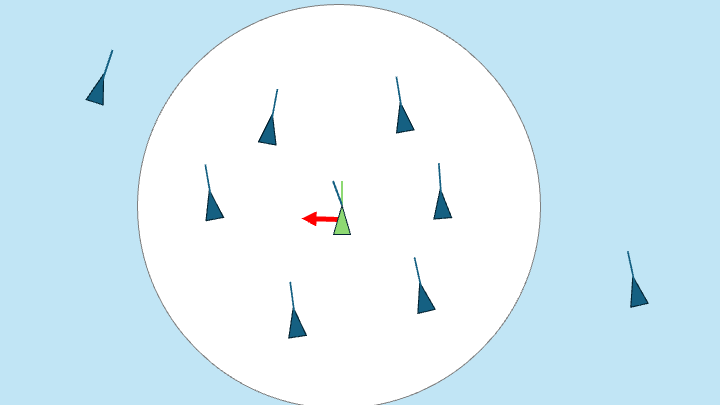
2. Alignment: steer towards the average heading of local Boids
Simply mix the current heading with the average heading of local Boids.

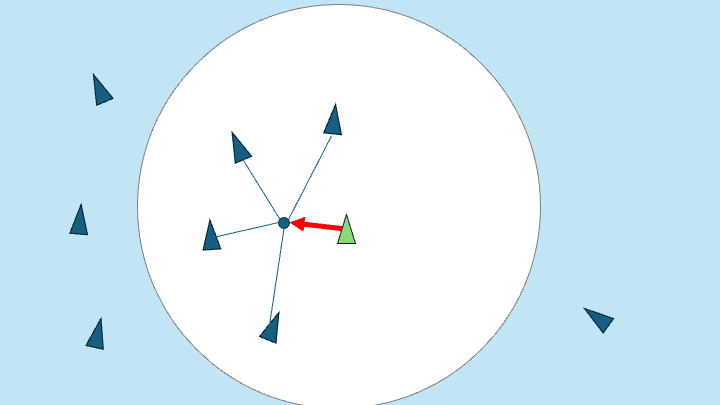
3. Cohesion: steer to move toward the average position of local Boids.
Find the average position of local Boids and steer towards it.

If Separation and Cohesion seem to be opposites of each other, remember that for separation we are working with vectors from the current Boid. Whereas for Cohesion we are considering the average position of a group of Boids in the calculation.
Enough theory, time to see a concrete example.
For this example we need both position and direction. The initStorage function now initialises 3 arrays. position, direction and noise. Noise is used to introduce a small random element to the boid behaviour. More about that later.
flockVertexTSL now gets the vector value stored in the directionStorage buffer. We create a rotation matrix from this vector. The vector is actual a velocity value. We will add this vector to the position vector to get the new position. To use this vector to create a 3×3 rotation matrix we first negate and normalize this vector. The negation is required because the geometry is modelled with z plus pointing forward whereas ThreeJS uses a z minus pointing forward coordinate space. This adjusted velocity value is now used as the zaxis of the matrix. We can now get the xaxis as the cross product of the zaxis and an up vector – vec3(0, 1, 0) . Cross product will return a vector that is orthogonal, at right angles, to both vectors used in the calculation. So now the zaxis and the xaxis vectors are prependicular to each other. We get the yaxis by getting the cross product of these vectors. Now we have 3 vectors that provide the coordinate space. We create the rotation matrix by passing the x component of each vector as the first 3 parameters to a mat3 instance. The y components for parameters 4-6, and z components for parameters 7-9. The only other change to the flockVertexTSL vertex shader is to multiply positionLocal by this rotation matrix.
const flockVertexTSL = Fn(() => {
    const instanceID = attribute("instanceID");
    const normal = normalLocal.toVar();
    const dir = normalize(directionStorage.element(instanceID)).toVar();

    //Create matrix
    const zaxis = dir.negate().normalize().toVar();
    const xaxis = cross(vec3(0, 1, 0), zaxis).normalize().toVar();
    const yaxis = cross(zaxis, xaxis).toVar();
    const mat = mat3( xaxis.x, yaxis.x, zaxis.x,
                      xaxis.y, yaxis.y, zaxis.y,
                      xaxis.z, yaxis.z, zaxis.z ).toVar();

    const finalVert = modelWorldMatrix.mul(mat.mul(positionLocal)).add(positionStorage.element(instanceID));

    return cameraProjectionMatrix.mul(cameraViewMatrix).mul(finalVert);
  });
Time to focus on the flocking code which is split between ComputeVelocity and ComputePosition. We’ll focus on Compute Velocity first. Remember flocking involves applying three simple rules. Separation, alignment and cohesion. First, we get the boid_pos and boid_dir from the buffers based on instanceIndex.
computeVelocity = Fn(() => {
    const boid_pos = positionStorage.element(instanceIndex).toVar();
    const boid_dir = directionStorage.element(instanceIndex).toVar();
Then we setup the initial separation, alignment and cohesion values. When calculating these values we only consider nearby boids. Inevitably the current boid is inside this radius so nearbyCount starts at 1, not 0.
    const separation = vec3(0).toVar();
    const alignment = vec3(0).toVar();
    const cohesion = vec3(flockPosition).toVar();

    const nearbyCount = uint(1).toVar(); // Add self that is ignored in loop
Then we enter a Loop. The a TSL Loop takes two parameters. The first parameter is an object with start and end values. The variable type to use as the counter and a condition, this is a string value, here we use <. The second parameter to the Loop function is a function, with the counter passed as an object. We can ignore the boid if the loop is pointing at the current boid. If i equals instanceIndex we Continue. The TSL If function takes two parameters, a condition and a function.
Then we get the position and direction for the boid pointed to by the i variable, storing these as the variable tempBoid_pos and tempBoid_dir. We get the offset vector from tempBoid_pos to boid_pos. Then get the length of this vector. The position and direction of the boid stored as instanceIndex will only be affected by the tempBoid in the loop if the distance from the boid to the tempBoid is less than the value stored as the uniform neighbourDistance. One more check, is the distance from the current boid to the temp boid, is not two small. Since we have a division by dist, this avoids a division by 0 overflow.
The most complex calculation is separation.
const s = offset.mul( float(1.0).div(dist).sub(
 float(1.0).div(neighbourDistance) )
).toVar();
separation.addAssign( s );
We use the offset vector and scale this by a value that increases the nearer we are to the boid we’re setting. So what does 1/dist minus 1/neighbourDistance mean?
Think about what happens when dist is small, 1/dist is very large and we can more or less ignore the small value of 1/neighborDistance. Whereas if this boid is near the limit of neighborDistance then we get more or less 1/neighborDistance minus 1/neighborDistance or zero. So when a boid is close to the target boid we massively increase the separation vector and when one is near the neighborDistance value we virtually ignore it.
For alignment we simply get the sum of each boids direction and for cohesion the sum of each boids position, with the cohesion variable starting with the uniform flockPosition.
Loop(
      { start: uint(0), end: uint(BOIDS), type: "uint", condition: "<" },
      ({ i }) => {
        If(i == instanceIndex, () => {
          Continue();
        });

        const tempBoid_pos = positionStorage.element(i).toVar();
        const tempBoid_dir = directionStorage.element(i).toVar();

        const offset = boid_pos.sub(tempBoid_pos).toVar();
        const dist = length(offset).toVar();

        If( dist.lessThan(neighbourDistance), () => {
          If( dist.lessThan( 0.0001 ), () => {
              Continue();
            } );
          const s = offset.mul(float(1.0).div(dist).sub(float(1.0).div(neighbourDistance))).toVar();
          separation.addAssign( s );
          alignment.addAssign(tempBoid_dir);
          cohesion.addAssign(tempBoid_pos);

          nearbyCount.addAssign(1);
        }); //If
      }); //Loop
Then outside the loop we use the nearbyCount value to get the average of value for alignment and cohesion by dividing the accumulated values by the nearbyCount value. For cohesion we need to subtract the current boids position and normalize the result. This leaves the target direction as the sum of the three properties. But when applying the newly calculated direction we only use it at a very low blend with the existing boid direction. Now we have a boid direction, remember this is the forward vector not a rotation value,
    const avg = float(1.0).div(nearbyCount).toVar();
    alignment.mulAssign(avg);
    cohesion.mulAssign(avg);
    cohesion.assign(cohesion.normalize().sub(boid_pos));

    const direction = alignment.add(separation).add(cohesion).toVar();

    const ip = exp(rotationSpeed.mul(-1).mul(deltaTime));
    boid_dir.assign(mix(direction, boid_dir.normalize(), ip));
    directionStorage.element(instanceIndex).assign(boid_dir);
  })().compute(BOIDS);
Updating the position is much simpler. As before we get the position and direction for the boid at instanceIndex. We use the noise random value we created earlier to introduce a little variation in the speed of a boid, storing this value as velocity. The new position of the boid is simply the old position plus the direction vector multiplied by the velocity we’ve calculated then multiplied again by the uniform deltaTime, the time in seconds since the last screen update.
computePosition = Fn( () => {
    const boid_pos = positionStorage.element(instanceIndex).toVar();
    const boid_dir = directionStorage.element(instanceIndex).toVar();
    const noise_offset = noiseStorage.element(instanceIndex).toVar();
    const noise = mx_noise_float( boid_pos.mul( time.div(100.0).add(noise_offset))).add(1).div(2.0).toVar();
  const velocity = boidSpeed.mul(float(1.0).add(noise)).toVar();

    boid_pos.addAssign( boid_dir.mul( velocity ).mul(deltaTime));
    positionStorage.element(instanceIndex).assign(boid_pos);
  })().compute(BOIDS);

  computeTest = Fn( () => {
    const position = positionStorage.element( instanceIndex );
    position.addAssign( vec3( 0, deltaTime.mul(100), 0) );
  })().compute(BOIDS);
The render function must update deltaTime, then call computeVelocity and computePosition. By running these functions many times in paraellel on the GPU. Despite being called for each of 2000 boids and for each boid having to loop through 2000 boids. That is 4 million times through the loop, yet it still runs at 60fps on even a modest ChromeBook.
function render() {
  if (deltaTime && clock) deltaTime.value = clock.getDelta();
  if (computeVelocity) renderer.compute(computeVelocity);
  if (computePosition) renderer.compute(computePosition);
  renderer.render(scene, camera);
}
Now you have a flocking example. After a few seconds all the boids come together and orbit around the flock position. But the boids are just a dart object. We want a bird that flaps its wings. In the next lesson we’ll bake the vertex positions of an animation and use that to set the vertex positions. To give multiple flapping birds.
If you find these articles useful, perhaps you can buy me a coffee by clicking the button below. It might encourage me to write more.
Signup to my mailing list.
