AR is the perfect solution for viewing a product in your own home. In this article we’ll look at using WebXR and ThreeJS to add AR experiences to an online shop. What do you mean you’ve never heard of WebXR or ThreeJS?
ThreeJS is a very popular Open Source library that makes it about as easy as possible to add 3D content to a web page. Under the hood it uses a WebGL renderer. If you’ve ever played with WebGL, you’ll know that even displaying a triangle is a challenge. With ThreeJS a few lines of code will show a complex model.
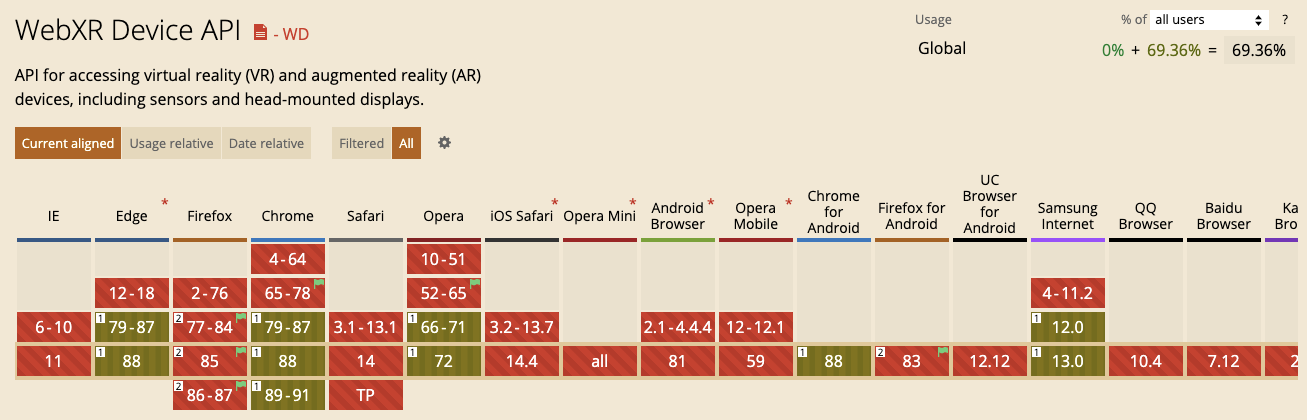
WebXR is an API for displaying immersive experiences directly in the browser. Supported by Google and Amazon. I writing this in February 2021 and here is a Can I Use screen grab showing current support for WebXR. As you can see Edge, Chrome, Opera and Chrome for Android and Samsung Internet support WebXR. In this article I’ll be using Chrome.
Resources for this article are here (https://github.com/NikLever/Learn-WebXR)
To code-along with this article open index.html and app.js from the start/lecture7_3 folder. A completed version of the code is in the folder complete/lecture7_3. The code comes from my Udemy course ‘Learn to Create WebXR, VR and AR, Experiences with ThreeJS’, which you’ll find a link to here https://niklever.com/courses

Let’s have a look at the index.html page, make sure to look using a web server. WebServer for Chrome is easy to setup if you don’t have a web server running on your development device. The HTML uses Bootstrap so it scales nicely from desktop to mobile. This isn’t an article about HTML markup so I’m not going to say much about it.
...
<div class="card-footer">
<small class="text-muted">★ ★ ★ ★ ☆</small>
<button class="ar-button" onclick="window.app.showChair(1);"><i class="fas fa-camera"></i></button>
</div>
...
What I will point out is the button using the class ar-button. Find it at line 126 in the index.html file. Notice it is setup to call the method showChair in the instance named app. The showChair method takes a single integer parameter.
assets
 ▸ ...
   chair1.glb
   chair2.glb
   ...
   chair6.glb
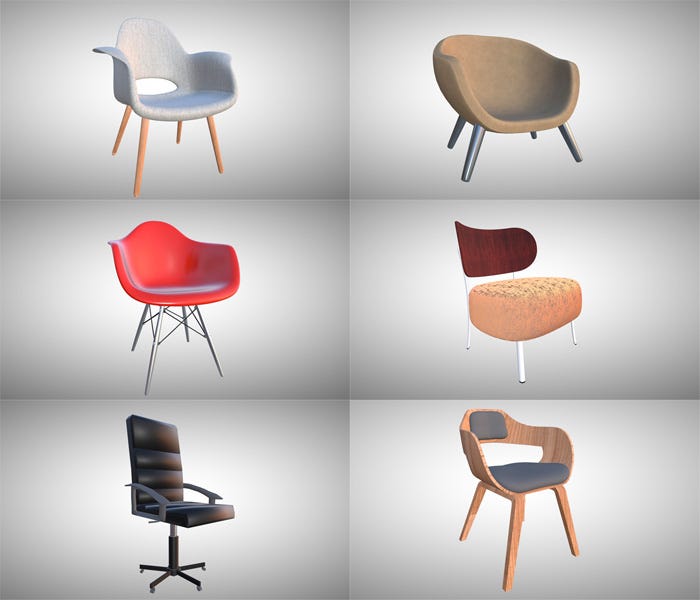
If we look in assets/ar-shop folder you’ll see 6 chairs as glb files. The aim of our code is to use WebXR AR hit-testing to position one of these chairs in a users room. More about hit-testing later in this article.
ThreeJS includes an AR hit-testing example. It uses a class that comes with the ThreeJS library, ARButton. But because we have 6 instances of the ar-button in our online shop we can’t use the ThreeJS one which can only exist as a single instance. We’ll need another approach.
//css/shop-homepage.css
...
.ar-button{
    display: none;
    width: 40px;
    height: 30px;
    float: right;
    right: 5px;
}
If you look at the css file css/shop-homepage.css you’ll see the css definition of the ar-button, notice by default it’s hidden, the display style property is set to none, which is the ThreeJS equivalent of setting visible to false. The first thing we need to do is display the button on two conditions.
The navigator object must have an xr property and it must support immersive-ar.
<script type="module">
   import { App } from './app.js';

   document.addEventListener("DOMContentLoaded", function(){
      const app = new App();
      window.app = app;
   });
</script>
Notice in the index.html we create an instance of the class App. Time to look in the app.js file. This will be very familiar if you know the ThreeJS library.
class App{
   constructor(){
      const container = document.createElement( 'div' );
      document.body.appendChild( container );

      this.camera = new THREE.PerspectiveCamera( 70, window.innerWidth / window.innerHeight, 0.01, 20 );
      this.camera.position.set( 0, 1.6, 0 );

      this.scene = new THREE.Scene();      const ambient = new THREE.HemisphereLight(0xffffff, 0xbbbbff, 1);
      ambient.position.set( 0.5, 1, 0.25 );
  this.scene.add(ambient);

      this.renderer = new THREE.WebGLRenderer({ antialias: true, alpha: true } );
      this.renderer.setPixelRatio( window.devicePixelRatio );
      this.renderer.setSize( window.innerWidth, window.innerHeight );
      this.renderer.outputEncoding = THREE.sRGBEncoding;
  container.appendChild( this.renderer.domElement );
      this.setEnvironment();
      ...
In the App constructor we create the usual camera, scene, lights and renderer. I won’t be providing an introduction to ThreeJS, there are many resources available. Including one on the ThreeJS website.
      this.loadingBar = new LoadingBar();
      this.loadingBar.visible = false;      this.assetsPath = '../../assets/ar-shop/';      this.reticle = new THREE.Mesh(
         new THREE.RingBufferGeometry( 0.15, 0.2, 32 ).rotateX( - Math.PI / 2 ),
         new THREE.MeshBasicMaterial()
      );

      this.reticle.matrixAutoUpdate = false;
      this.reticle.visible = false;
      this.scene.add( this.reticle );

      this.setupXR();

      window.addEventListener('resize', this.resize.bind(this) );

   }
   ...
At the end of the constructor we create an instance of LoadingBar, this creates an overlay with a rounded bar center screen that can be set to show the loading state of a 3D model assets. We set the path to where we can find the models and create a white ring that will show the results of hit testing. Then we call setupXR. This is where we’ll find the code to show the ar buttons.
setupXR(){
   this.renderer.xr.enabled = true;

   if ( 'xr' in navigator ) {      navigator.xr.isSessionSupported( 'immersive-ar' ).then( ( supported ) => {         if (supported){
            const collection = document.getElementsByClassName("ar-button");
            [...collection].forEach( el => {
               el.style.display = 'block';
             });
         }
      } );

  }
  ...
First we use the xr property of the ThreeJS renderer. This is where ThreeJS has WebXR support. The xr property is an instance of the ThreeJS class WebXRManager. ThreeJS has good documentation and here is where you’ll find the docs for this class.
Then we check for xr in the browsers navigator object. If this exists then we use the isSessionSupported method of the xr object checking for ‘immersive-ar’. This returns a promise, which when it returns has a single returned parameter, supported. If this is true then we use the getElementsByClassName method of the browsers document object to get an HTML collection of elements using the class specified. An HTML collection is not an array, but it’s easier to handle arrays rather than collections and easily converted to an array using the spread operator … . Now we have an array we can use forEach setting the style display property to block.
You can test WebXR apps on a desktop PC by installing the WebXR emulator. If you haven’t done so already and are interested in WebXR development. Now is the time to install it.

On a desktop with the WebXR emulator and the AR device selected you’ll now see the AR buttons. Great. Remember the button, when pressed calls showChair. Let’s take a look at that method in the App class now.
showChair(id){
   this.initAR();

   const loader = new GLTFLoader( ).setPath(this.assetsPath);
   const self = this;

   this.loadingBar.visible = true;

   // Load a glTF resource
   loader.load(
   // resource URL
   `chair${id}.glb`,
   // called when the resource is loaded
   function ( gltf ) {
      ...
   },
   // called while loading is progressing
   function ( xhr ) {
      self.loadingBar.progress = (xhr.loaded / xhr.total);
   },
   // called when loading has errors
   function ( error ) {
      console.log( error.message );
   });
 }
First we call initAR, more about that in a moment. The initAR function is going to start an AR session and that must be as a result of a user action, so this is the perfect place for it.
Then we create an instance of a GLTFLoader. This class will load a glb file including all models and animation. In this example there is no animation. We set the path the loader will use when loading assets using the class method, setPath.
So the user knows the progress of downloading the file we show the loading bar we created in the App constructor. Then use the GLTFLoader class method load. This takes four parameters. The name of the asset, here we use the id passed to the function and a template string to set the correct name. The second parameter is an onLoad event, the third onProgress and the fourth onError.

The onProgress callback updates the loading bar by dividing the xhr parameter loaded property by total. This will give a value in the range 0 to 1. By passing this to the loadingBar it displays a visual indication of progress in downloading to the user. onError simply passes the error message to the developer console.
self.scene.add( gltf.scene );

self.chair = gltf.scene;

self.chair.visible = false;

self.loadingBar.visible = false;self.renderer.setAnimationLoop( self.render.bind(self) );
In the onLoad event, we get a gltf object passed. This has a scene property, we set this as the app property chair. Hide the loading bar and start a rendering loop using the ThreeJS renderer method setAnimationLoop. This means that ThreeJS will call the render method as many times as the browser will allow.
We still need to initiate an AR session without using the ThreeJS ARButton class. We’re going to do this in the initAR method we met a moment ago.
initAR(){
   let currentSession = null;   const self = this;   const sessionInit = { requiredFeatures: [ ‘hit-test’ ] };   function onSessionStarted( session ) {
      ...
   }   function onSessionEnded( ) {
      ...
   }   navigator.xr.requestSession( ‘immersive-ar’, sessionInit ).then( onSessionStarted );
}
We start by defining a currentSession variable that is set to null. Since we will have event listener callback functions we’ll need a self variable to access the app inside the event functions, where this will no longer be the app instance.
We’ll need a sessionInit object with requiredFeatures including hit-test. We’ll also need an onSessionStarted callback and an onSessionEnded callback. Great, now we can request an immersive-ar session, passing the sessionInit object.
Once the requestSession promise returns we call onSessionStarted. Time to add some code to the function.
function onSessionStarted( session ) {
   session.addEventListener( ‘end’, onSessionEnded );
   self.renderer.xr.setReferenceSpaceType( ‘local’ );
   self.renderer.xr.setSession( session );
   currentSession = session;
}
First up we need to add an end event to the session, calling onSessionEnded. Then we set the reference space and update the renderer’s xr object setting the session. We set current session to keep track of it.
function onSessionEnded( ) {
   currentSession.removeEventListener( ‘end’, onSessionEnded );   currentSession = null;   if (self.chair !== null){
      self.scene.remove( self.chair );
      self.chair = null;
   }   self.renderer.setAnimationLoop( null );
}
The onSessionEnded function needs to remove the added end event from the session, set currentSession to null. If a chair has been loaded then we remove it from the scene and end the rendering loop by setting the animation loop to null. That’s all the code you need to enter. If you decided not code-along then the complete version has all the necessary code.
//SetupXR
const self = this;this.hitTestSourceRequested = false;
this.hitTestSource = null;

function onSelect() {
   if (self.chair===undefined) return;

   if (self.reticle.visible){
      self.chair.position.setFromMatrixPosition( self.reticle.matrix );
      self.chair.visible = true;
   }
}this.controller = this.renderer.xr.getController( 0 );
this.controller.addEventListener( 'select', onSelect );

this.scene.add( this.controller );
Let’s review how hit-testing works.
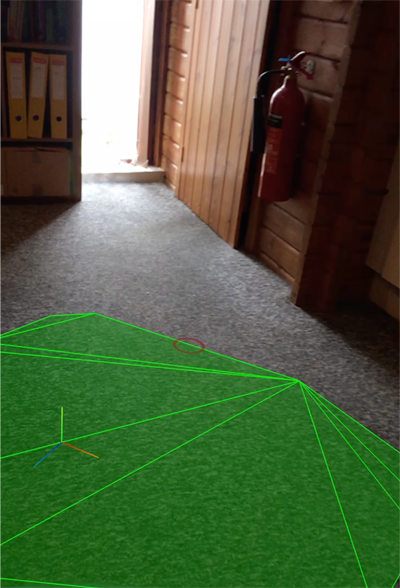
Notice in setupXR there are two properties related to hit testing. Hit testing in this context means finding real-world geometry, using the camera and image tracking to determine where the floor is.
It is a feature of both the ARCore library on suitable Android devices and ARKit on iOS devices. Unfortunately, only Android works with WebXR at the time of writing.
render( timestamp, frame ) {
   if ( frame ) {
      if ( this.hitTestSourceRequested === false )
         this.requestHitTestSource( )      if ( this.hitTestSource ) this.getHitTestResults( frame );
   }   this.renderer.render( this.scene, this.camera );
}
The two properties are hitTestSourceRequested and hitTestSource. If look at the render method you can see if hitTestSourceRequested is false, then we call the app method requestHitTestSource.
requestHitTestSource(){
   const self = this;

   const session = this.renderer.xr.getSession();   session.requestReferenceSpace( 'viewer' ).then( function ( referenceSpace ) {
      session.requestHitTestSource( { space: referenceSpace } ).then( function ( source ) {         self.hitTestSource = source;
      } );
   } );   session.addEventListener( 'end', function () {   self.hitTestSourceRequested = false;
      self.hitTestSource = null;
      self.referenceSpace = null;
   } );   this.hitTestSourceRequested = true;
}
In this method we call the session method requestReferenceSpace. Once the promise returns we have a reference space to pass to the requestHitTestSource method. And once this returns we finally can set the hitTestSource. Since this example requires us to come in and out of immersive ar we need to add a session end event that resets the app properties for hit testing. So that covers getting the hit test source the next step is using it.
getHitTestResults( frame ){
   const hitTestResults = frame.getHitTestResults( this.hitTestSource );   if ( hitTestResults.length ) {

       const referenceSpace = this.renderer.xr.getReferenceSpace();
       const hit = hitTestResults[ 0 ];
       const pose = hit.getPose( referenceSpace );       this.reticle.visible = true;
this.reticle.matrix.fromArray( pose.transform.matrix ); } else { this.reticle.visible = false; }} 
Again, in the render method, if we have a hit test source then we can call the app method getHitTestResults. This uses the frame passed to the render method as a parameter. The WebXR frame object has a getHitTestResults method, which returns an array of hits. That is where a ray in the camera’s direction, with an origin at the camera, hits the real-world geometry found by the device. If we get any hits back then we can get the pose from the first hit. A pose has a transformation matrix and we use this to show, position and orientate the reticle.
//SetupXR function
function onSelect() {
   if (self.chair===undefined) return;

   if (self.reticle.visible){
      self.chair.position.setFromMatrixPosition( self.reticle.matrix );
      self.chair.visible = true;
   }
}this.controller = this.renderer.xr.getController( 0 );
this.controller.addEventListener( 'select', onSelect );

this.scene.add( this.controller );
The ThreeJS WebXRManager class, the renderer’s xr object, has a getController method which for a WebXR AR experience has a select event. In the setupXR method we added a select event handler to the controller, this is triggered when you click the screen. It checks if the chair we loaded in the showChair method has been set as the class property chair. Then we check if the reticle is visible. If it is then we set its position and orientation using the reticle’s matrix and make it visible.

https://niksgames.com/webxr/complete/lecture7_3/
If we visit the page on a suitable mobile device and choose the camera ar button, move the device around until the reticle is visible, then click the screen, you can see the chair in your room. There are 6 different chairs to view. But don’t try sitting on them, they’re not really there!
Using WebXR via the ThreeJS library is easily done.
Get the full course including an introduction to ThreeJS, introduction to WebXR, VR and AR, architecture, game and training examples here