Want to learn to create Shaders? Well you’ve picked the right time. My courses that contain lectures on coding Shaders are all Udemy best price for the next few days.
Megaphone with Promo speech bubble banner. Loudspeaker. Label for business, marketing and advertising. Vector on isolated background. EPS 10.
To celebrate finishing the second draft of my new Unity DOTS e-book, I’m having a sale of my Udemy Unity courses. Use the coupon code DEC23_BEST, or click the links below, to get the best price on Udemy for these courses over the next few days.
For all of my courses I include the Three.JS library I used at the time I was writing and recording the course. This ensures the code matches the library so no further installation is required other than downloading and unzipping a zip file from Udemy or GitHub or cloning and forking a repo from GitHub. But another approach is to use a package manager. By far the most popular is NPM, Node Package Manager and in this article we’ll look at using this approach.
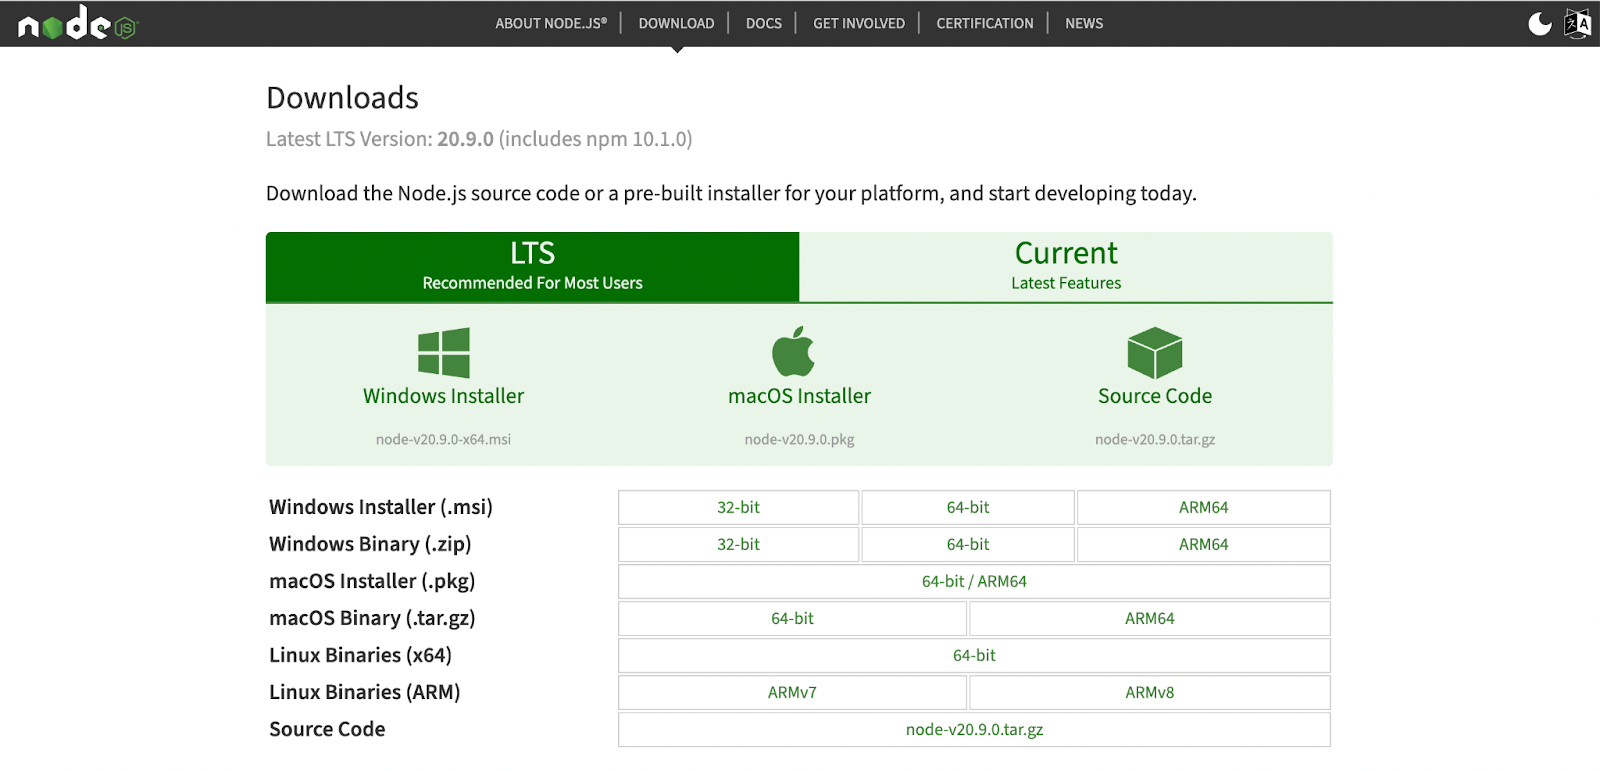
Caption: The Node.JS download page
To start you will need Node.JS installed on your PC, Mac or Linux device. If you haven’t got Node.JS installed then click the Node.JS link above or enter nodejs.org in your browser address bar. Download the installer for your device and install. NPM comes with the install.
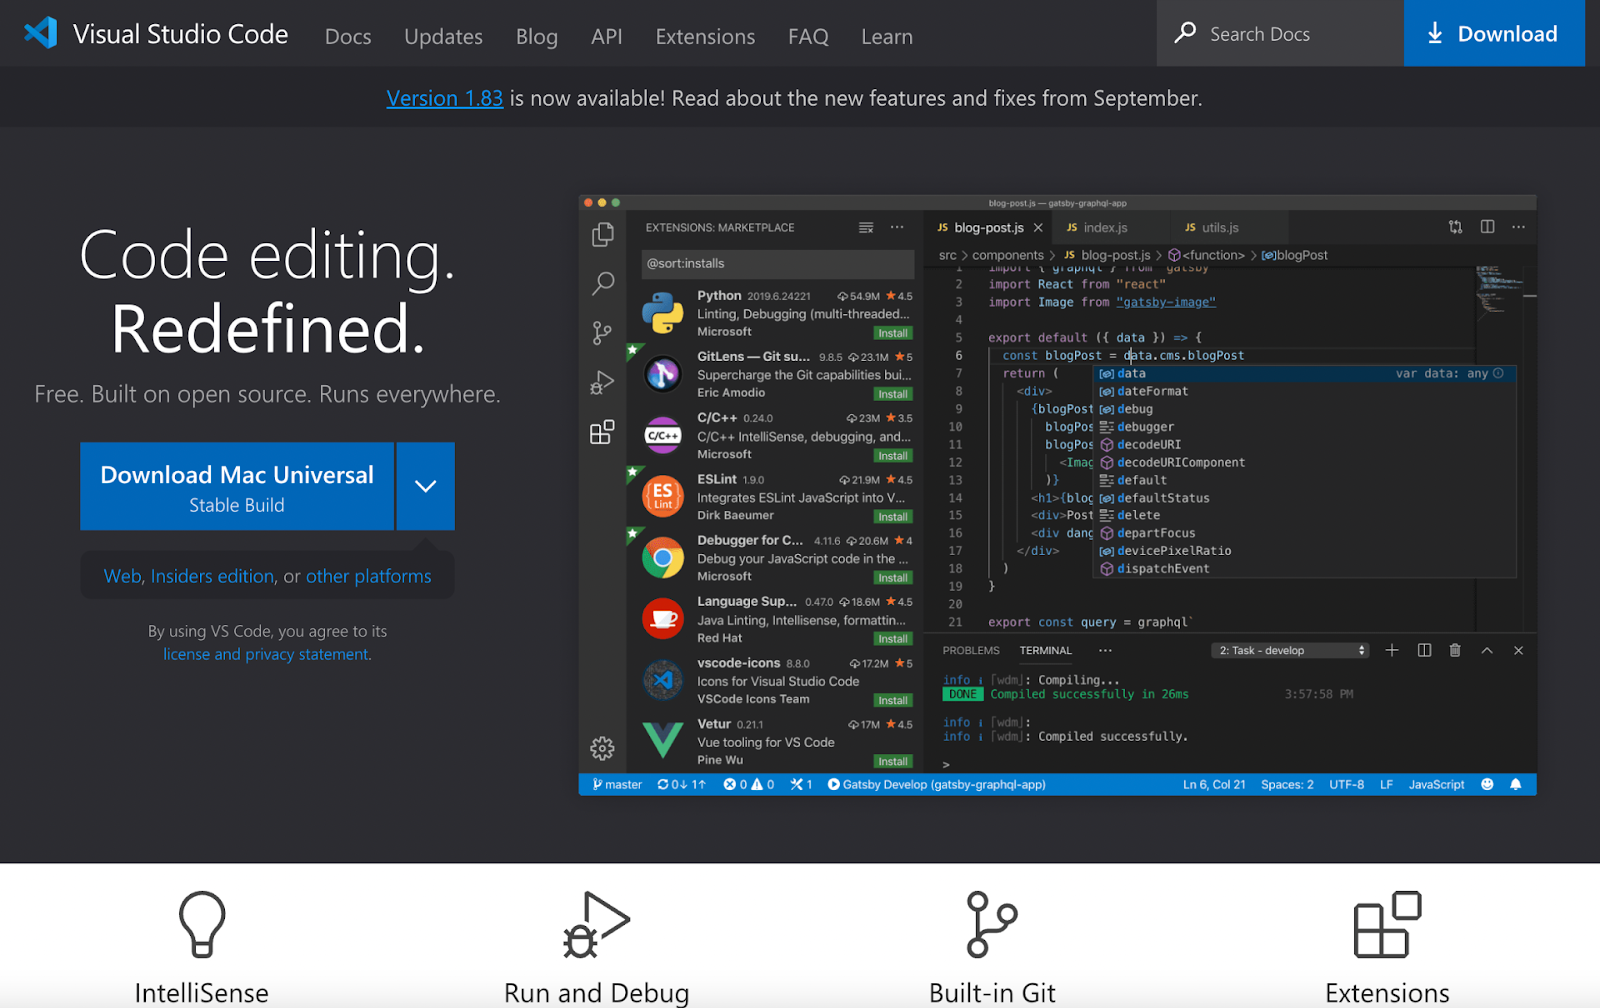
Caption: VSCode home page
If you haven’t got VSCode installed then install that as well. It is my recommended code editor these days. Either click the link above or enter https://code.visualstudio.com/ in your browser address bar.
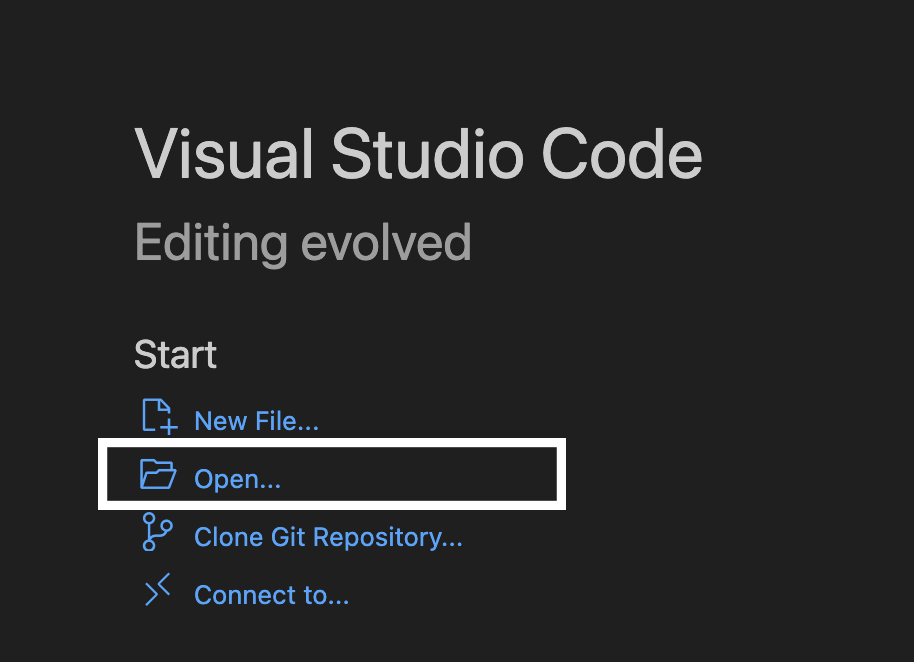
Open VSCode and choose Open.
Caption: VSCode Open
Navigate to a new folder where your project files will be stored. You’ll need to agree to trust the authors, but since that is you there is no problem. Use menu: Terminal > New Terminal. Enter
npm install three
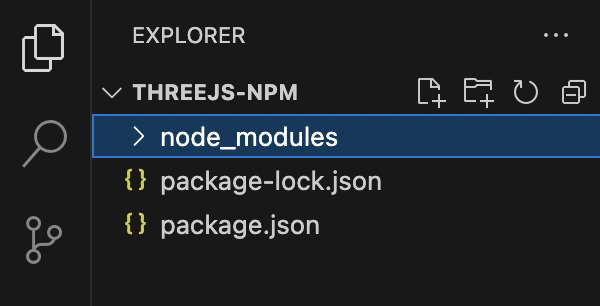
Notice you now have a node_modules folder and two new files package.json and package-lock.json.
Caption: Folders and files created
package.json looks like this. three is listed as a dependency. package-lock.json is created and edited by npm and should not be touched.
{
   "dependencies": {
      "three": "^0.157.0"
   }
}
three is the Three.JS library which you’ll find in the node_modules/three folder.
This will allow you to launch a dev server and package a completed project for distribution.
You could place your project files at the root of the folder. But most developers prefer to keep things tidy by adding content to folders. Create a src folder and a public folder and create a new file called vite.config.js add this code to the file.
Now vite will look in src for any html or js files, in public for assets and package for distribution to the build folder. Note the public and build paths are relative to the src path.
To see an example using npm and vite download this repo.
Caption: GitHub Code button dropdown
Just click the green Code button and choose Download ZIP. Unzip to a folder of your choice and open the folder in VSCode. To install the dependencies enter
npm install
The package.json file is scanned for dependencies and the node_modules folder is populated with all the packages needed. Recall the scripts we added to package.json. Use
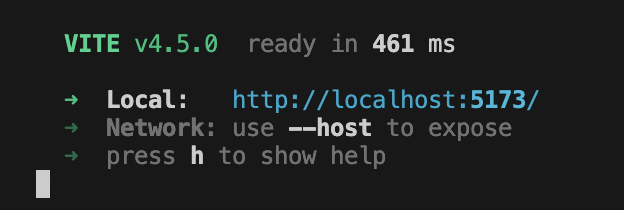
npm run dev
Caption: vite dev server running on port 5173
ctrl+click (PC) or cmd+click (Mac) the localhost link to launch the dev server in your browser.
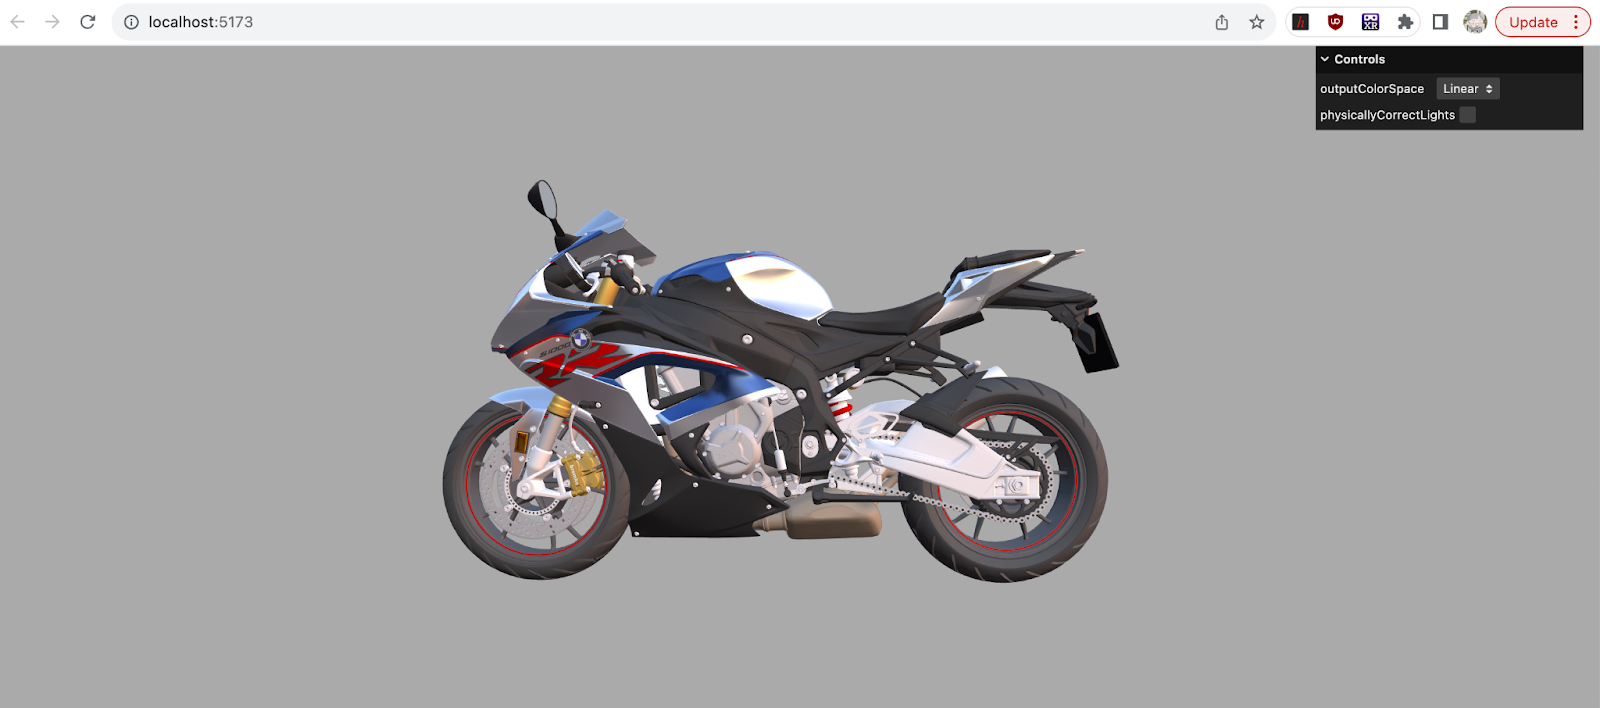
Caption: Example app running in the vite dev server in the browser
Just a simple example of a Three.JS app created using vite as a build tool.
Take a look at src/index.html. Notice the script. Notice we can import the core Three.JS library from three.
<script type="module">
   import * as THREE from "three";
   import { OrbitControls } from "three/addons/controls/OrbitControls.js";
   import { GUI } from "three/addons/libs/lil-gui.module.min.js";
   import { GLTFLoader } from 'three/addons/loaders/GLTFLoader.js';
   import { DRACOLoader } from 'three/addons/loaders/DRACOLoader.js';
   import { RGBELoader } from 'three/addons/loaders/RGBELoader.js';
three will be converted into node_modules/three/build/three.module.js and three/addon becomes node_modules/three/examples/jsm. Why? Take a look at package.json in the three folder.
Notice exports. The default export for three, “.”, when used as an import is ./build/three.module.js. Used as a require, something used when creating a nodejs app, uses the classic javascript version ./build.three.cjs. ./addons/* becomes ./examples/jsm/* .
Back to the index.html file. Find the loadGLTF function, line 93.
function loadGLTF(){
   const loader = new GLTFLoader( );
   const dracoLoader = new DRACOLoader();

   dracoLoader.setDecoderPath( 'draco-gltf/' );

   loader.setDRACOLoader( dracoLoader );

   // Load a glTF resource
   loader.load(
      // resource URL
      'motorcycle.glb',
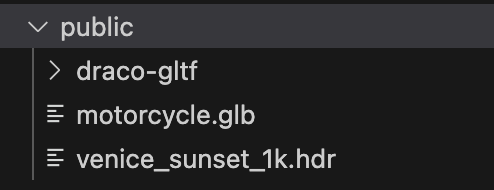
Notice setDecoderPath is draco-gltf. Since this is not an import, for vite to find it correctly it must be in the public folder.
Caption: Contents of the public folder
It is simply copied from node_modules/three/examples/jsm/libs/draco/gltf. You can see this folder also contains the glb loaded, motorcycle.glb, and the environment map, venice_sunset_1k.hdr.
For the last step enter
npm run build
Notice a new folder is created, build.
Caption: The build folder
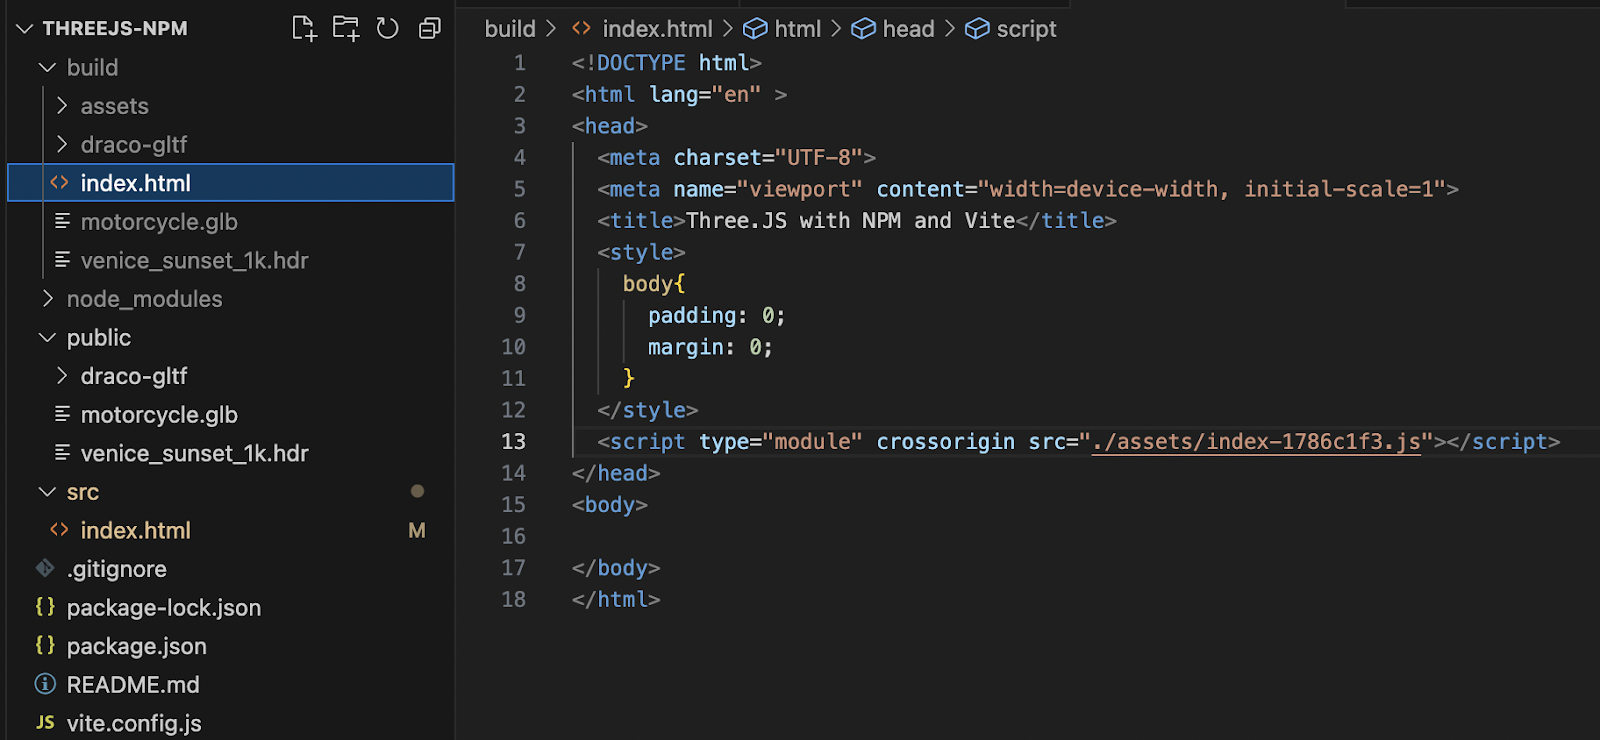
A new index.html is created loading the js file in the assets folder. You might find you need to add a dot before the forward slash.
src=”/assets/index…”
Becomes
src=”./assets/index…”
The contents of the public folder are copied to the build folder. The main script in the assets folder is bundled and minified. The single script now contains the Three.JS library and all the other imports in the index.html file in the src folder.
Caption: Open with Live Server
If you have Live Server installed then you can run the app by right clicking on build/index.html and choosing Open with Live Server.
Using npm and vite is a great way to create your Three.JS apps. I hope this short article helps you get started.
Close up of fresh hazelnuts against white background
Close up of fresh hazelnuts against white background
In this article we’ll look at using WebGL to display a Quad, a rectangle, that fills the window. If you want to code-along then check out the CodePen-start link. Here is the final version.
It’s a very simple shader just using uv to blend the colours. This article isn’t about the shader, it’s about getting the results of the shader on screen. You’ll learn about attributes, buffers, elements and programs. Let’s get started.
Before we can use WebGL in a browser we need a canvas and a context. To create this we’ll use a new function, setupWebGL. We create a canvas element and append it to the body. Then we get the webgl context. This could return null in which case we throw an error. These days most browsers on most devices do support webgl.
function setupWebGl() {
   canvas = document.createElement("canvas");
   document.body.appendChild(canvas);
   const gl = canvas.getContext("webgl");
   if (gl == null) throw "WebGl not Supported";
   return gl;
}
Back in the init method we call the function.
gl = setupWebGl();
By default a canvas is sized at 300 x 150. We want it to fill the screen to do that we’ll need a resize method. If a canvas has been created then set its width to window.innerWidth and its height to window.innerHeight.
function onWindowResize() {
   if (canvas){
      canvas.width = window.innerWidth;
      canvas.height = window.innerHeight;
   }
}
In the init method add an event listener and also directly call this function.
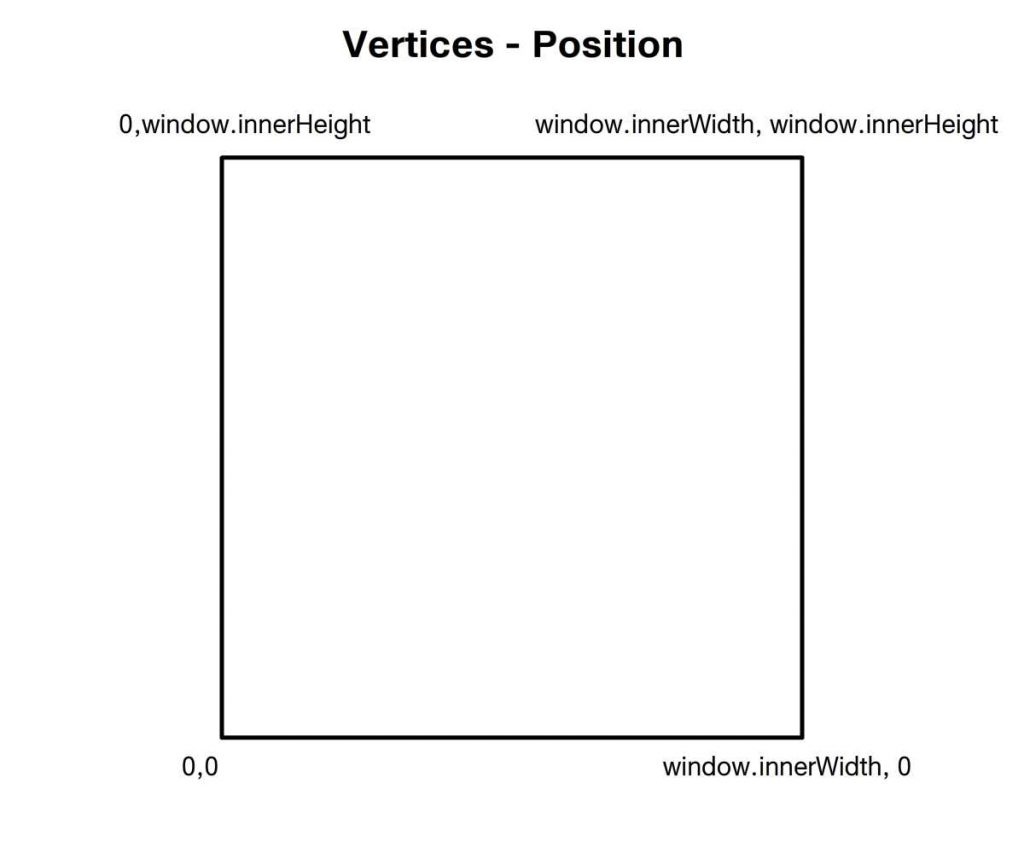
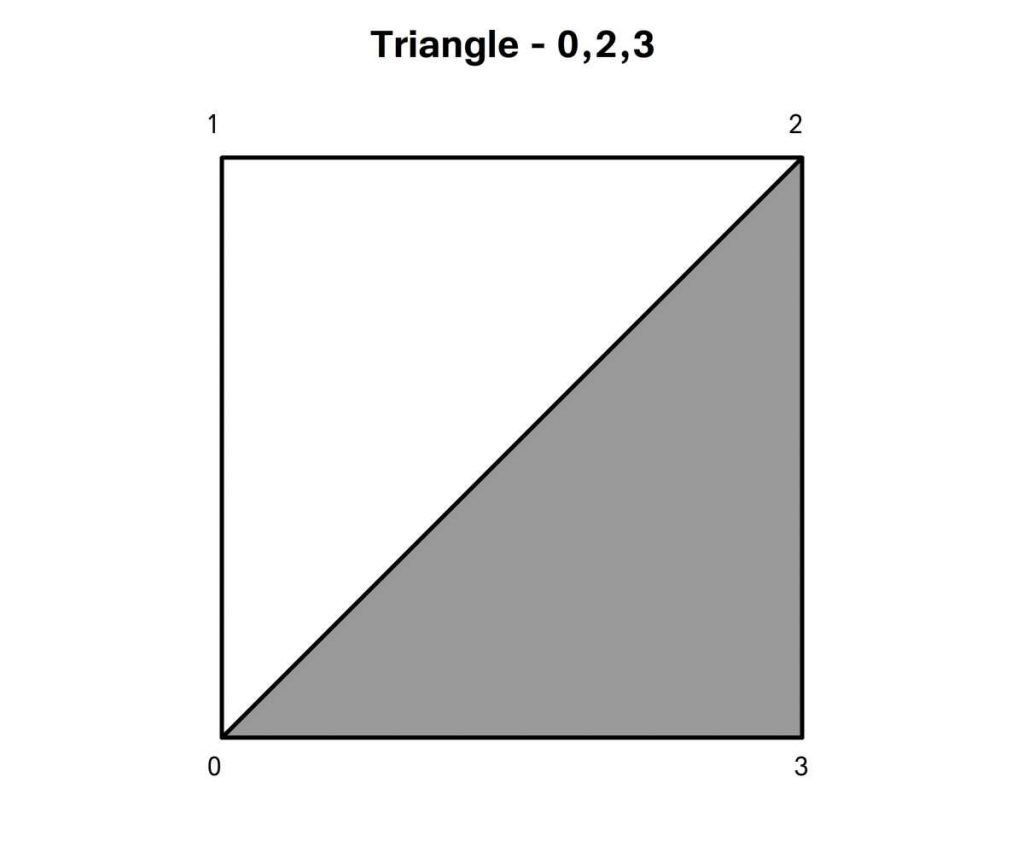
Now we need to define a quad that will fill the canvas area. For that we need some vertices. The minimum we need to define a quad is the position of 4 vertices. But in our shader we’re also going to use a uv value.
Vertices – PositionVertices – Uv
We’re going to define an array of objects with position and uv properties. Each of these properties will be a simple array. Picturing a Quad, see images above. We start with the vertex at the bottom left corner giving this the position 0, 0 and the same values for uv. Then we move to the top left, this has position value 0 for x and window inner height for y. The uv for this vertex is 0, 1. The next vertex is top right, with position values of the window width and height and uv 1, 1. And finally the bottom right with position values of window width, 0 and uv of 1, 0.
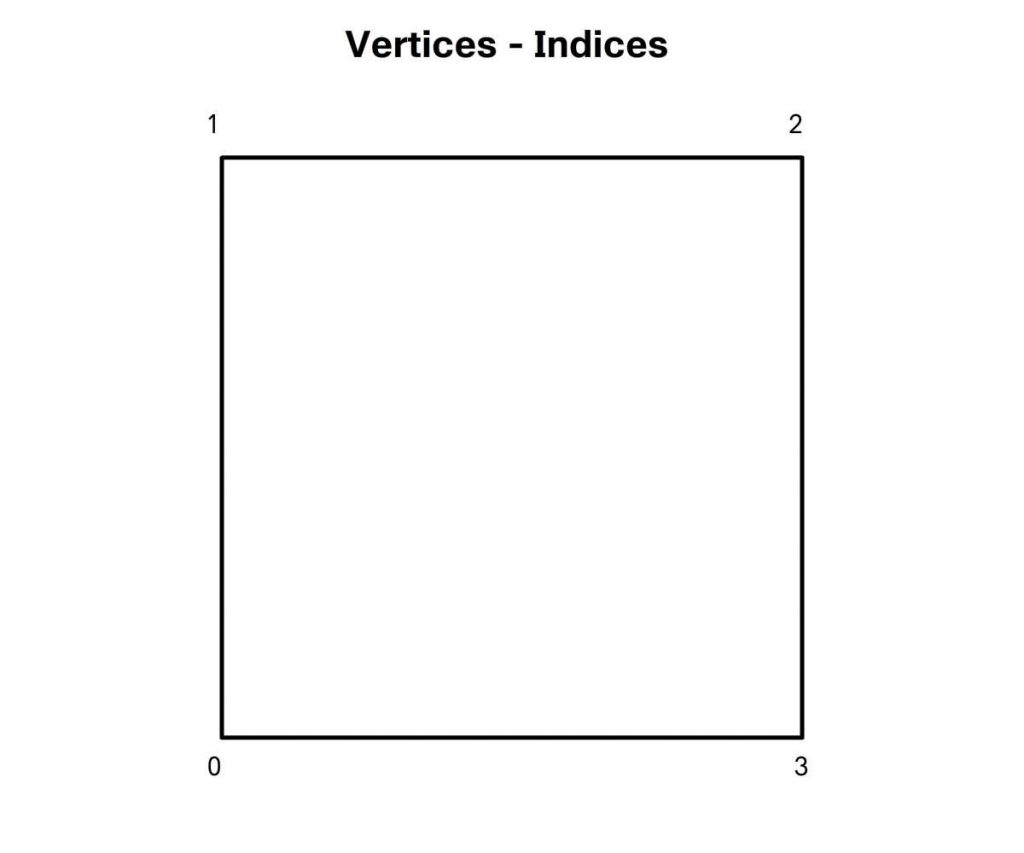
WebGL can draw points, lines and triangles. To render our quad we need to define two triangles by defining the indices of the vertices. When we do this we’re creating what WebGL describes as an Element. Let’s do that using another function, createQuadElement. First we define the indices.
Vertices – IndicesTriangle using vertex indices 0, 1 and 2Triangle using vertex indices 0, 2 and 3
Bottom-left, top-left, top-right for triangle one and bottom-left, top-right, bottom-right for triangle two.
WebGL is all about buffers. This is how we pass data from the CPU to the GPU. Before we can pass any data we need to inform WebGL which buffer we’re passing the data to. We do this using bindBuffer. When we do this we need to inform WebGL what type of data we’re passing so it knows where to store it. For indices we use ELEMENT_ARRAY_BUFFER. And the second parameter is the CPU based buffer. Now WebGL is ready to receive data. This uses the WebGL bufferData method. Again we specify the target type, then the data, here we convert the JS array to an unsigned 16-bit integer array, this is the format that WebGL expects to store indices. The last parameter is the usage value. STATIC_DRAW means the data is going to be defined once and then used multiple times. You use DYNAMIC_DRAW when the data is likely to be updated regularly. This helps the GPU when allocating memory.We return an object with length and indexBuffer properties.
function createQuadElement() {
   const indices = [0, 1, 2, 0, 2, 3];

   //Create indices buffer
   const indexBuffer = gl.createBuffer();

   gl.bindBuffer(gl.ELEMENT_ARRAY_BUFFER, indexBuffer);
   gl.bufferData(
      gl.ELEMENT_ARRAY_BUFFER,
      new Uint16Array(indices),
      gl.STATIC_DRAW
   );

   return {
      length: indices.length,
      indexBuffer
   };
}
Back to the init method. Add a call to this method after defining the vertices.
glRect = createQuadElement();
OK, so now gl is a webgl context for a canvas and glRect is a WebGL element defining two triangles by indices. But at this stage WebGL doesn’t have any data about the triangles other than indices. It will need to know the vertex positions and for the shader we’re going to create it will need to know about the uv values. This involves a two stage process. First we define how we transform the vertex position values to canvas space in the vertex shader and what colour to use for each pixel in the fragment shader. For this we need a new function, setupProgram. A program in WebGL is a combination of a compiled vertex shader and fragment shader. After creating a program you can add attributes to the program. For our vertex shader we will have a vec2 uniform that will contain the screen width and height. An attribute defining the vertex position and another the uv. We need to pass an interpolated version of the uv to the fragment shader so we add a varying. The main function passes the uv value. Then we create a coord value.
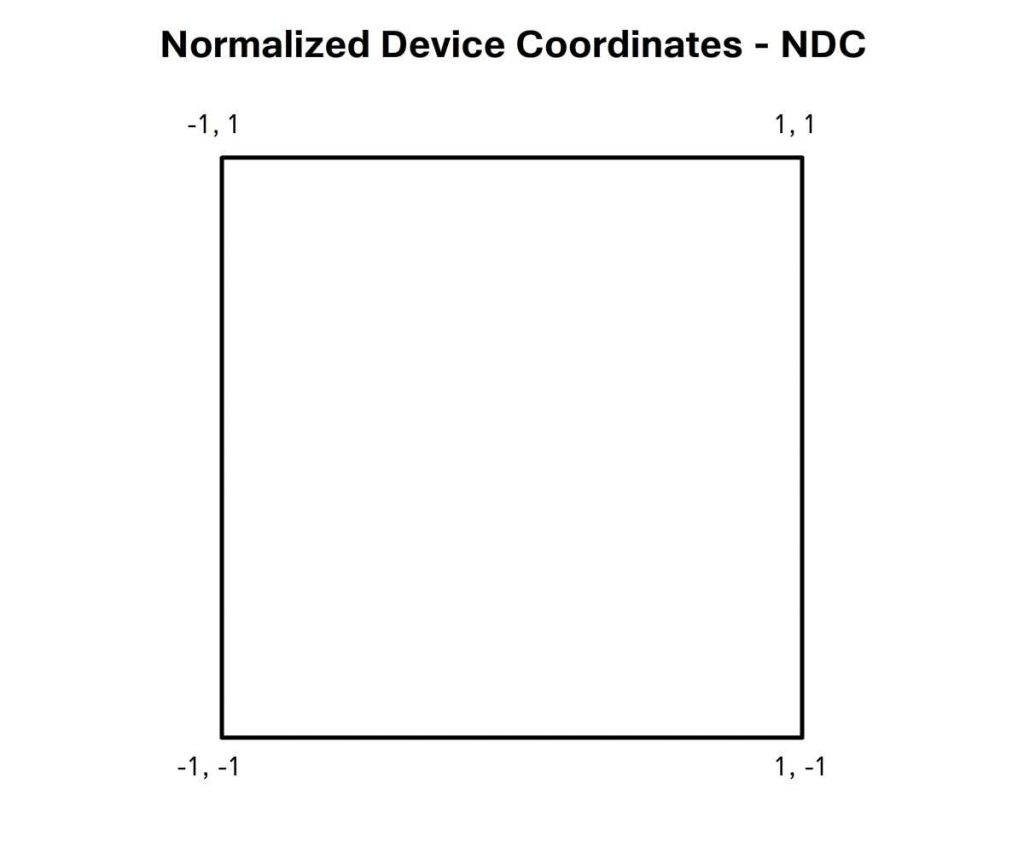
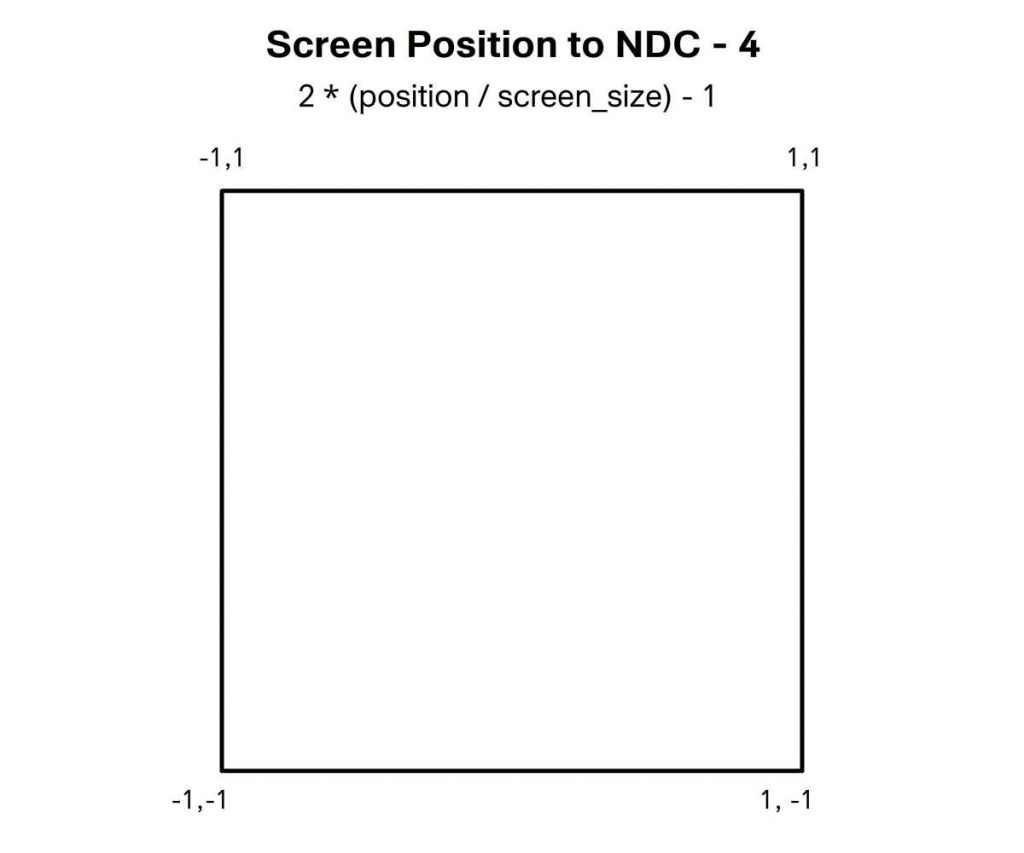
Normalized Device Coordinates – NDC
Remember normalized device coordinates? To be on screen the x, y and z values must all be in the range -1 to 1. Position is a window coordinate.
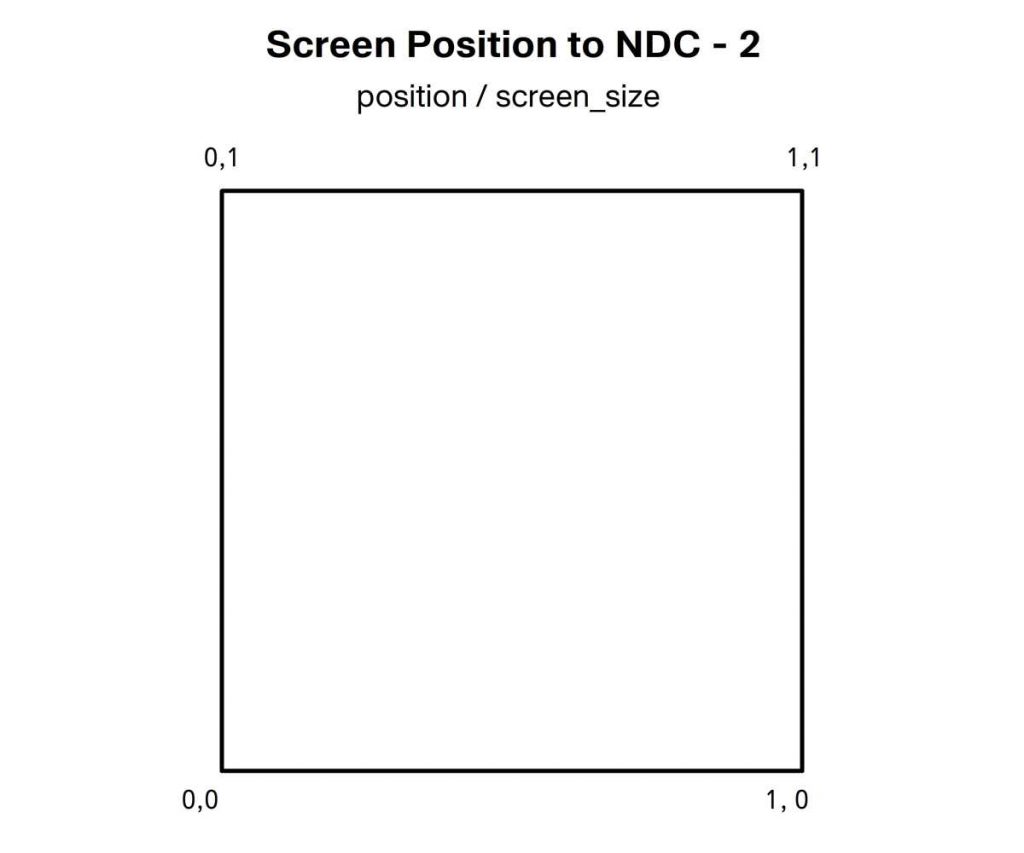
Screen Position to NDC – Step 1
At 0, 0 we want to convert this to -1, -1 and at window top right this should be 1, 1. If we divide position by screen_size then all positions on screen are in the range 0 to 1.
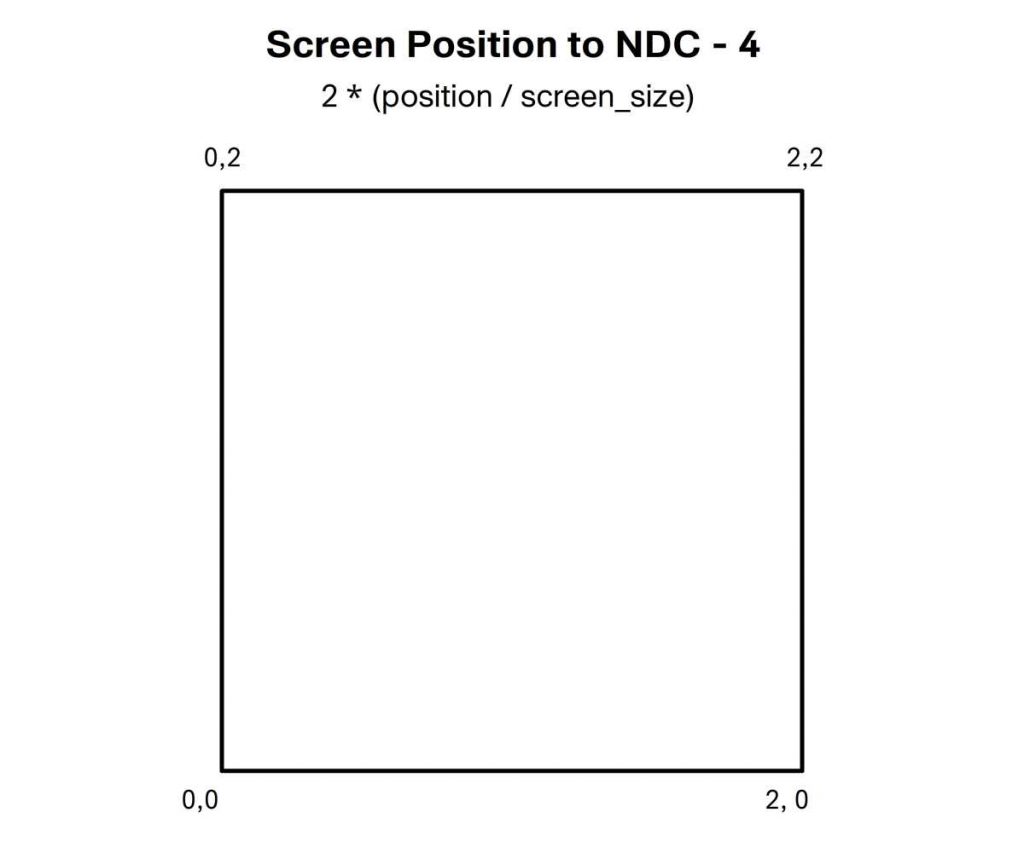
Screen Position to NDC – Step 2
Multiply this by 2 and now we have a range of 0 to 2.
Screen Position to NDC – Step 3
Subtract one and we’re in the range -1 to 1.
Screen Position to NDC – Step 4
We set the z and w values to 1. Z could be -1 or 0. But if it is less than -1 or greater than 1 it would be clipped and you’d get a blank canvas.
The fragment shader is super simple. We define a precision. Define the varying uv. And in the main function use vUv for the red and green channels. Remember in the fragment shader the value of vUv will be an interpolated value of all the vertices in the triangle based on the fragments location in the triangle. Blue is set to 0 and alpha to 1. Then we call compileShaders to create the program. All would be well if compileShaders existed, time to create this function.
Let’s keep things simple. Let’s split the task into making two shaders and then making a program from the compiled shaders. The makeShader function we’re going to write needs two parameters. The first will be the shader type and the second the text source. Our makeProgram function will take the compiled shaders and return a program. Because in this example there is only one program we’ll add use program to tell WebGL to make the newly created program the active one.
OK. So now we need makeShader and makeProgram. Let’s start with makeShader. Remember this takes two parameters; the type, vertex or fragment and the source. We use the WebGL method createShader passing the type. Then we pass the source. Now we compile the shader. Better check all went well. The WebGL method getShaderParameter returns true if compilation was successful when used with the query flag compile status. If this is false then we tidy up by deleting the shader. Showing a console warn and throwing an error. If all went well then we return the shader.
function makeShader(type, source) {
   const shader = gl.createShader(type);
   gl.shaderSource(shader, source);
   gl.compileShader(shader);
   if (!gl.getShaderParameter(shader, gl.COMPILE_STATUS)) {
      gl.deleteShader(shader);
      console.warn(source);
      throw "Shader is Invalid";
   }
   return shader;
}
Now we have the shaders time to create the WebGL program. The makeProgram function takes the compiled shaders as parameters. We first create a new program using the gl method createProgram. Then we attach the two shaders one at a time using the attachShader method of the WebGL context. To complete the process of creating a program we also need to use the WebGL method linkProgram that finalizes the creation of the data on the GPU. Like creating a shader we should check all went well. We do this using getProgramParameter passing the program and the constant LINK_STATUS. If this returns false then we get the problem using getProgramInfoLog and pass this to console warn. And throw an error.
function makeProgram(vertexShader, fragmentShader) {
   const program = gl.createProgram();
   gl.attachShader(program, vertexShader);
   gl.attachShader(program, fragmentShader);
   gl.linkProgram(program);
   if (!gl.getProgramParameter(program, gl.LINK_STATUS)) {
      console.warn(gl.getProgramInfoLog(program));
      throw "Unable to link Program";
   }
   return program;
}
Back in the init method we can add
program = setupProgram();
We getting close. But currently the program uses a uniform and two attributes. Currently we haven’t passed this data to the program. To pass the uniform we’ll use another function set2fUniform with three parameters; the program, a uniform name and the values to pass. The 2f refers to two floats or a vec2. We need a pointer to the memory location of this uniform. We get this using getUniformLocation. Since initially the uniform does not exist this method both returns an existing uniform and creates a new one. Then to populate a vec2 we use the WebGL method uniform2f, passing the location and 2 float values. We could use values[0] comma values[1]. But the rest parameter symbol three dots converts the values array into just that syntax.
It just remains to set the vertex attributes position and uv for the program. For this we’ll use another function, createAttribute. We’ll use three parameters; program, the attribute name and the vertices array. First we extract an array that only consists of the named property using the JavaScript Array method map. This iterates through the array and returns the value that matches vertex name. We need the size of a single item in this new array. Then we create a new buffer. We get the location of the attribute on the GPU using the WebGL method getAttribLocation. Just like uniforms this has a dual purpose it can return the position of an existing attribute or create a new one. Now we prepare the location by calling enableVertexAttribArray. We bind the buffer, using the constant type ARRAY_BUFFER. The next WebGL call is to vertexAttribPointer. This describes to the GPU how to use the currently bound buffer. It takes the location, the size of each item in the array, the type of data, whether to normalize the data to a range based on the type. Since this does not apply to floats we set it to false. Parameter five is the stride, you can put gaps between each element, for this example the data is tightly packed so stride is 0. And the last parameter is an offset value to the first item, again this is 0 for our purposes.
Now we create a helper attribute. This is so we can update the position attribute at run time if the window changes size. It has the values array, the buffer and a refresh method as properties. The refresh method binds the buffer, then passes data using the bufferData method of the WebGL context. For this we need to convert the values into a typed array, each element in the array must be a single float not an array. JavaScript has a useful method flat which converts an array of arrays into a simple array. Now we have this helper we can call the refresh method to actually pass the CPU data to the GPU.
We just need one more function. This time to draw the glRect element. Or any other element that is made up of triangles. We simply call the WebGL method drawElements. For this example the type is TRIANGLES. We pass the length property of the element, remember that’s the number of indices. The index type and the buffer.
function drawElement(element) {
   gl.drawElements(
      gl.TRIANGLES,
      element.length,
      gl.UNSIGNED_SHORT,
      element.indexBuffer
   );
}
In the resize method. Add
if (glRect) drawElement(glRect);
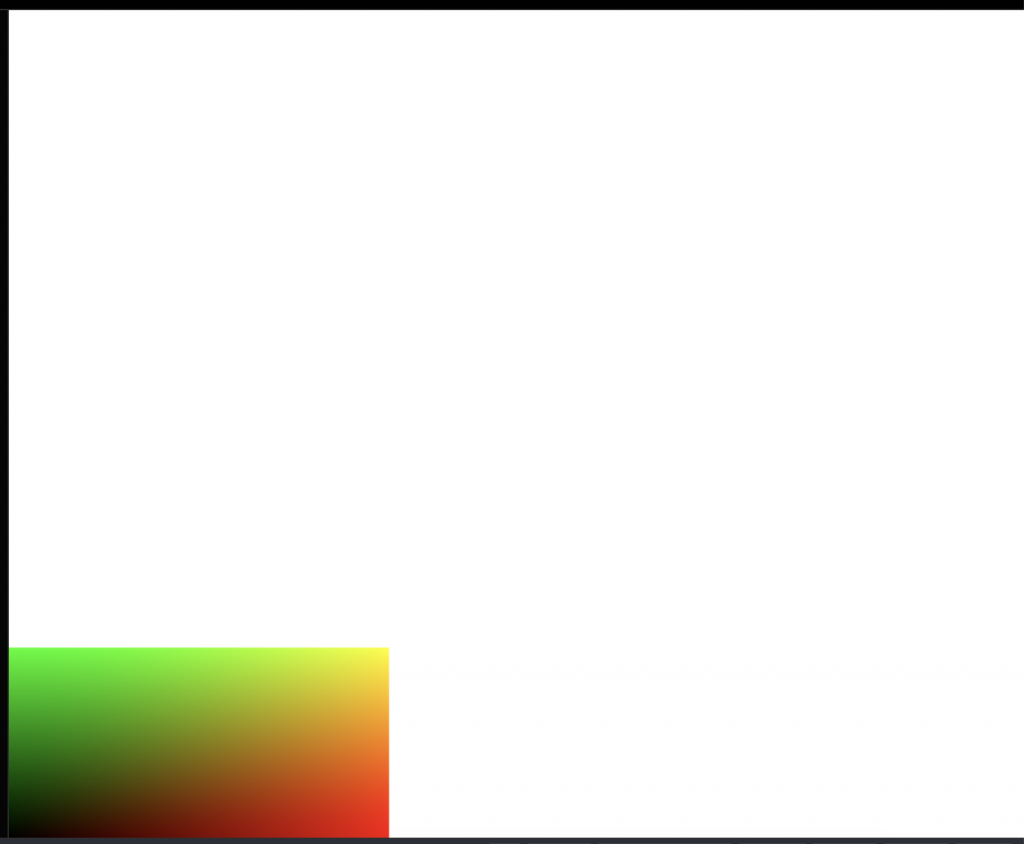
Viewport not set
The shader is just in the bottom left. By default the gl viewport will be 300 x 150, the canvas size at the time the context was created. In the resize method add
if (gl){
   gl.viewport(0, 0, window.innerWidth, window.innerHeight);
}
Much better, but there’s still a problem. If the window changes size then the uniform screen_size will have the wrong values and the attribute position will also be wrong.
If program exists then call the set2fUniform function passing the program, screen_size and the window size. If position exists then update the values array and call its refresh method.
Unity have just contracted me to write their DOTS, Data Orientated Technology Stack e-book. To celebrate I thought I’d have a sale of my Unity courses. They’ll be at the best price on Udemy through to Tuesday. Time to grab a bargain!
A Complete Guide to Unity’s Universal Render Pipeline
As Unity gradually switches to URP from the Built-in Render Pipeline, it’s time to learn the new techniques from the author of Unity’s URP e-books.
The theme of this years competition is announced. 13th century. I gave it some thought and decided on a quest for the Holy Grail. I’m doing a WebXR game using ThreeJS. I’ve already created a working project framework using npm and webpack with help from Matt McKenna.
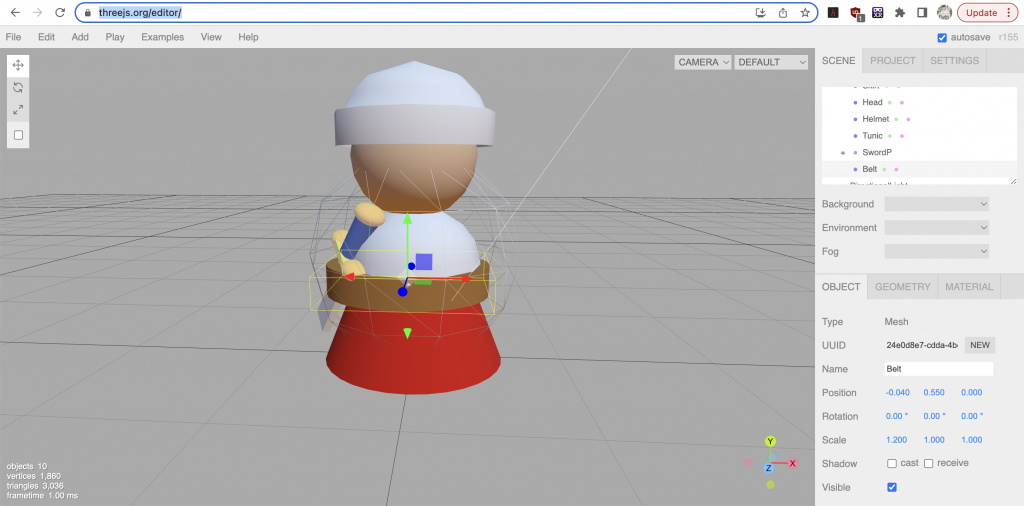
With a 13k size limit Blender models are a no-no. All assets need to be created in code. I fiddled with the ThreeJS Editor and came up with this as the player character.
Sir Coadalot in the ThreeJS Editor
Downloading this as a JSON file is 12K uncompressed. Let’s remake it in code.
14th August
Big day. Before the competition theme was announced I’d been working on the key components I thought my game would need. A VRButton. I’d already created one for my WebXR course. But I made a tweak to it for displaying the VR Cardboard icon from an svg string.
vr-cardboard.svg icon
I had created the most basic 3D physics engine. If you look in the source you’ll find it in the src>SimplePhysics folder. Just 3 files,
SPWorld.js
This is where rigid bodies are added and collisions calculated
SPBody.js
A single rigid body
SPCollider.js
A SPBody instance has a single collider which can only be a Sphere or a AABB ( Axis Aligned Bounding Box )
SimplePhysics demo
Minified and zipped it comes in under 2K.
If you want to see it in action and you’ve downloaded the repo then rename index.js as index-game.js and rename index-sp.js as index.js. If you’ve got the game running that’s npm run start then you can see it in a browser using localhost:8080. The physics isn’t perfect to say the least but needs must when the entire game budget is only 13k.
My first step in creating the game was to change a sphere into my player character. The downloaded json file from the ThreeJS editor game the necessary geometries, material colours and mesh positions and orientations. Here’s the code to create the knight.
createModel(){
  const gSkirt = new THREE.CylinderGeometry(0.4, 0.6, 0.5, 32, 1, true );
  const gHead = new THREE.SphereGeometry(0.4, 24, 10);
  const pHelmet = [
    new THREE.Vector2(0.5, 0),
    new THREE.Vector2(0.5, 0.2),
    new THREE.Vector2(0.45, 0.2),
    new THREE.Vector2(0.4, 0.3),
    new THREE.Vector2(0.3, 0.4),
    new THREE.Vector2(0, 0.5),
  ];
  const gHelmet = new THREE.LatheGeometry(pHelmet, 12);
  const pTunic = [
    new THREE.Vector2(0.45, 0),
    new THREE.Vector2(0.43, 0.1),
    new THREE.Vector2(0.4, 0.2),
    new THREE.Vector2(0.32, 0.3),
    new THREE.Vector2(0.16, 0.4),
    new THREE.Vector2(0.05, 0.5),
  ];
  const gTunic = new THREE.LatheGeometry(pTunic, 12);
  const gBelt = new THREE.CylinderGeometry(0.45, 0.45, 0.2, 32, 1, false);

  const mSkirt = new THREE.MeshStandardMaterial( { color: 15991041 } );
  const mHead = new THREE.MeshStandardMaterial( { color: 16373422 } );
  const mHelmet = new THREE.MeshStandardMaterial( { color: 0xC7C7C7 } );
  const mTunic = new THREE.MeshStandardMaterial( { color: 16777215 } );
  const mBelt = new THREE.MeshStandardMaterial( { color: 12615993 } );

  const root = new THREE.Group();
  const skirt = new THREE.Mesh( gSkirt, mSkirt );
  skirt.matrix.fromArray(
    [1,0,0,0,0,1,0,0,0,0,1,0,0,0.25,0,1]
  );
  root.add(skirt);
  const head = new THREE.Mesh( gHead, mHead );
  head.matrix.fromArray(
   [1,0,0,0,0,1,0,0,0,0,1,0,0,1.3466628932086855,0,1]
  );
  root.add(head);
  const helmet = new THREE.Mesh( gHelmet, mHelmet );
  helmet.matrix.fromArray(
   [1,0,0,0,0,1,0,0,0,0,1,0,0,1.4010108612494776,0,1]
  );
  root.add(helmet);
  const tunic = new THREE.Mesh( gTunic, mTunic );
  tunic.matrix.fromArray(
    [1,0,0,0,0,1,0,0,0,0,1,0,0,0.6106004423389476,0,1]);
  root.add(tunic);
  const belt = new THREE.Mesh( gBelt, mBelt );
  belt.matrix.fromArray(
    [1.2,0,0,0,0,1,0,0,0,0,1,0,-0.04,
     0.5495005511829094,0,1]
  );
  root.add(belt);

  root.traverse( object => {
    if ( object.matrixAutoUpdate ){
      object.matrix.decompose( object.position, object.quaternion, object.scale );
     }
   });

  return root;
}
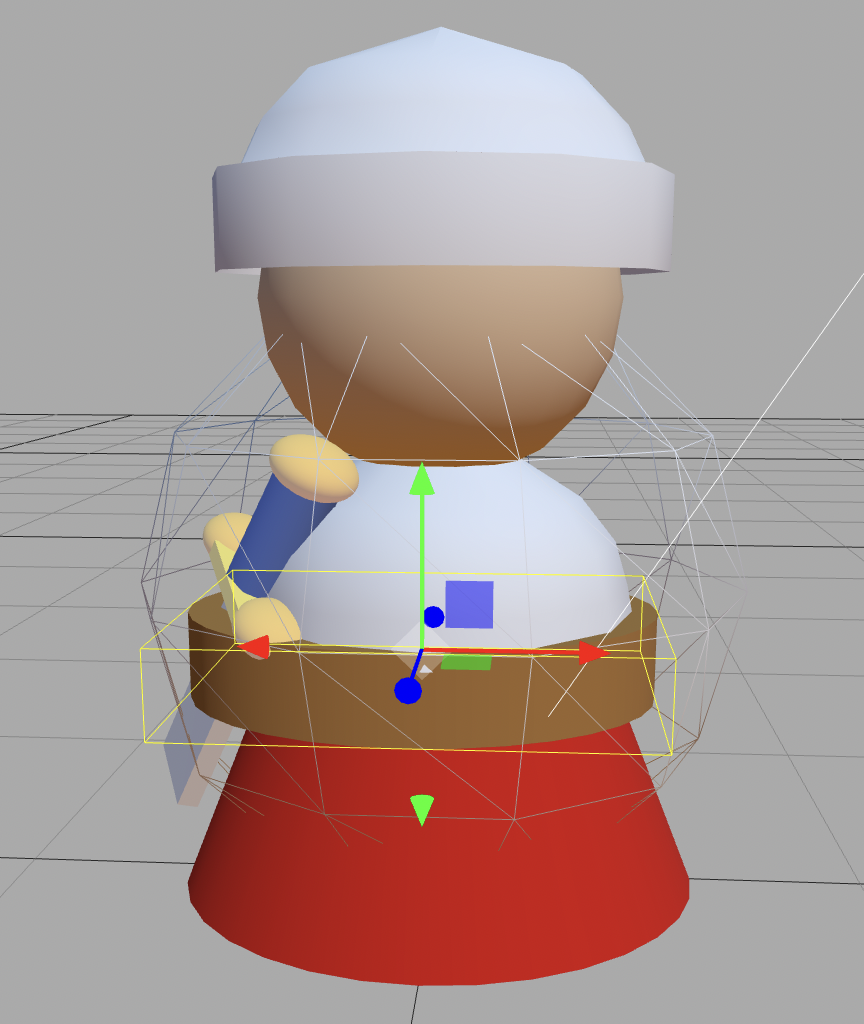
Sir Coadalot
I also created a castle tower in code. I added my JoyStick control for testing on the desktop. Put it all together and had this – not bad for day 1
August 15th
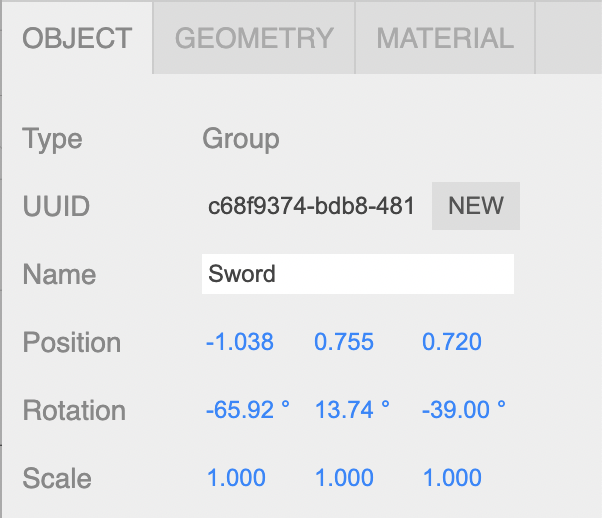
I worked on animations for the player character today. Given the tight 13k budget. Using a 3D content creator like Blender and exporting as a GLB is a none starter. So I used the ThreeJS Editor, carefully moving and rotating the sword root object into various poses then writing down its position and rotation.
Inspector panel in the ThreeJS Editor
Having got a set of keyframes. I created a JS object.
Of course the player needs an enemy. Meet the Black knight. Just the same with different material colours and one point on the helmet LatheGeometry points array changed.
August 16th
Today I coded the castle walls and towers. Added a DebugControls class to allow keyboard entry when testing using the WebXR emulator on a desktop. I also added some bad guys. Super primitive AI they just move toward the player character. The bad news is I’ve only got 1k left to complete the game. Something might have to go!!! Here’s a screengrab from my Quest2
August 17th
Today I refactored the game. Removed the BasicUI. Removed the OBJParser and the Rock OBJ String. Instead I create a rock using an IcosahedronGeometry instance then randomly perturb the vertex positions.
class Rock extends THREE.Mesh{
  constructor(radius=0.5){
    const geometry = new THREE.IcosahedronGeometry(radius, 8, 6);
    geometry.translate( 0, radius, 0 );
    const vertices = geometry.getAttribute('position');
    for(let i=0; i<vertices.array.length; i++){
      vertices.array[i] += (Math.random()-0.5) * 0.35;
    }
    vertices.needsUpdate = true;
    const material = new THREE.MeshPhongMaterial( {color: 0xaaaaaa } );
    super(geometry, material);
  }
}
I limited the scene to one tree type. This gained me 2K. I was unfeasibly happy by this. That’s what happens with this competition! And makes it fun.
I updated the castles, created Player and Enemy classes that extend the Knight class so I can create the models using the Knight class but have different behaviour for the Player and an Enemy. And I created some new props.
Props
August 18th
Today I setup patrolling for the bad guys. Just a four cornered path and the enemy moves around this path unless the player is within 10 world units. I also started work on the introduction panel and gameover panel. No way in the byte allowance I can use a custom font. That would blow the budget straightaway.
Patrolling
August 19th
Main thing today was making the sword functional. I added an Object3D to the end of the sword. In the Player update method I do a check using the physics engine to see if this object position intersects any colliders. If the ThreeJS object associated with the physics body has the name ‘Gate’ or ‘Enemy’, I call methods of the object. For Gate that is the method openGate. I have a problem though I only have 33 bytes left. I did some checking, removing the sfx increases the bytes to 330. But removing the CollisionEffect increases the remaining bytes to over 2K. All assets are nearly complete. So 2K should be enough. Looks like I need to simplify the CollisionEffect.
Opening Gate
August 20th
A week into the competition and the game is developing well. I was travelling today so didn’t do much. I created a ForceField that will be visible for 10secs after a Shield pickup. It uses an InstancedMesh. An InstancedMesh instance takes geometry and material just like a Mesh. In addition it has a third parameter, count. The count parameter is the number of duplicates of the geometry. To position and orientate each mesh you use the setMatrixAt method. Passing an index and a matrix. Here’s the update method showing how the motion of the shields is handled.
update(dt){
  this.time += dt;

  const PI2 = Math.PI * 2;
  const inc = PI2/ForceField.count;
  let index = 0;

  for(let row=0; row<ForceField.rows; row++){
    const n = (row % 2) ? 1 : -1;
    const y = (ForceField.height/ForceField.rows) * row;
    for(let i=0; i<ForceField.count; i++ ){
      const t = (this.time * n) % PI2;
      const r = (this.time * -1) % PI2;
      const z = Math.sin(t+i*inc) * ForceField.radius;
      const x = Math.cos(t+i*inc) * ForceField.radius;
      this.obj.position.set(x,y,z);
      this.obj.rotation.set(0,t,0);
      this.obj.updateMatrix();
      this.meshes.setMatrixAt( index ++, this.obj.matrix );
    }
  }

  this.meshes.instanceMatrix.needsUpdate = true;
}
ForceField
August 21st
Travelling again today so didn’t achieve much. Main thing was rewriting the CollisionEffect as a InstancedMesh, rather than extending the custom class GPUParticleSystem. Gained nearly 1700 bytes. Well worth it.
August 22nd-23rd
Lot’s of debugging. I now have the basis of a game. Lots of fine tuning to do. I have 384 bytes left. But a bit of tiding up might gain me enough to add some sound.
4th September
I was away for the last few days with my daughter and the grandkids. Didn’t get anything done! I did a session of debugging yesterday, added a little sound and with 23 bytes left submitted!
13K is a serious limit and restricted what I could add as gameplay. But I really enjoyed working within this restriction. Particularly happy with the physics engine. Looking forward to next years theme.
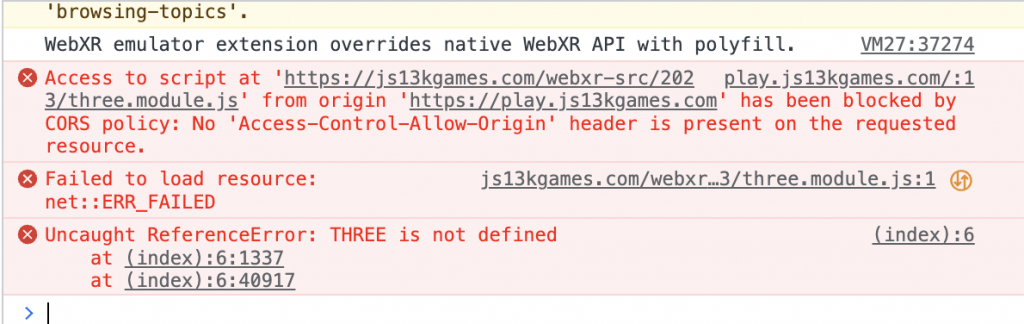
Disappointingly there was a bug on the js13kgames site which made my game unplayable on the voting site so it received no votes and came last in the WebXR category!!! The problem was a cross-origin problem meaning the Three.JS library wouldn’t load from the path provided by the organisers. Frustrating after the spending many hours creating the game. Heh-ho, nevertheless I enjoyed the challenge.
The latest cookbook, I’ve written for Unity is now live. It is all about Universal Render Pipeline (URP) effects and is now available to download for free. The e-book provides 12 recipes for popular visual effects that can be applied to a wide range of games, art styles, and platforms. Get ready to cook up Renderer Features, GPU-instantiated meshes, decals, volumetric materials, and more. You can use it alongside my other Unity e-book, Introduction to the Universal Render Pipeline for advanced Unity creators , which offers a wealth of information about how to use URP for creators that have developed projects with the Built-In Render Pipeline.
Here’s a handy overview of the recipes you’ll find in the book.
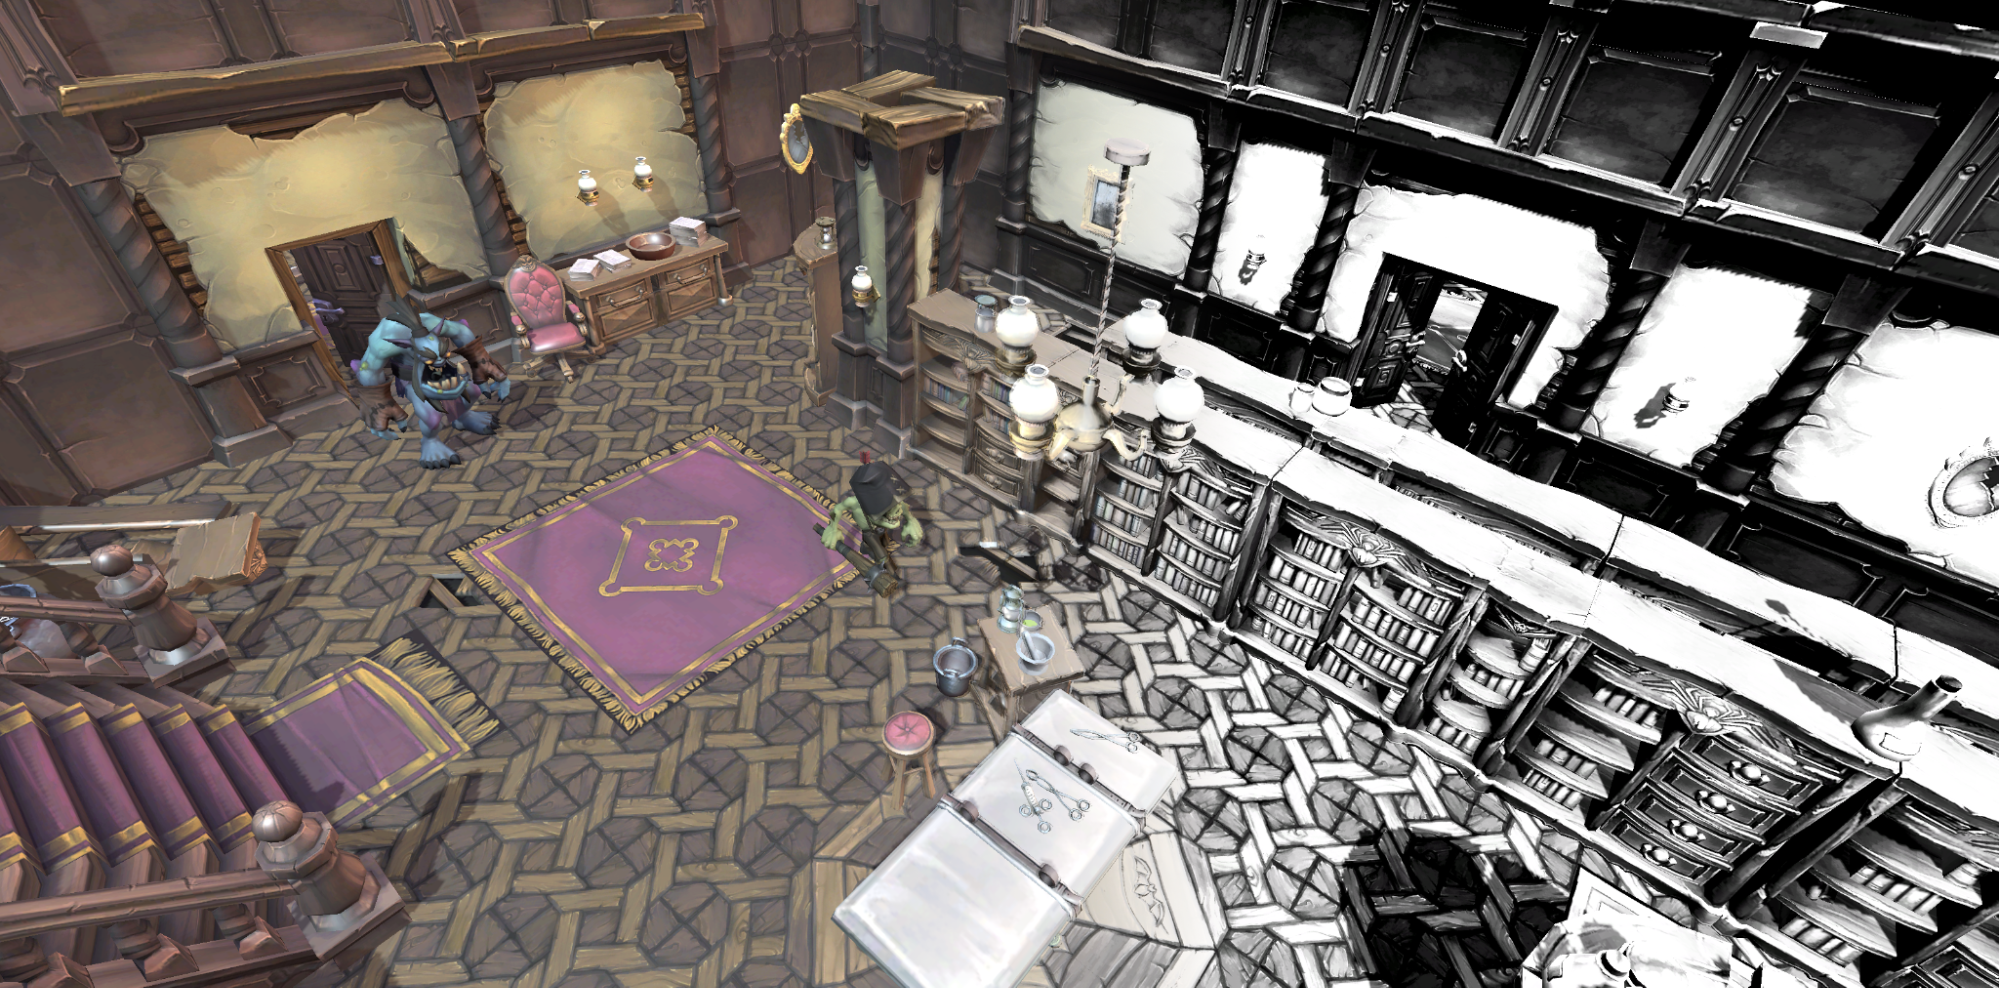
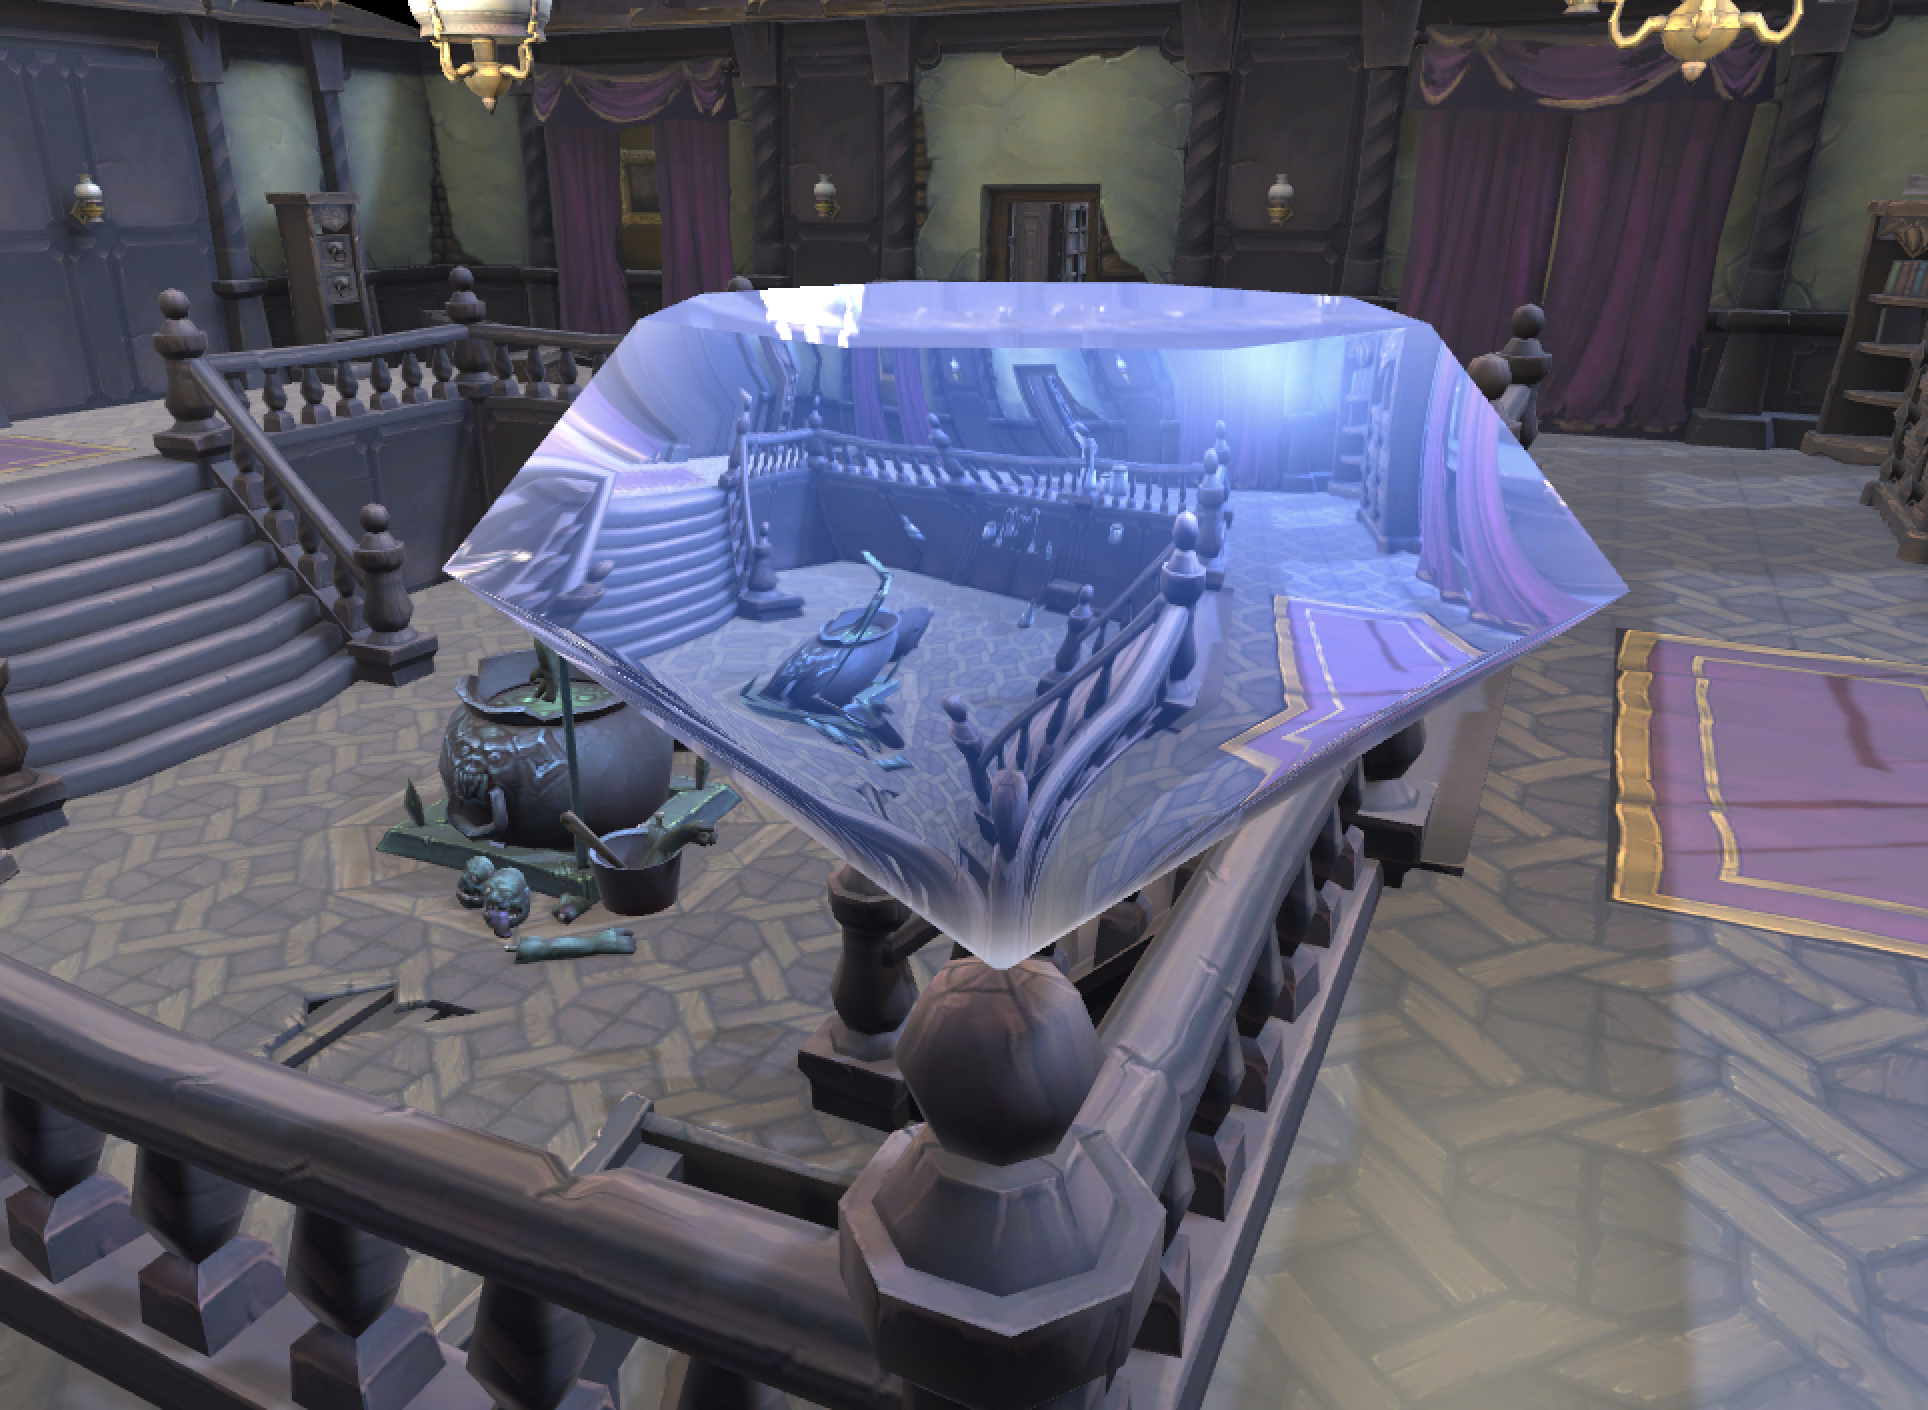
1. Stencils
Renderer features provide you with ample opportunities to experiment with lighting and effects. This recipe focuses on Stencils, using only the bare minimum of required code. If you work alongside the sample project, open the sample scene via Scenes > Renderer Features > SmallRoom – Stencil in the Editor.
The sample project uses the magnifying glass over desk example, and the aim is to convert the lens of the magnifying glass so that it allows you to see through the desk like an x-ray image. The approach uses a combination of Layer Masks, shaders, and Renderer features.
Renderer Features are a great way to achieve dramatic custom effects or gameplay possibilities.
Stencils in action: As the magnifying glass moves over the desk, it can see through the drawers to reveal what’s inside.
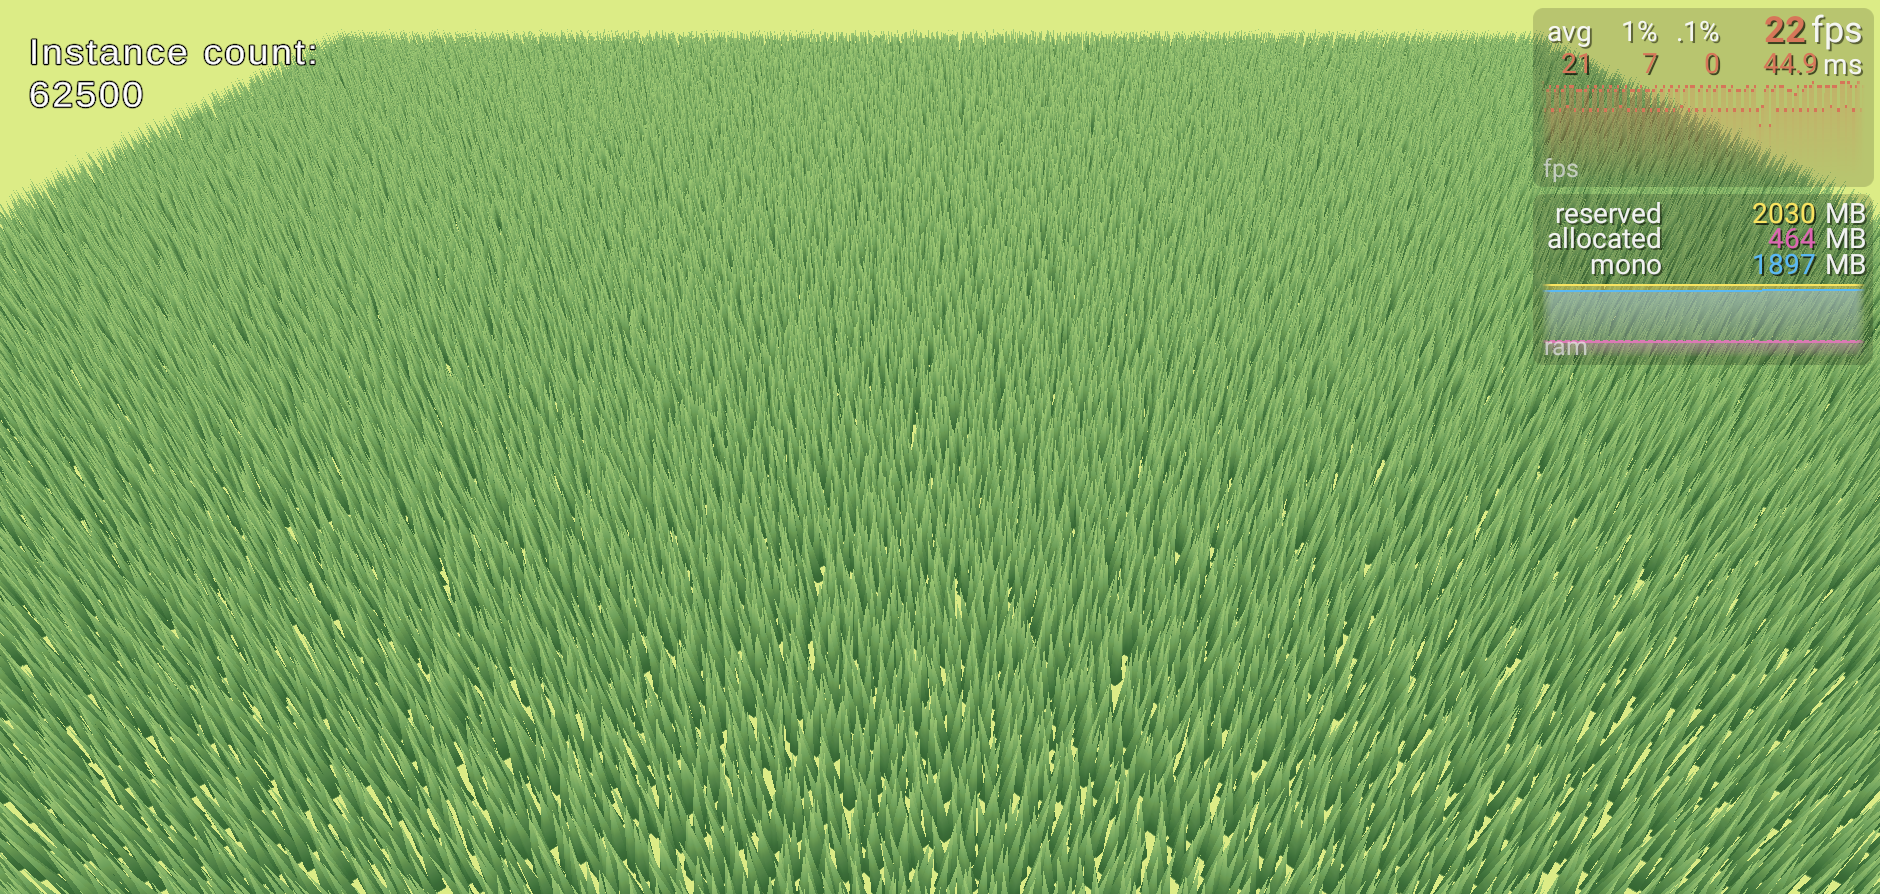
2. Instancing
Exchanging data between CPU and GPU is a major bottleneck in the rendering pipeline. If you have a model that needs to be rendered many times using the same geometry and material, then Unity provides some great tools to do so, which are covered in the cookbook’s instancing chapter.
This recipe uses a field full of grass to illustrate the concept of instancing. It uses the SRP Batcher, GPU instancing, RenderMeshPrimitives, and ComputeBuffers.
A field of grass rendered using an SRP Batcher-compatible material
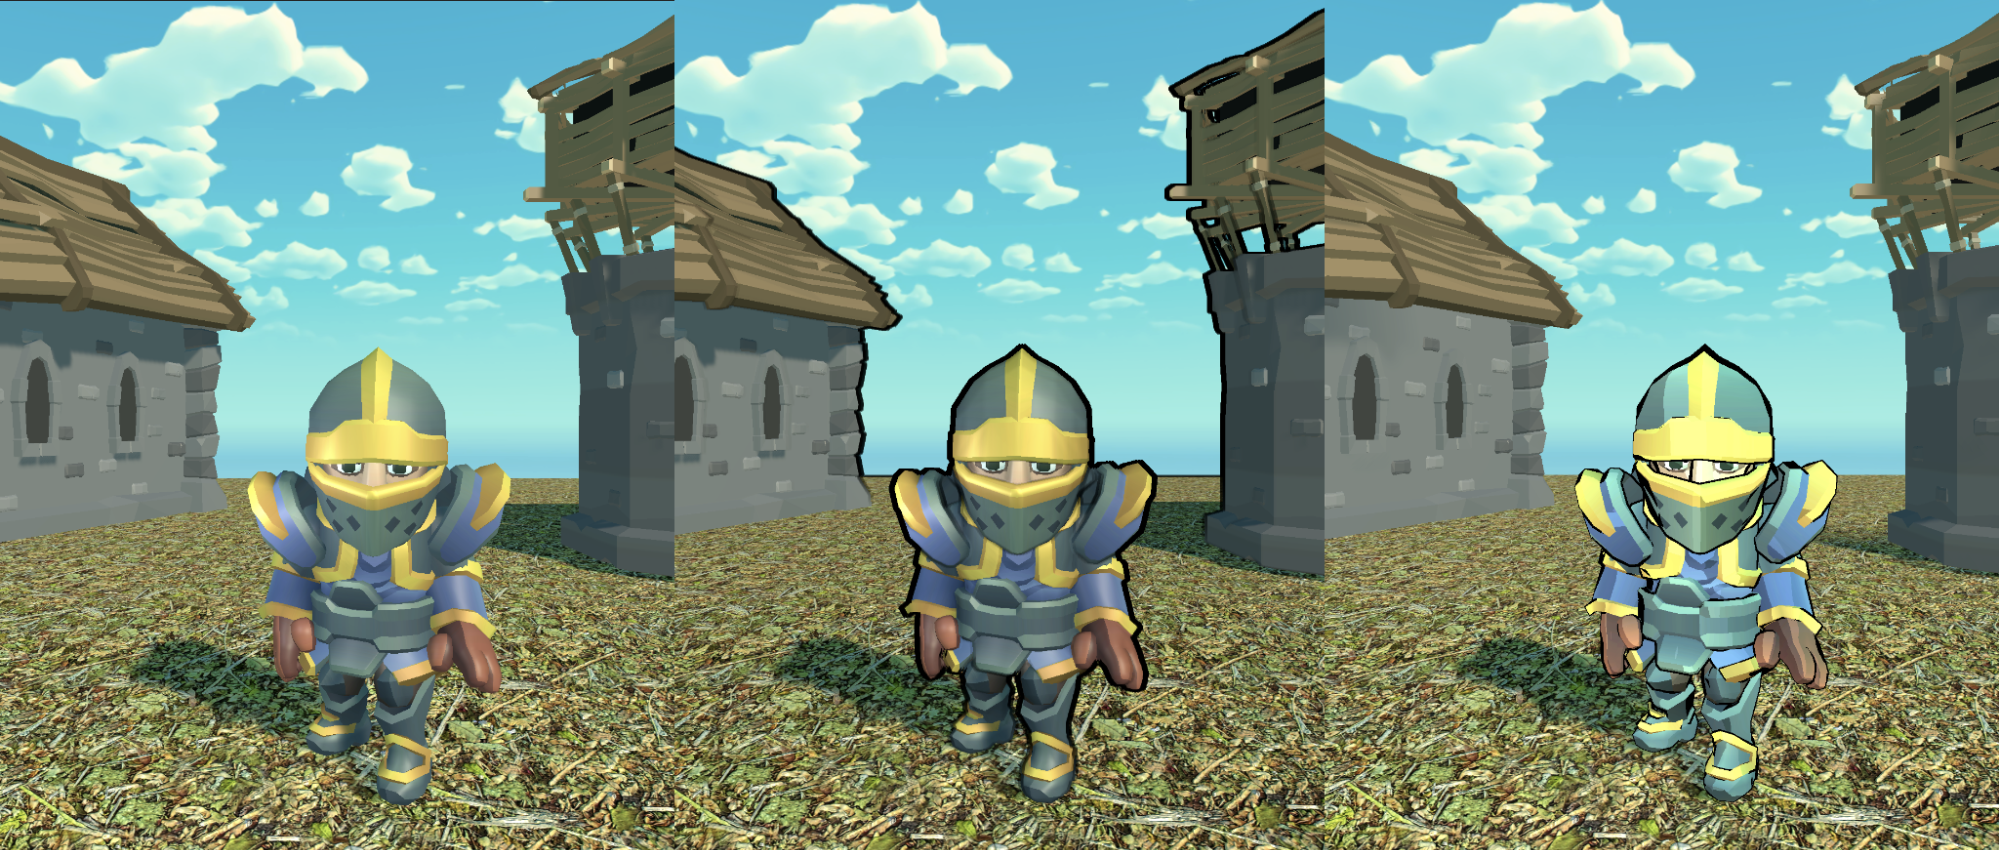
3. Toon and outline shading
Often used together, toon and outline shaders present two distinct challenges. The toon shader takes the cooler that would be created using a URP-compatible Lit shader, and ramps the output rather than allowing continuous gradients, thereby requiring a custom lighting model.
The example in this recipe uses Shader Graph. However, Shader Graph doesn’t support custom lighting, so there’s no node available to directly access the Main and Additional Lights. Instead, you can leverage a custom node to access those.
Check out the Toon and outline shading recipe to get the full details.
One scene, three different looks: Standard shading (left), with post-processing (center), and per-material shading (right)
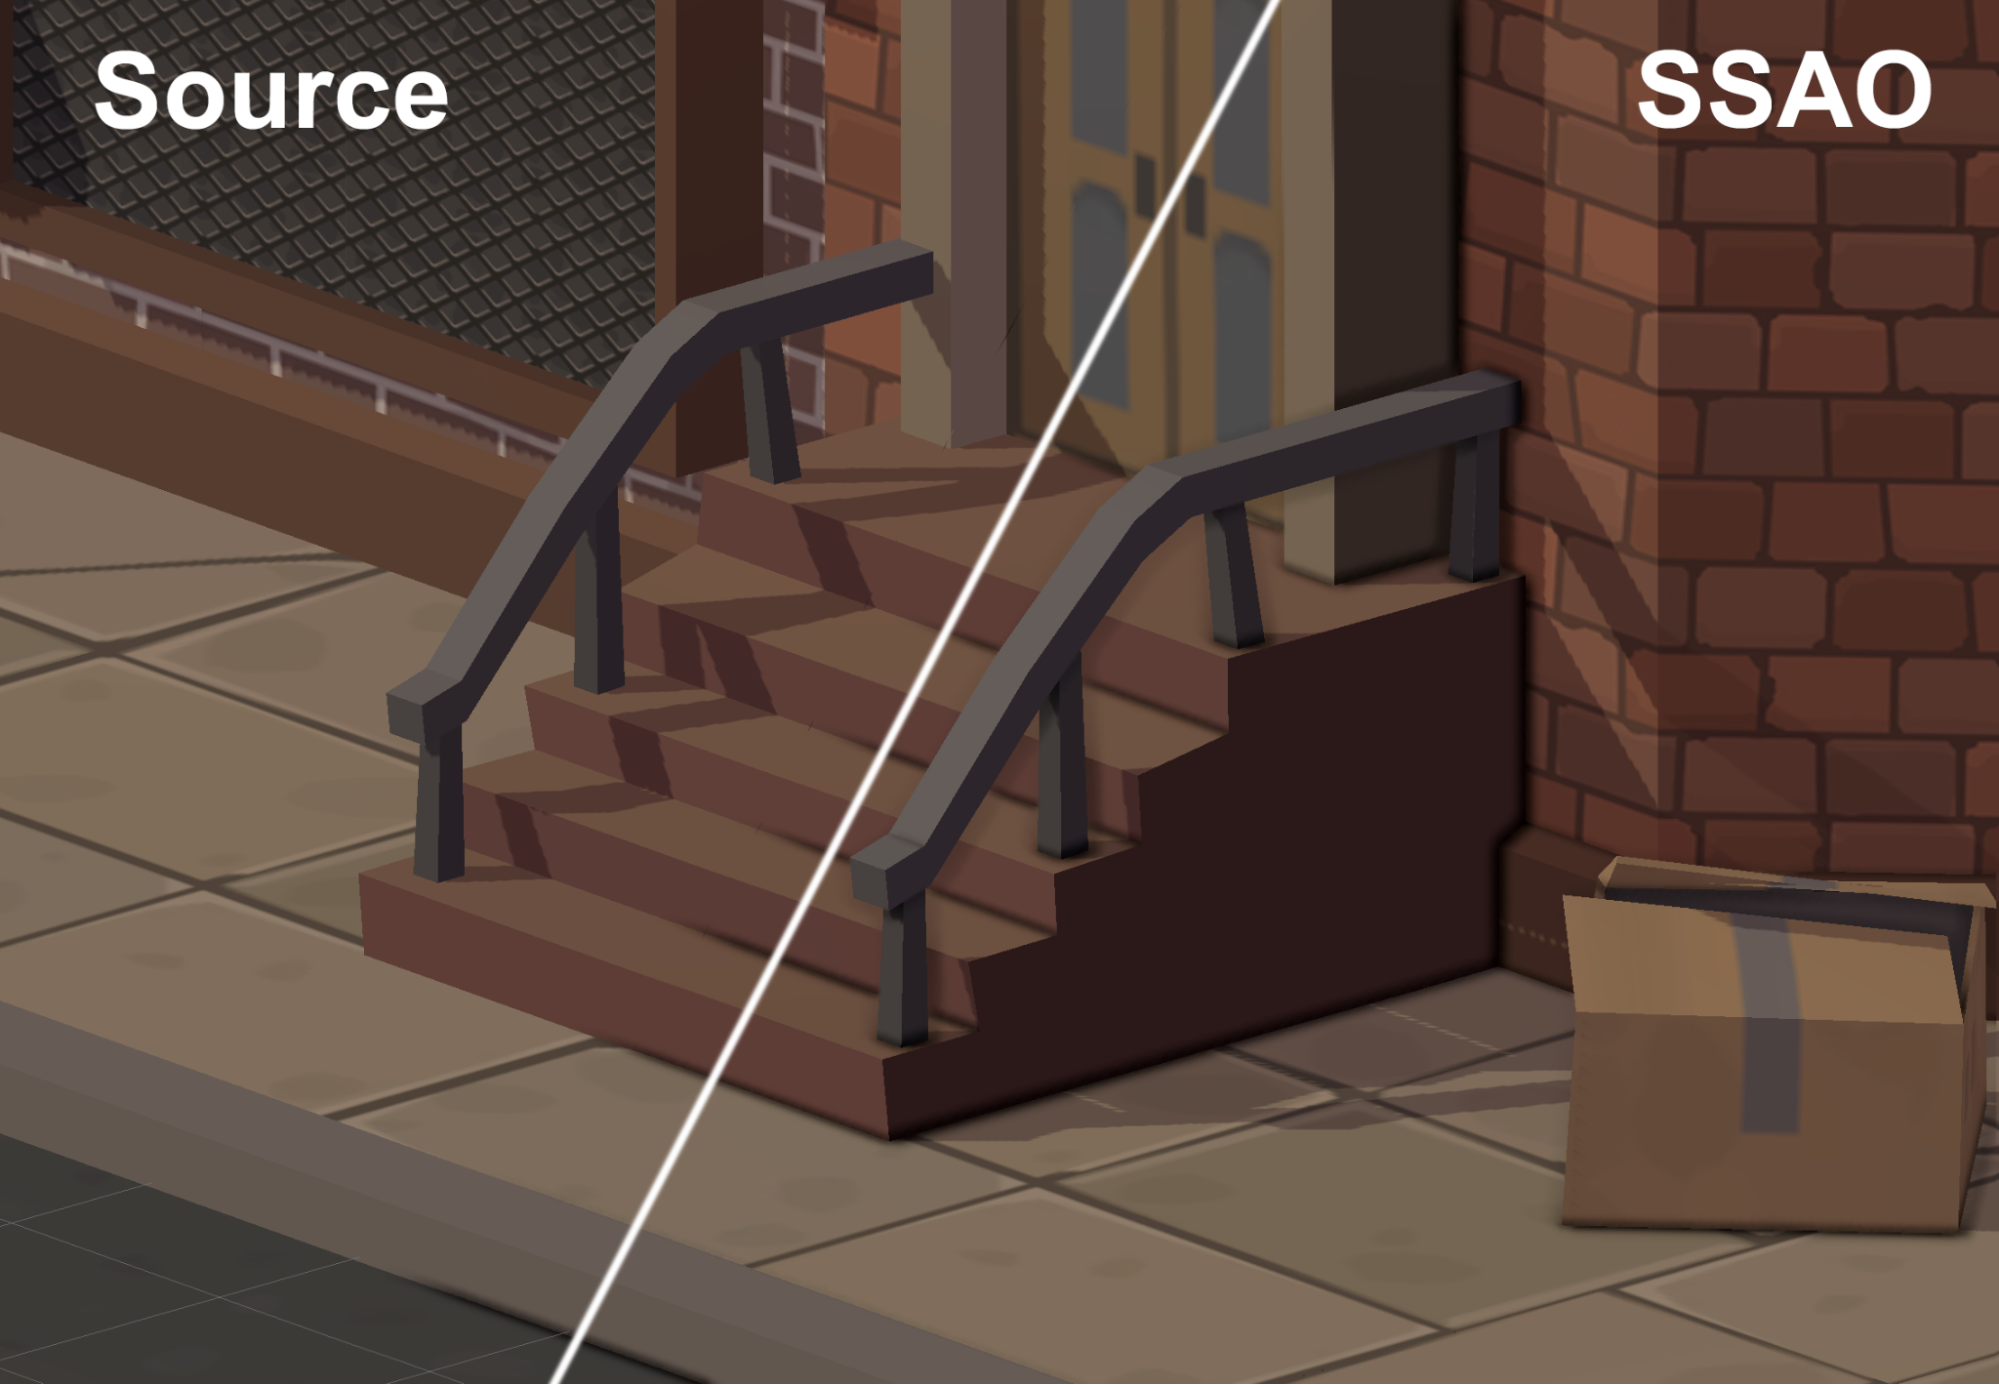
4. Ambient Occlusion
Ambient Occlusion is a post-processing technique available from Unity 2020.2. This effect darkens creases, holes, intersections, and surfaces that are close to one another. In the real world, such areas tend to block out or occlude ambient light, thereby appearing darker.
See how you can implement real-time Screen Space Ambient Occlusion (SSAO) effect as a Renderer Feature using URP.
Screen Space Ambient Occlusion
5. Decals
Decals are a great way to insert overlays onto a surface. They’re often used to add visuals such as bullet holes or tire treads to the game environment as the player interacts with the scene.
If you want to follow along this recipe, you’ll work with URP Decal Projection properties, creating the material, and even adding a decal with code.
A new Decal Projector in action
6. Water
The water recipe is created in Shader Graph to make the steps more accessible. It’s built in three stages:
Creating the water color
Moving tiled normal maps to add wavelets to the surface
Adding moving displacement to the vertex positions to create a swell effect
While this recipe forms the basis of a simple water shader, you can enhance it using Caustic Reflections, Refraction, and Foam.
Simple water shader in motion
7. LUT for color grading
Using LUT Textures is an efficient way to create dramatic color grading, and this approach can be useful in many games. It involves using one filter, but the steps employed apply to all of them.
Using Color Lookup to create grading effects
8. Lighting
Lighting with URP is similar to using the Built-in Render Pipeline. The main difference is where to find the settings.
This chapter in the cookbook covers related recipes for real-time lighting and shadows, including baked and mixed lighting using the GPU Progressive Lightmapper, Light Probes, and Reflection Probes. You’ll pick up enough instruction for a five-course meal!
A few things to keep in mind about shaders and color space: When using lighting in URP, you have a choice between a Lit Shader and Simple Lit Shader, which is largely an artistic decision. If you want a realistic render, you can use the Lit Shader, but if you want a more stylized render, you can use Simple Lit for stellar results.
The diorama scene mixing baked and real-time lighting
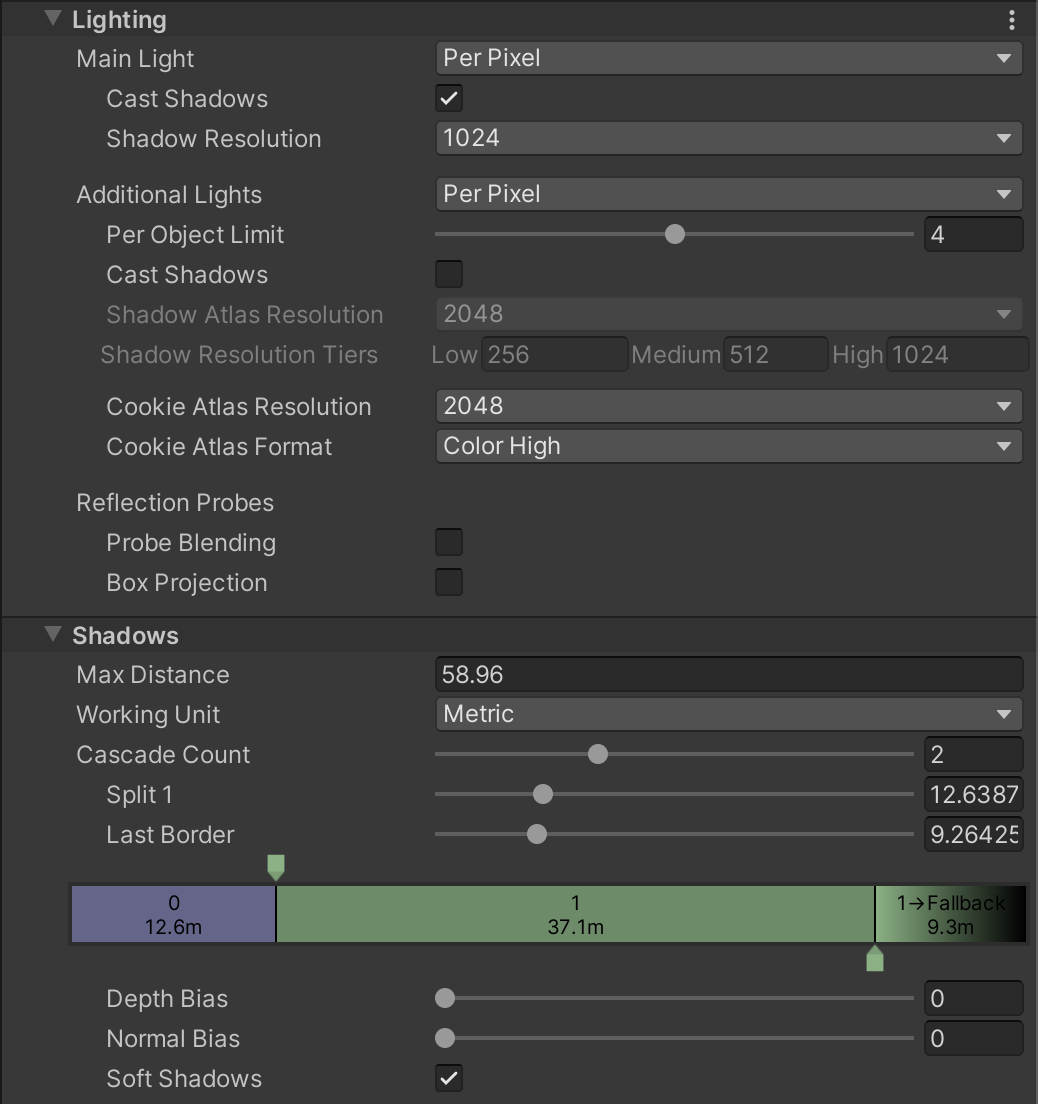
9. Shadows
Shadow settings are set using a Renderer Data object and a URP Asset using URP. You can use these assets to define the fidelity of your shadows.
The URP Asset
This recipe includes tips for: Main Light and Shadow Resolution, Shadow Cascades, baking lights, and more.
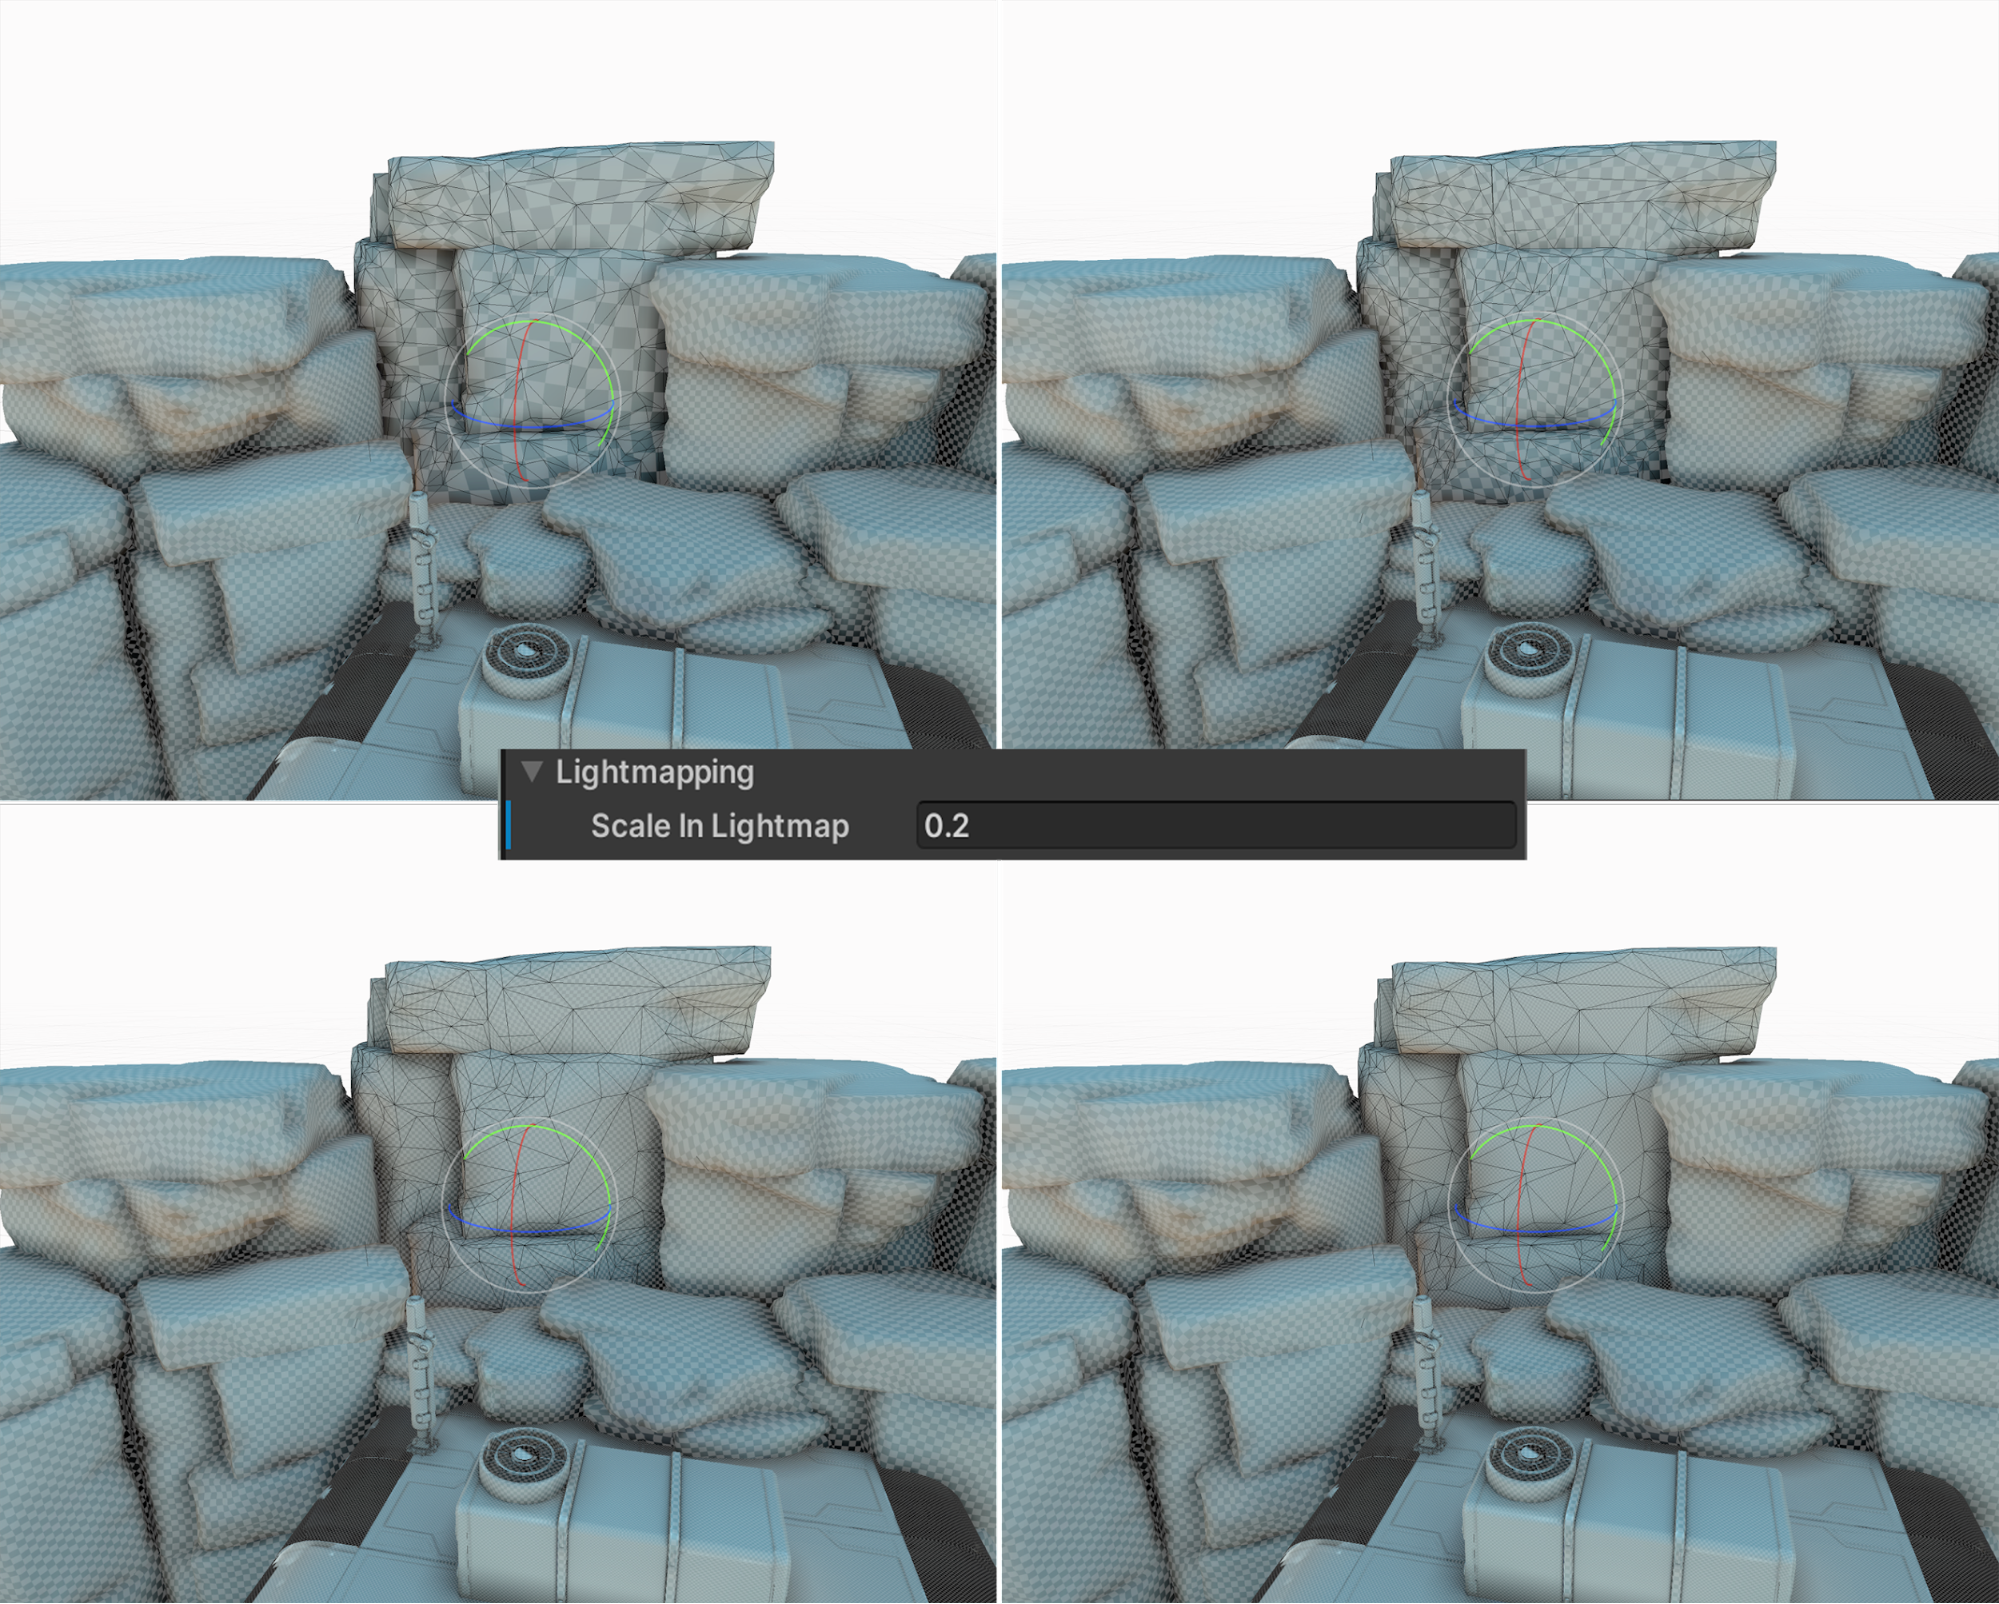
Texel size by scale setting: In the top-left image, texel size is set to 0.5; in the top-right image, 0.2; in the bottom-left image, 0.1, and in the bottom-right image, 0.05.
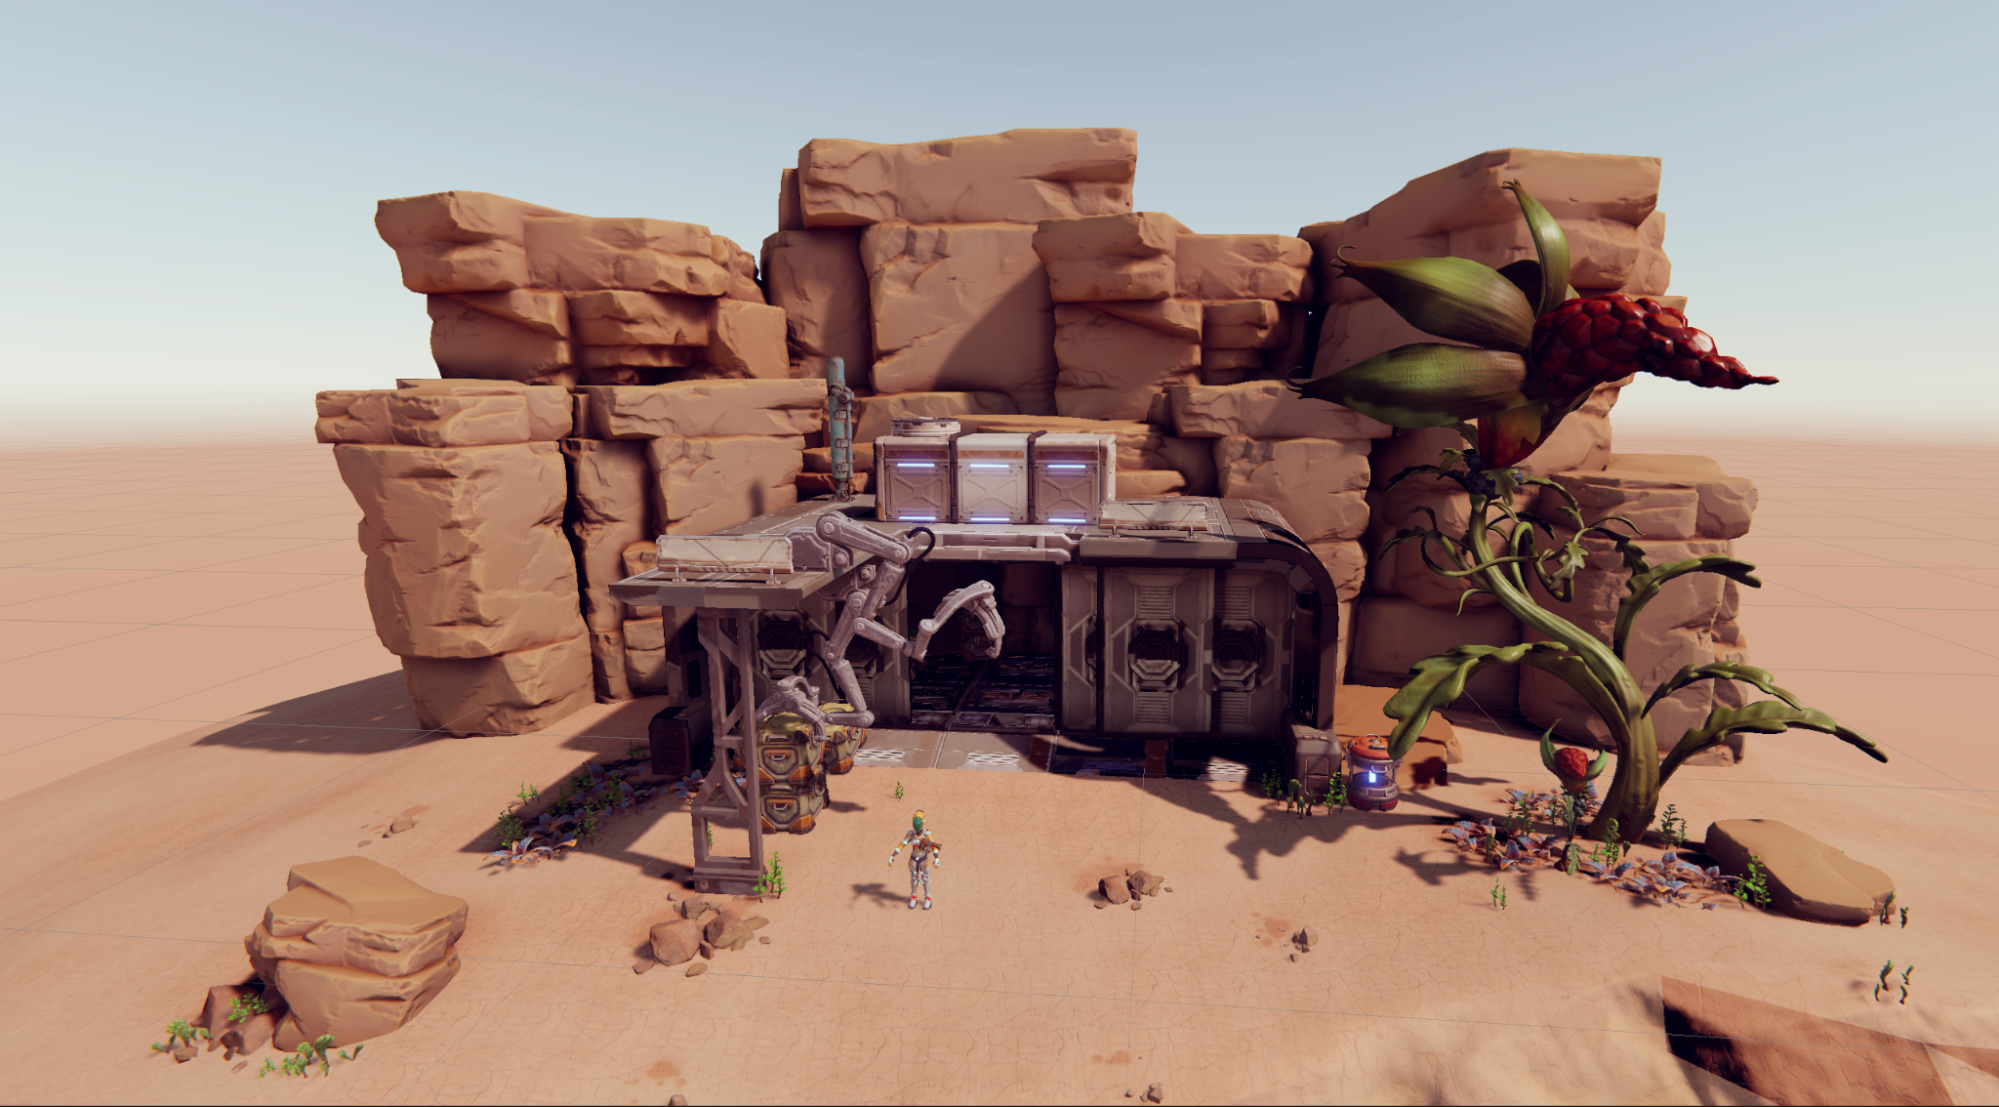
10. Light Probes
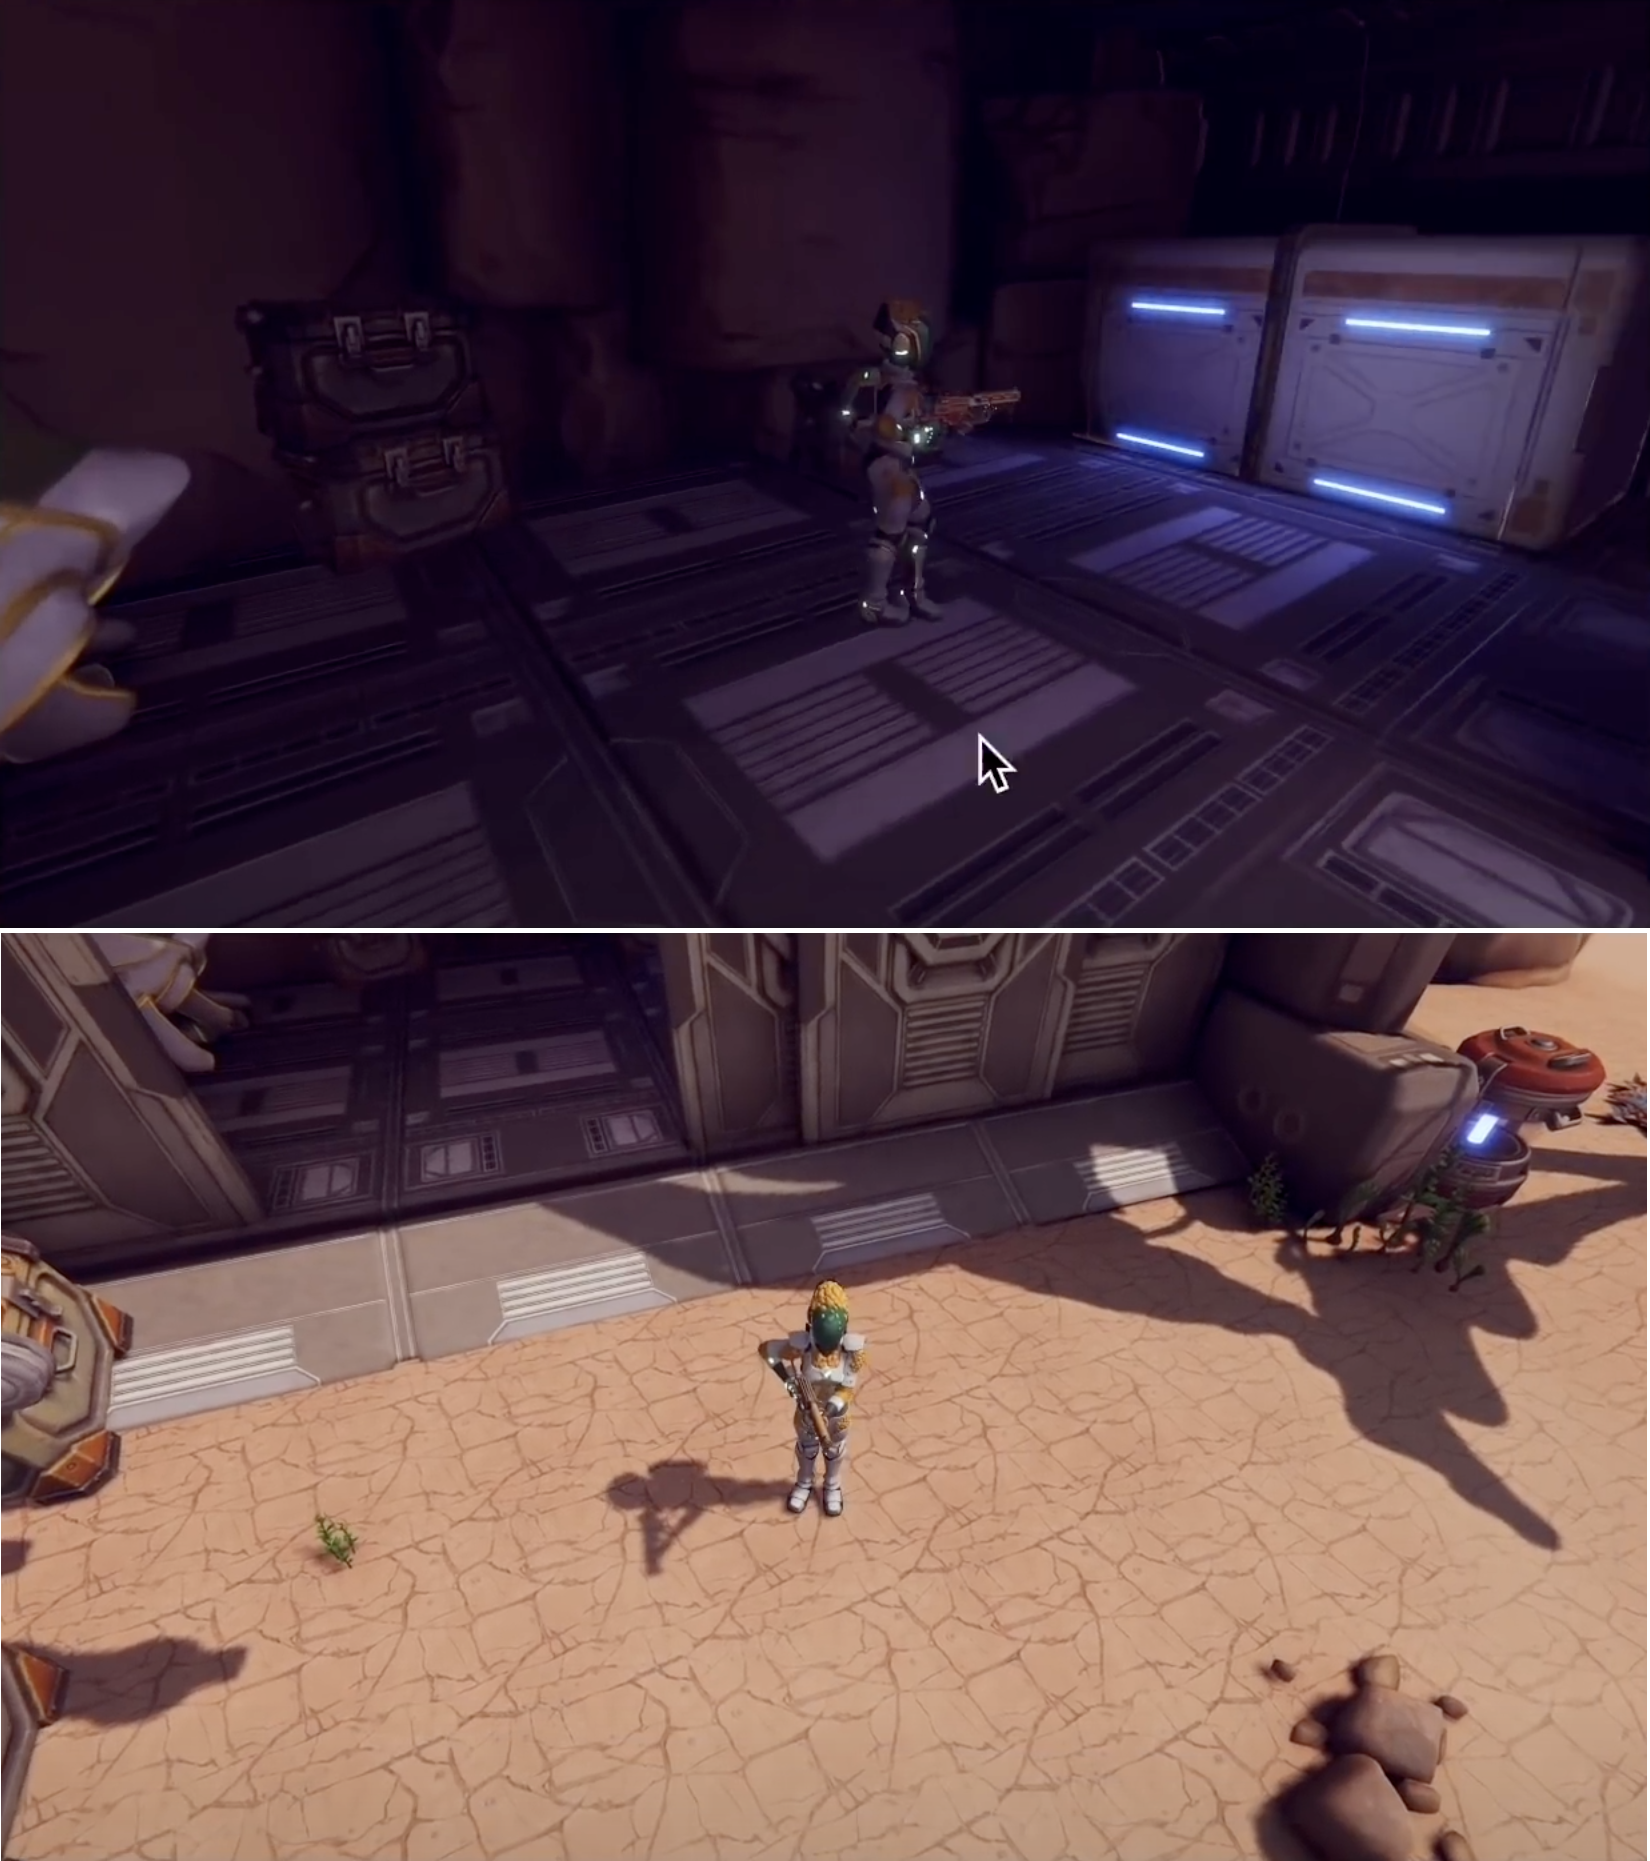
Light Probes save the light data at a particular position within an environment when you bake the lighting by clicking Generate Lighting via Window > Rendering > Lighting panel. This ensures that the illumination of a dynamic object moving through an environment reflects the lighting levels used by the baked objects. It will be dark in a dark area, and in a lighter area it will be brighter.
Follow this recipe to find out how to position Light Probes with a code-based approach in order to speed up your editing, how to use Reflection Probes in your scene, and how to blend them.
The robot inside and outside of the cave, with lighting level affected by Light Probes
11. Screen Space Refraction
Screen Space Refraction uses the current opaque texture created by the render pipeline as the source texture to map pixels to the model being rendered. This method and recipe is about deforming the UV used to sample the image.
Learn how to use a normal map to create refraction effects as well as tint a refraction effect.
An example of Screen Space Refraction
12. Volumetrics
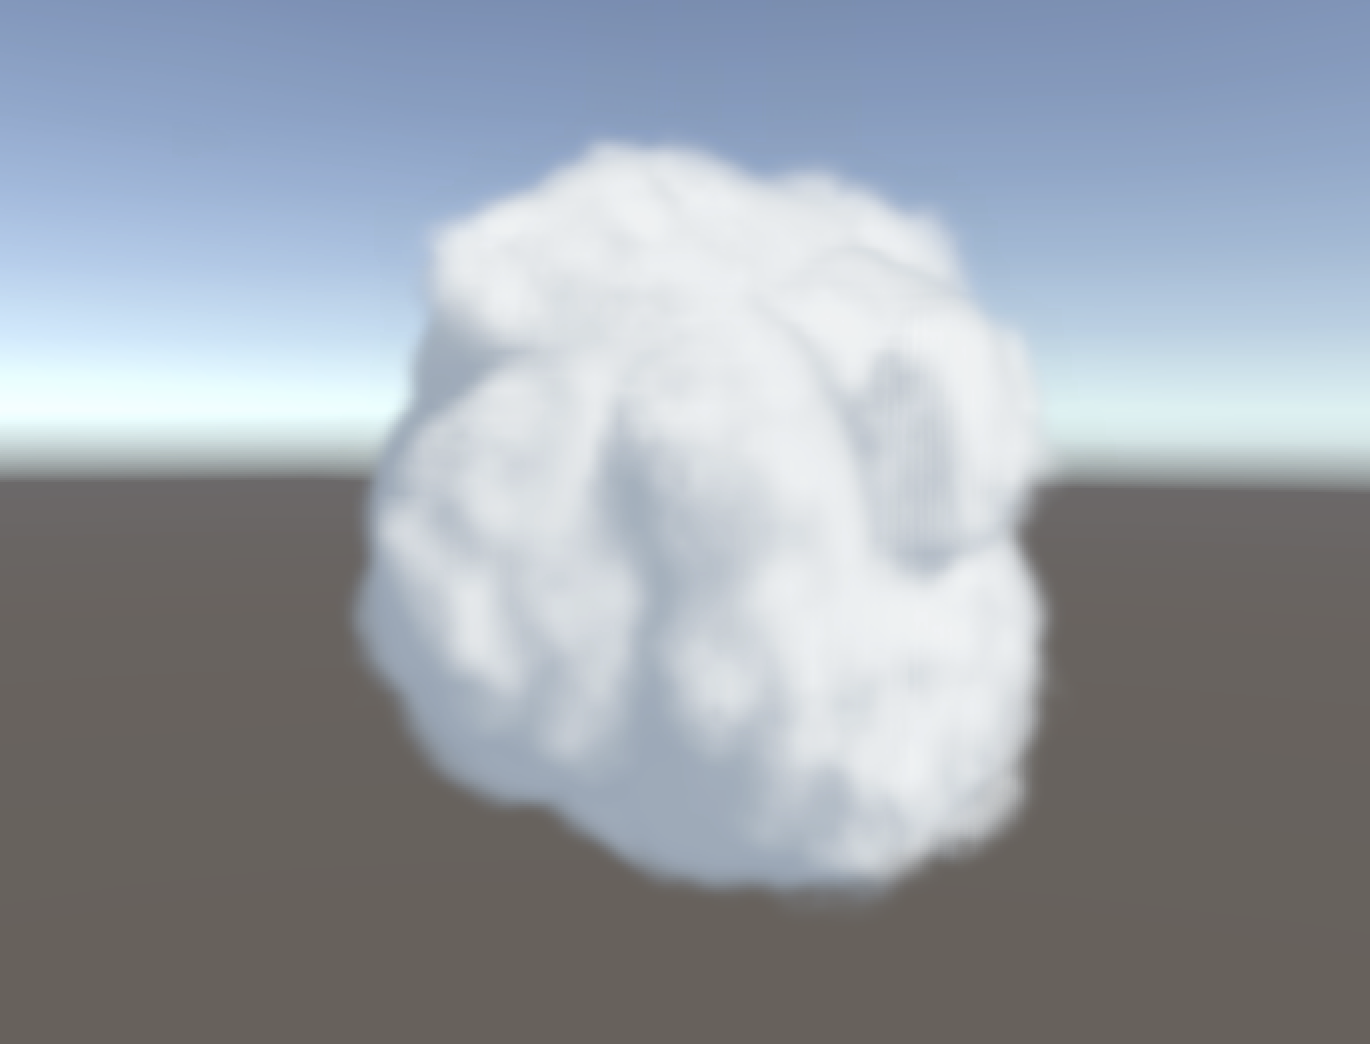
This is a recipe for using ray marching to render a 3D texture. Unity supports 3D textures, which are an array of images placed in a grid on a single texture, rather like a Texture Atlas. The difference is that each image is the same size. Using a 3D UV value, you can source a texel from the grid of images with UV.Z defining the row and column of the individual image to use.
You can also use Houdini when creating the 3D texture. Alternatives to a 3D texture include using multilayered Perlin noise, or prebaking a tileable noise texture using Unity.
A cloud with ray marching
More resources
This cover image shown here is from PRINCIPLES, an adventure game from COLOPL Creators, the technology brand of COLOPL, Inc., who developed the series of Shironeko Project and Quiz RPG: The World of Mystic Wiz.
When the Wonderland editor moved from 0.9.5 to 1.0.0 there was a significant change to the code framework. In this article we’ll look at how you can easily migrate an old project to work in the latest editor. If you plan to code-along then download my Wonderland course resources.
With the switch by default Wonderland now uses npm, NodeJS Package Manager, and esbuild bundler. The WL.registerComponent method no longer exists. For each of your custom components you need to do some editing. If you want to code-along then open the code-along Migrate project. As you can see, Wonderland creates an npm project.
node modules
After running you’ll find a node_modules folder, two new json files; package.json and package-lock.json and index.js. The node_modules folder by default contains the wonderlandengine, glMatrix and howler and a few other modules. Index.js is auto generated by the editor and this file handles registering your components.
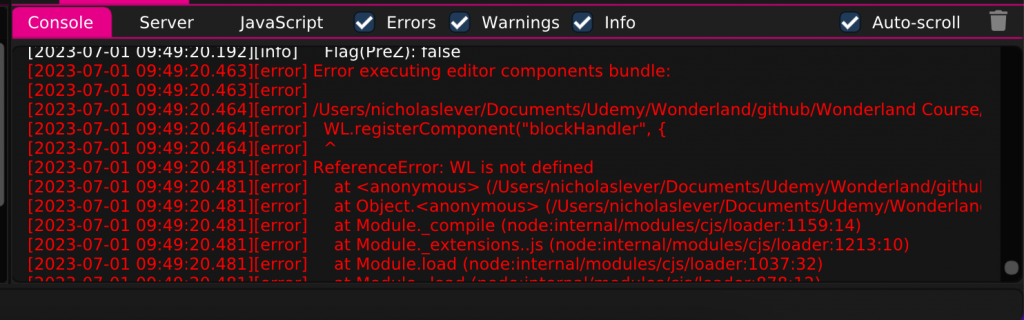
Console errors
Looking at the project console window we can see there are errors when packaging. WL not defined. Notice it refers to the blockHandler component let’s fix this file.
Where we have WL.registerComponent this becomes export class, then the class name, BlockHandler here and then extends Component
export class BlockHandler extends Component {
If you’re familiar with JavaScript classes then you will instantly say, hang on where does Component come from. If so go to the top of the class. We need to add an import. It comes from the wonderlandengine api. From the module we saw in the node_modules folder.
import {Component} from '@wonderlandengine/api';
Each component needs a TypeName, Wonderland uses the type name in the editor not the class name.
static TypeName = "blockHandler";
Parameters are defined using a static Properties object. The Wonderland api has a Property class and we use this to specify property types and default values. If we’re using something from the api we need to import it so we add Property as a second import from wonderlandengine/api.
import {Component, Property} from '@wonderlandengine/api';
We specify vrCamera as a Property.object. This means the editor will include a scene objects dropdown for this component property. Speed is a Property.float, for floats we can pass a default value to the constructor.
Now we are dealing with classes we need to remove ‘: function’.
init() {
And we remove all the commas linking the functions in what was previously an object.
This component uses the glMatrix library and now we are using the new framework we need to add each class we use from the library as an import. For this component we need vec3 and quat. They come from gl-matrix which you can find in the node_modules folder.
import { vec3, quat } from "gl-matrix";
The easiest way to remove glMatrix. Is to use find and replace all.
This component also uses HowlerAudioSource. When using this we need to add it as an import.
import {HowlerAudioSource} from '@wonderlandengine/components';
This is a Wonderland component. Because it is not directly attached to a scene object. We need to make sure the component is registered. Any dynamically created component needs to do this. We add a static onRegister method, this method will receive the engine, which was previously the WL global, as a parameter. We use the registerComponent method of the engine and pass the class name. Without this linking would fail and you would get an error in the browser.
At this point the project should package correctly. But you will then notice that Wonderland has added several useful warnings about legacy methods. You’ll see several methods have a line through them and if you hover over them a panel will appear explaining what method you should switch to. Position, for example, no longer uses Translation, now it is Position instead.
this.vrCamera.getPositionWorld( this.tmpVec1 );
Instead of translate you choose between translateLocal and translateWorld.
this.object.translateWorld( this.tmpVec );
And getForward is now getForwardWorld.
this.vrCamera.getForwardWorld( this.tmpVec1 );
Some other changes you’ll come across.
WL.onXRSessionStart is now an instance of the Emitter class. We replace WL with this.engine. Engine is always available to a class that extends Component. And replace push with add.
And finally getters and setters have been replaced.
this.object.translationLocal use this.object.getPositionLocal(out) and this.object.setPositionLocal(v)
this.object.translationWorld use this.object.getPositionWorldl(out) and this.object.setPositionWorld(v)
this.object.rotationLocal use this.object.getRotationLocal(out) and this.object.setRotationLocal(q)
this.object.rotationWorld use this.object.getRotationWorld(out) and this.object.setRotationWorld(q)
this.object.scalingLocal use this.object.getScalingLocal(out) and this.object.setScalingLocal(v)
this.object.scalingWorld use this.object.getScalingWorld(out) and this.object.setScalingWorld(v)
this.object.transformLocal use this.object.getTransformLocal(out) and this.object.setTransformLocal(q2)
this.object.transformWorld use this.object.getTransformWorld(out) and this.object.setTransformWorld(q2)
Follow the steps in this article and you’ll soon have your projects running smoothly using the latest Wonderland editor. You’ll find more information in the ‘Migrate Your JavaScript to 1.0.0’ article.
If you use Unity then you really should get up to speed with this pipeline which will replace the Built-in Render Pipeline. This course by the author of Unity’s e-book will show you how.
The days are long, but that doesn’t mean you should neglect your studies. To encourage you I’m having a pre-summer SALE.Grab yourself a bargain and kick back and learn a new skill!!
Create WebXR, VR and AR app, using the Wonderland EngineWonderland is a high performance engine for WebXR apps. The editor makes creating VR experiences super-easy. In this course I show you how. https://www.udemy.com/course/webxr-wle/?couponCode=SUMMERSALE23
Learn to Create WebXR, VR and AR, experiences with ThreeJSLearn how to create VR and AR experiences that work directly from the browser, using the latest API from Google and Amazon and our favourite Open Source WebGL library, ThreeJS https://www.udemy.com/course/learn-webxr/?couponCode=SUMMERSALE23